Jun 22, 2009
 Click the pic to see a larger version.
These whimsical wonders are 10 more miniature polymer clay masks from the 2009 Internet Mask Swap. Created by Ellen Bellenot Rumsey, these little works of art are each small enough to fit in a three inch square. She’s used an amazing array of textures and colorful pearl-ex powders. The mica in the powders and in the gold polymer clay give it all incredible glowing lustre.
I’m taking a few hours away from my school work to catch up on taking pictures from the Mask Swap and from the Dyeing Days. These are two huge annual events that take around a week to put together and somehow managed to both happen within a month of each other this year, and along with going back to school full time. We got tremendous amounts done and both events went very well, but I havent had any time to chronicle and share the results.In fact, the massive amount of reading and computer time I put in for the 4 classes I’m taking leave my eyes feeling as though they look very much like the ones in these masks.
I’m going to play hooky from homework once in a while and get some pictures up, so look for more soon! IS it playing hooky to take pics and edit them in photoshop when your classes are in digital photography and photoshop2? hmmm, perhaps I should take an ethics class and see if my homework there answers the question there…
May 16, 2009

Whew! What a huge undertaking, and what wonderful, amazing small rewards! I mean small as in “miniature”, or specifically “fits inside a three inch square” (more or less). Several years ago I was invited to take part in a Polymer Clay Miniature Mask Swap by Sherry Bailey. I was in one of the several groups, and sent in my masks. Shortly thereafter I got my box of goodies, and kicked myself all around the room for not having been in every group—there were pictures included and I missed out on some real gems. I vowed never to repeat THAT mistake! And also to be in another mask swap ASAP. I ended up taking over the job and expanding the number of participants (my artistic greed knows little about bounderies or sensible work loads in some areas…)
So for the last few years, there’ve ben annual swaps that attract wonderful artists who ALSO want collections of these minimarvels. When announced, interested parties sign up for one, two, or three groups of ten. The SwapMistress (thats me, in this case) keeps track of who signs up, and fills the groups. We do a total of ten groups of ten people. For each group, the participant sends in ten masks, all signed/with a card and bagged. When they are all here, my husband and I alphabetize the incoming boxes for easier finding, and then start filling up Group Bags by lining up the brown paper lunch bags. Starting with 10 bags marked “A” we check the All Powerful List and take out each participant’s set one at a time–If Mary is in group A, we put one of her masks in each bag, and the same with the other 9 participants. At the end, each person in Group A will get a Group A bag mailed back to them, containing one of their own and one of each of the other 9 people’s masks. Sounds fairly simple, right? It kindof is…except then we do it for B, C, D, E, F, G, H I and J groups. This generally takes a full day–there are a thousand little masks. Then, the next day, my dear sweet hubby and I start packing boxes. If Mary was in Group A, D and F, we pull an A, D and F bag and put it aside for her in a grocery bag marked with her name and the groups (cross checking is pretty important!! ) with the mailing lable and postage she sent. This also takes a day or so…and then there’s the packing and sealing of the boxes, and three hours or so at the Post Office.
I, being the SwapMistress and therefore In Charge, get to violate the “three groups” thing and be in ALL ten groups. This is great because I get to keep one from every person in every group–no more missed gems!! Except of course for the people that make it harder to choose by sending ten that are all different for their sets. Then I still only get to keep one, but I DO have the opportunity to unbag and photograph them all, then rebag before putting them into the group bags. So I say it again—its a huge undertaking, but OH-so-worth-the -effort. I end up making and giving away 100 miniature masks, and getting 100 masks to keep. All are individual works of art showing a vast array of techniques. All have miniature size and polymer clay in common, and “masks” as a theme, but all are astoundingly different interpretations of that theme. I will be photographing the collection that I have gathered over this decade, and putting them in a book, but I’ll share a few of them here on this blog, and you can see some masks from previous years here.
The group of ten Warm and Cool Masks shown above was sent in by Karen Cowles. The two masks below made using the alcohol inks on polymer clay were sent in by Nina Owens. The light was fading and I only had time to take a few pics. I took more the next day, so watch for future posts! You can also see more at other participants’ blogs like these by Laurel Steven and Tonja . Click the pics to see them larger.

Apr 11, 2009
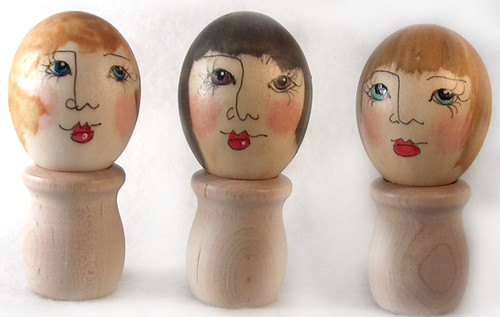
eggladies1, originally uploaded by sarajane helm.
These ladies are made from blown eggs that have been painted with three layers of Liquid Polymer Clay and baked in between each application.
Each one was then given a hand-drawn face using a Micron Pen (this brand is compatable with the clay). Acrylic paints supply facial coloring, and the hair is more liquid polymer clay–it comes in gold, silver, black, and other colors.
The eggs are incredibly light weight, and can still be crushed if not packaged carefully but they are much stronger than untreated eggs.
Its fun to further decorate them with Easter Bonnets or Christmas Finery and use them to decorate a tree or hang from a branch!
Here are some more pages from the PolyClay Gallery about decorating eggs with polymer clay!
Feb 20, 2009

“You are what you love–and not what loves you back”.
That’s so true–and its also part of a line from a song by Jenny Lewis and the Watson Twins from a CD that I really love, “Rabbit Fur Coat”. It is a delightfully witty and beautifully played set of songs. I’ used to love to listen to music and do my homework….Recently I went back to college after a long winter break that lasted 30 some years. I’m enjoying all of my classes, especially learning about Adobe Photoshop and Illustrator. What wonderful tools!! I’m learning a lot of things that I had no clue about in these programs; some of the tools just don’t lend themselves to easy self-discovery. Even reading about them isn’t the same as having someone show you what the tool does and how it works and then practicing it for a while. Oh, the joy of realizing that something you’ve been frustrated at can indeed be done!
Now I am doing something I really love a lot; taking bits and pieces of art that I have and re-contextualizing them in new ways. Collage and mosaics and masks and miniatures and textiles and image manipulation all play a large part of “what do you do?” for me, and its wonderful to be moving into the next layer of “how do you do that?”. School can be really illuminating; and it certainly lights up lots of new creative connections, even in older brains like mine! Using what’s old and making it new again is what creativity is all about. Here’s a recent assignment; a collage that uses Photoshop layers and masks, plus a quote. It features a doll (BonBon Bertie) and her setting that I made with fabric and FIMO polymer clay photographed by Bob Grieser back in 1999, and other images–plus the quote by Jenny Lewis!
You can see more dolls here, and at Aunt Acid’s blog.
Feb 12, 2009

In my Multimedia class in school, we are making collages using Adobe Photoshop. This is lots of fun, but then, I’ve always enjoyed making collages in any form. Here’s one that was made with polymer clay, paper and cards. I used rubber stamps to create the patterns on the clay that are used to dress up the face. Find out how to make faces and molds here. You can also have your own rubber stamps made through Ready Stamp in California.
Click here to see the Valentine’s Day collage I made for class. It’s over at Aunt Acid’s blog.
And Happy Valentine’s Day to everybody!
 Click the pic to see a larger version.