Mar 9, 2015
 Its astounding that more than a year has gone by since I last posted here. It certainly wasn’t because I didn’t have anything going on! After 14 months of putting together all sorts of details that go into running a Main Street Gallery and hosting different art shows every month, organizing classes and websites for others, I found that I was doing a lot…but with more stress and less and less art. The owners and I had different goals, and came to a parting of the ways.
I learned a great deal, and will take it all with me to the next gallery or retail emporium in my future. I’m already checking into several different ways to integrate creative arts, instruction, and sales into a space in my community, and that’s where the focus will be: creative connections. I love having music, art, film, writing–all sorts of creative things going on, and I love sharing the buzz that you can get going with creativity. Creativity makes every day a little brighter. Perception and communication are my goals, and I promise to keep sharing them, here, there and everywhere.
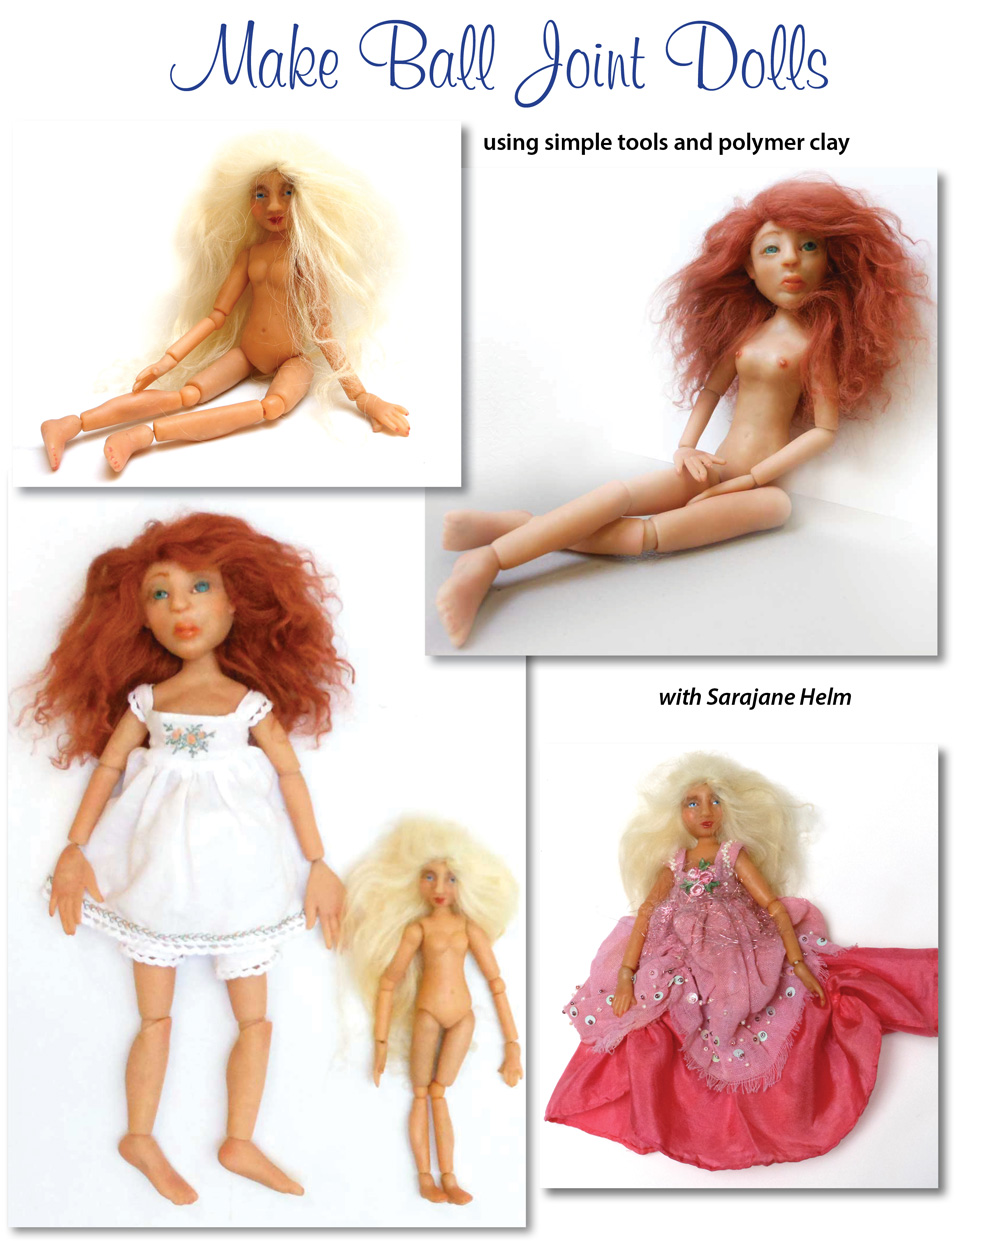
I’ve moved my studio home just in time to take advantage of the upcoming warmer weather, and I’ve got outdoor classes in shibori, dyeing for textile artists, fabric painting, metal etching and polymer clay coming up. I’m also working on more dolls, and have a new PDF on creating ball joint dolls with polymer clay that is available EXCLUSIVELY through the Polymer Clay Adventure. I’m also back to work on the video for that, now that the studio is set back up at my house.
Please join my email newsletter and get the upcoming news about classes, events, and more!

Jan 14, 2010

I’m continuing to work on web site updates for myself and for clients during this break between semesters at school. I’m also spending hours every week making faces, beads and pendants with ceramic clay. Some will be fired when I go back to school, but some I’ve been firing with the help of my bead and jewelry artist friend Laura. Here are some pics of the first and second batches.
I’ll be making some of these into beaded Spirit Dolls, some into jewelry and selling some of them individually and in new Spirit Doll kits with hand dyed ribbons and fabric. Its all a learning curve as I work with new materials, and I’m happy to say that each batch gets better technically and I’m starting to achieve more of what I want with these. I’m always excited with the adventure of each new batch, and looking forward to carrying out some of the ideas I have connected with them, and seeing how others do too! I’ve got a new doll started already, and I’ll post pics of that in progress next.

Nov 11, 2009

Big masks, little masks…I’m going to be living in mask-land for the next several months as I take LOTS of pictures of mini-masks I’ve collected over the last ten years of Internet swaps and use Adobe Photoshop and its clipping mask and layer masks in order to get all the pics ready for placement (using Adobe Indesign) in the upcoming book from PolyMarket Press titled “A Collection Of Polymer Clay Masks”. Over the last two years, many artists have also submitted images of full size (wearable size) masks also made using polymer clay, and now that I have a computer with enough memory and the programs to put it together, I’m ready to pull all the details together and lay out this book. The goal is to have it all done by the end of summer, so I have a LOT to do, but I’ve already begun! I haven’t done a final count yet, but I know there are at least 400 of the miniature masks, and I’m thinking of how to divide them up into chapters as I don’t want to do them chronologically. So far I’ve come up with “animal, vegetable, mineral, traditional and fantasy” and I’m starting there—if I do all the photos and there are some that don’t fit in those catagories, I will have to change or add, but I think that covers a lot!
My classes in school in digital photography, Photoshop, Illustrator, and InDesign are all a vital part of learning how to self-publish beautiful and informative books, and yesterday’s InDesign class covered how to build an Index–vital info for this new book, and I’ve begun to build one with the artists’ names who’s work appears in the book–there’ll be more than a hundred for sure, probably more.
I think its very important for an an artist who is writing a book to have their work at its best on the cover, but in thinking about it over the last several months I’ve realized that this one is NOT a book about my work so much as it is about this fabulous collection and the medium of polymer clay. The book itself is my featured work this time, and I want it to look its best. Once I knew that, it was obvious to me that the image of Katherine Dewey’s Noh Maiden mask (full size) was needed on the front cover. There are hundreds of beautiful mask images in my files already, and more to shoot—but this image is a fave. I moved my Time Mask from its previous spot on the front to the back, and added some of Melanie West’s mini masks as well. The pics shown here are not quite finalized…but as a Work In Progress, they are ALMOST there, and I’ll be sure to show of the final versions next summer when all is done. For now, here’s a peek at the front and back so far! (editors note–I just put up the revised versions 11-14)

Oct 11, 2009
 Judith and I are the two and the show is the 37th annual International Quilt Festival in Houston Texas at the George R. Brown Convention Center, October 14-18. We’ve done this show for several years now and love it. The fabrics, tools, embellishments and beautiful work are astounding in amount and variety!
We’ll be there in booths #1848 and #1850, with Fun Polymer Clay Jewelry By Judith Skinner and Sarajane’s Polyclay Gallery. We’re bringing jewelry, beads, faces, spirit doll kits, face bags, dyed textiles, millefiore slices and cabochons, paper dolls, and of course BOOKS! We’ll even autograph ’em.
 We made a vow at this show last year that we’d have all our files converted and be globally distributed through Ingram Book Company, and we got it done. Now they are available through sources like Amazon.com and PolkaDotCreations.com and of from us directly.
Learning how to best use the right software like Adobe InDesign, Photoshop, and Illustrator as well as Microsoft Word has taken up most of my creative time this year but now we are ready to go forward with new books, like Judith’s “The Art Of The Blend” and my two books on polymer clay masks.
I did manage to get in a few weeks of dyeing and fabric painting while on break between semesters, and it all does seem to add up, particularly when I try to pack it all into the luggage and haul it around! There are thousands of booths with an incredible variety of vintage and new items, and the explosion of color and creativity there is incredibly energizing and exciting. I’ll be sure to talk about it here in upcoming posts.
Please do come and see us at the show if you are there and say hello!
Apr 11, 2009
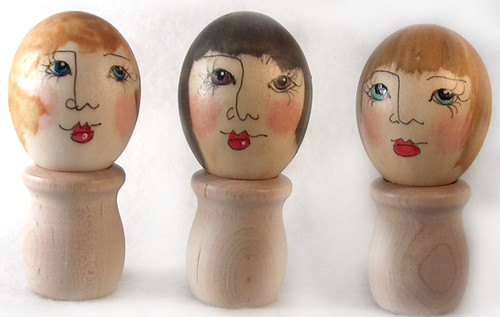
eggladies1, originally uploaded by sarajane helm.
These ladies are made from blown eggs that have been painted with three layers of Liquid Polymer Clay and baked in between each application.
Each one was then given a hand-drawn face using a Micron Pen (this brand is compatable with the clay). Acrylic paints supply facial coloring, and the hair is more liquid polymer clay–it comes in gold, silver, black, and other colors.
The eggs are incredibly light weight, and can still be crushed if not packaged carefully but they are much stronger than untreated eggs.
Its fun to further decorate them with Easter Bonnets or Christmas Finery and use them to decorate a tree or hang from a branch!
Here are some more pages from the PolyClay Gallery about decorating eggs with polymer clay!
Feb 12, 2009

In my Multimedia class in school, we are making collages using Adobe Photoshop. This is lots of fun, but then, I’ve always enjoyed making collages in any form. Here’s one that was made with polymer clay, paper and cards. I used rubber stamps to create the patterns on the clay that are used to dress up the face. Find out how to make faces and molds here. You can also have your own rubber stamps made through Ready Stamp in California.
Click here to see the Valentine’s Day collage I made for class. It’s over at Aunt Acid’s blog.
And Happy Valentine’s Day to everybody!
 Its astounding that more than a year has gone by since I last posted here. It certainly wasn’t because I didn’t have anything going on! After 14 months of putting together all sorts of details that go into running a Main Street Gallery and hosting different art shows every month, organizing classes and websites for others, I found that I was doing a lot…but with more stress and less and less art. The owners and I had different goals, and came to a parting of the ways.