Oct 22, 2024
What a busy year it has been! I had a great session of dyeing, with traditional tied shibori and ice techniques giving great results, Months of metal too, with a big batch of etched copper and brass as well as flat patinas on both. Then came the cutting and finishing, and now the photos.
Which is very timely, as I am redoing my websites! I have closed my Polyclay site and am consolidating the parts that I want to keep into this site, updating and freshening as I go. I’ll be posting here, and I’ll be putting items for sale into my shop.
Lots to do, but now that my outdoor gardening is done for the year, I can grow my website…and work on some new projects too!
May 2, 2024
I have recently drawn up some new doll patterns and put together kits that can be used with them. I’ve gone through my extensive stash of hand dyed silks, cotton, ribbons and lace as well as vintage textiles, sequins and beads, and put together some great project potentials for slow stitching, art doll making or…whatever!
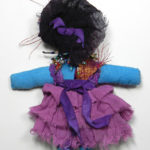
SO much sorting, bagging and photographing meant I was due a treat, so I made up one of the kits, just to see what I could do with it. I used my new 18″ doll pattern printed at 80%, which made up into a 14″ doll, and finished up the muslin in the kit entirely.
I added to the kit: thread, embroidery floss, wool mohair, polyester stuffing, acrylic paint, a small piece of fusible interfacing, and some thin peach colored ribbon. I used up everything but a few beads and sequins!
By the time she was done, she had become a redheaded beauty with an underlayer of garments, a beaded and embroidered overdress, a vintage silk ribbon corselette, lace purse and a hat lavishly covered with ribbons. Her embroidered shoes sparkle with sequins and beads
I sewed pieces directly onto the doll for the underlayer. Then, with the addition of the skirt and accessories, she can have several different outfits!
Oct 31, 2022
I’ve been putting together all sorts of kits for making art dolls, some with premade bodies, some with faces and all with lots of colorful cotton, rayon and silk. Big dolls, little dolls, shadowboxes, icons or fabulous wearable jewelry or bags…these kits are great starting points to projects.
Recently I’ve put together 48 deluxe kits, turning out the bins and boxes to add fabrics and embellishments.
Each kit contains hand dyed kona cotton, silk gauze, a silk handkerchief, ribbons, plus vintage sari silk ribbons, angelina fiber, and a specially selected mix of sequins and beads. I’ve also included 5 millefiore style polymer clay faces (slightly curved for dollmaking ease) and my own patterns for making a variety of dolls. Click here to download the .pdf file
The smallest person or mermaid is about 3.5 inches when made up. The middle sized person sews up into a 10 inch doll. This one also has a mermaid tail option. The mannequin style is 9″ but you can also easily add a mermaid tail as I did in the sample shown here.
I used to buy premade cotton 3″ doll bodies and dye them, but they have not been available for years, so I drafted some patterns.I print them on cardstock, cut them out and trace them onto the fabric, then stitch. THEN cut out the pieces–that’s the secret to working with small parts! The fabric in the kits, when folded double, makes several dolls as shown here.
I made some up in dyed kona cotton, and some in tiedyed cotton jersey. Both worked up very nicely into samples that I embellished with ribbons, beads, sequins…I started with what was gathered into the kits, and then added more beads.
The 3.5 orange doll sample hasnt been embellished yet, nor has the green mermaid. One has a millefiore style face, and one is sculpted. The ones that come in kits are not attached, and I also have sets of 5 face canes in a variety of styles. That’s in addition to a wide array of sculpted polymer clay and ceramic faces.
I’m updating my shop here with kits, faces and even some finished dolls.
I’ll be adding more available inventory to my shop here and also sell on Facebook,
Oct 22, 2020
Since I last posted here, I’ve been spending some time and effort turning textiles and beads I already have into new dolls and wearable art, and exploring new techniques along the way as I go. For months I spent an hour or so most weekdays embellishing dolls with beads, silk ribbons, dyed textiles…I also did some sewing using versions I altered of Patti Culea’s wonderful doll patterns from her books. I had used parts of her patterns before–she designed wonderful hands and feet for her dolls–but I had never made a doll just as it was in her designs.I jump around from instructions on my own curve, but you can miss things that way too. So I made one of my 2020 projects to get out my stash of dyed cotton jersey and try the patterns as given, and THEN mess with them more…
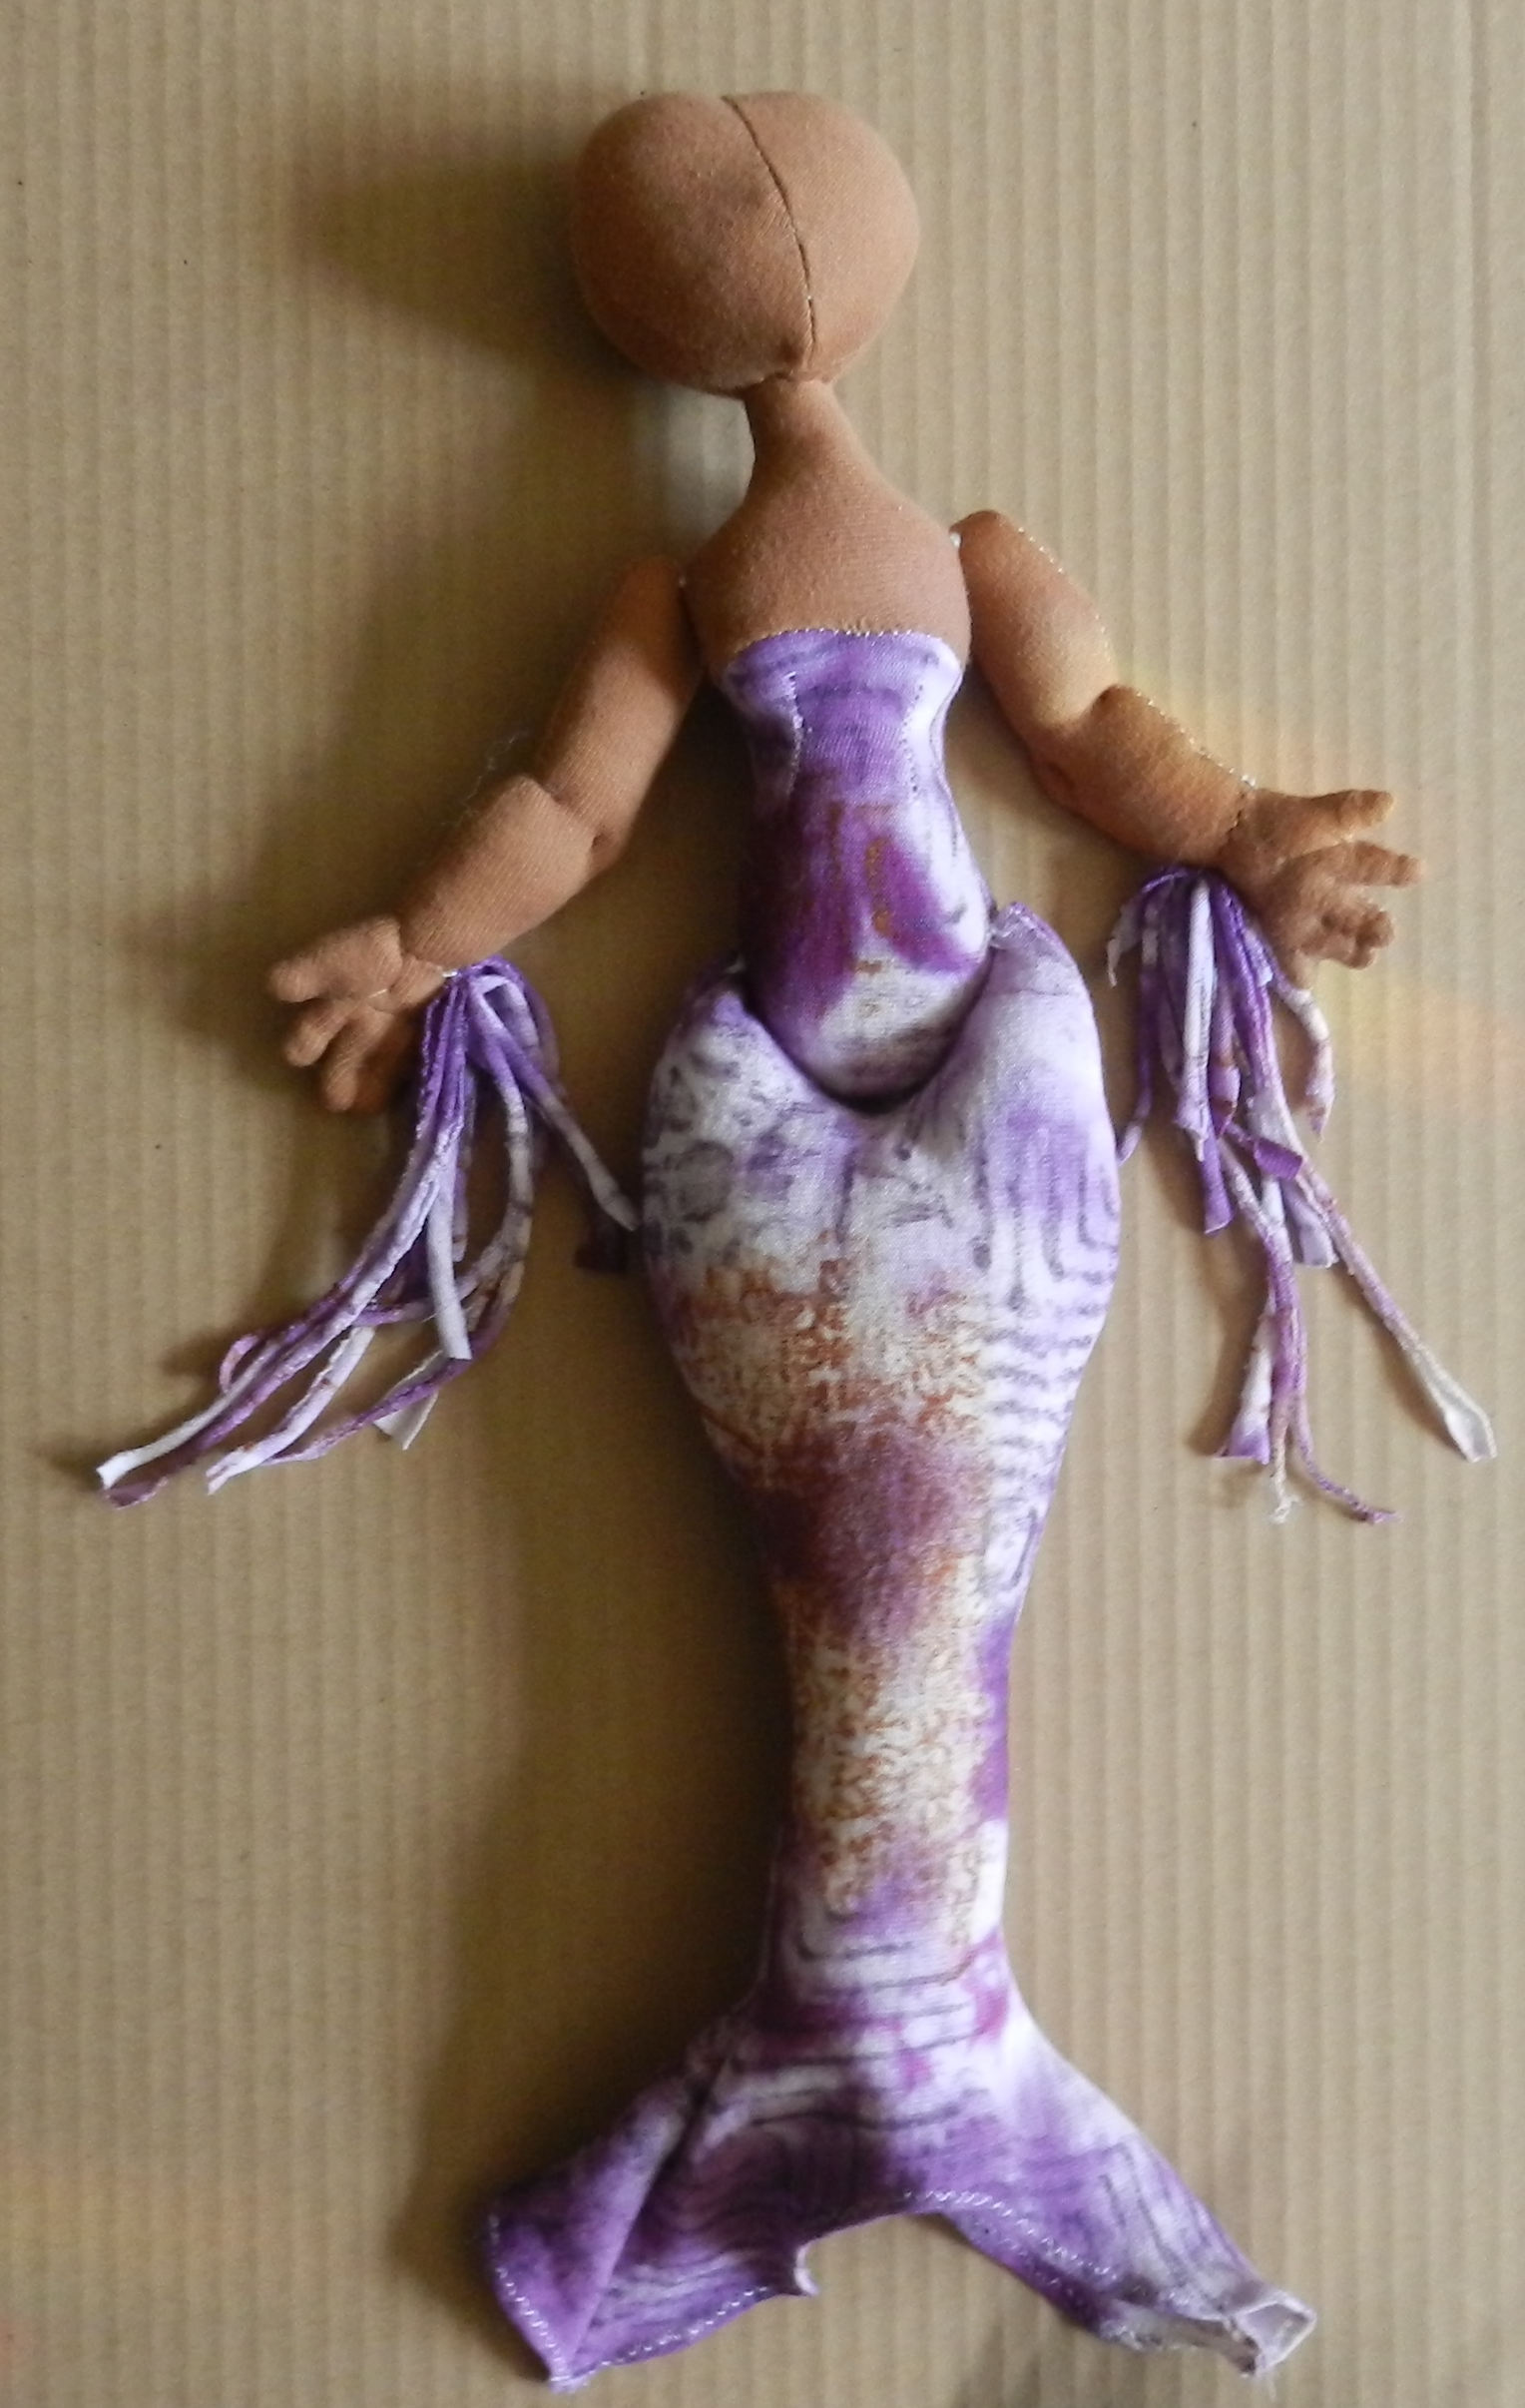
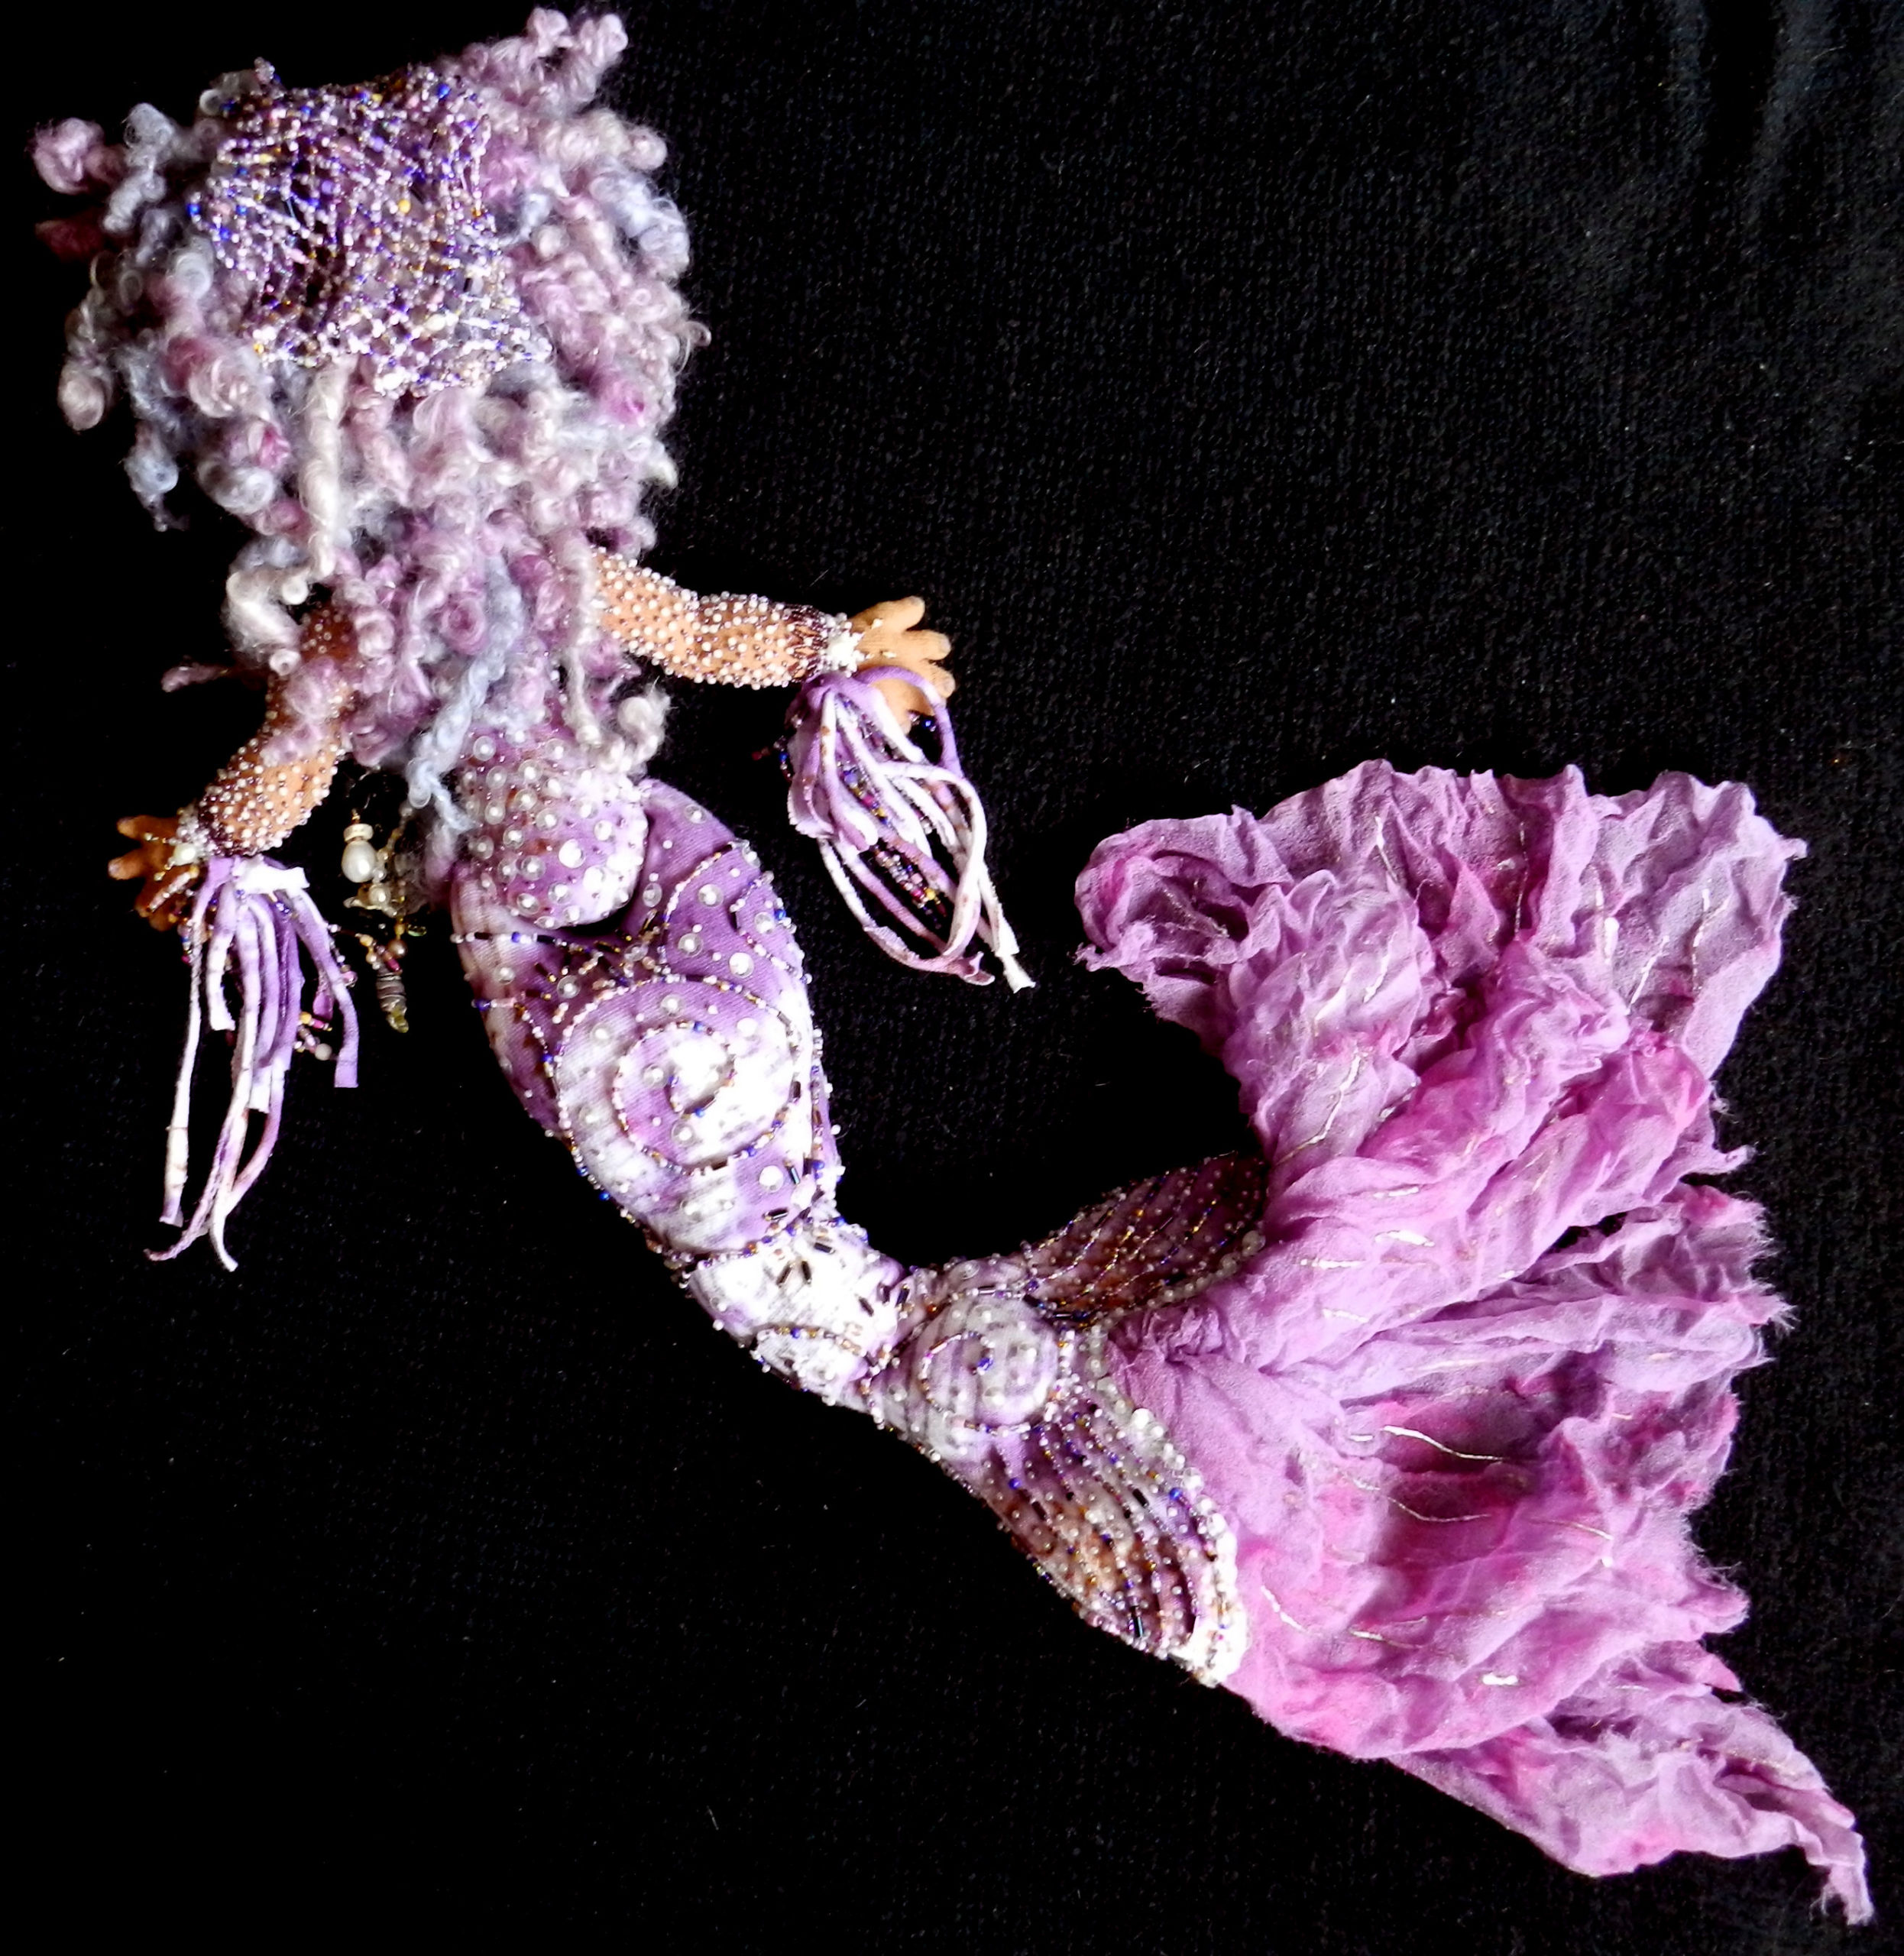
I played with scale and body shape and ended up with 3 dolls that need to have some clothes made for them (coming later this year!) and one that had a mermaid tail instead of legs, with moveable hips and shoulder joints. I used Procion coldwater fiber reactive dyes with some over painting using Shiva Oil paint sticks to give the body and tail fabric some color. Then it was stuffed with polyester fiberfill and wire to create a bendable bottom armature. Dyed silk gauze gives her tail a flowing purple flourish. Her face and nails were painted with acrylics, and I sewed on many sessions-worth of beads and sequins to her body, arms, and tail flukes.
I made her some polymer clay seashells, starfish and black coral, and fashioned her some necklaces, earrings, and hair decorations. Several of these still need to be glued into place in her hair, Her hair is where it all started so it is fitting that that is where she finishes up. Several years ago I was given a skein of beautiful hand dyed and mixed fibers that I knew instantly I wanted to use on a special doll. This one makes great use of it, and I have enough left to wig up a blue fairy as well! But that’s another project. I quite enjoyed this mermaid and would like to make more, but smaller, as the beading took a long while. She is 18″ from head to flukes, and more added for her piled up hair and gauzy tail! I’d like to get the pattern tweaked to about half that. After all, I have lots more fabric, sequins, and beads, and this seems like a good time for more fairies, mermaids, dolls and divas. I’m happier doing some beautiful distractions along with the realities.
mermaid-lower-body-detail
Mar 13, 2020
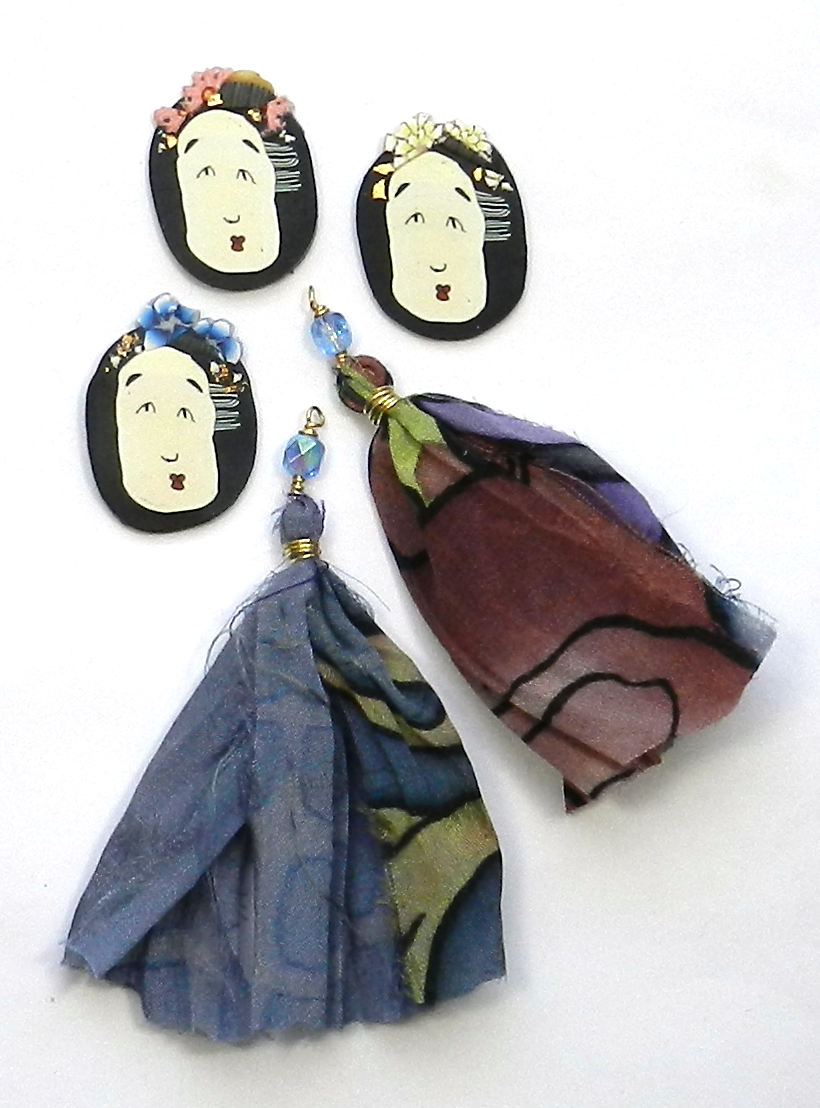
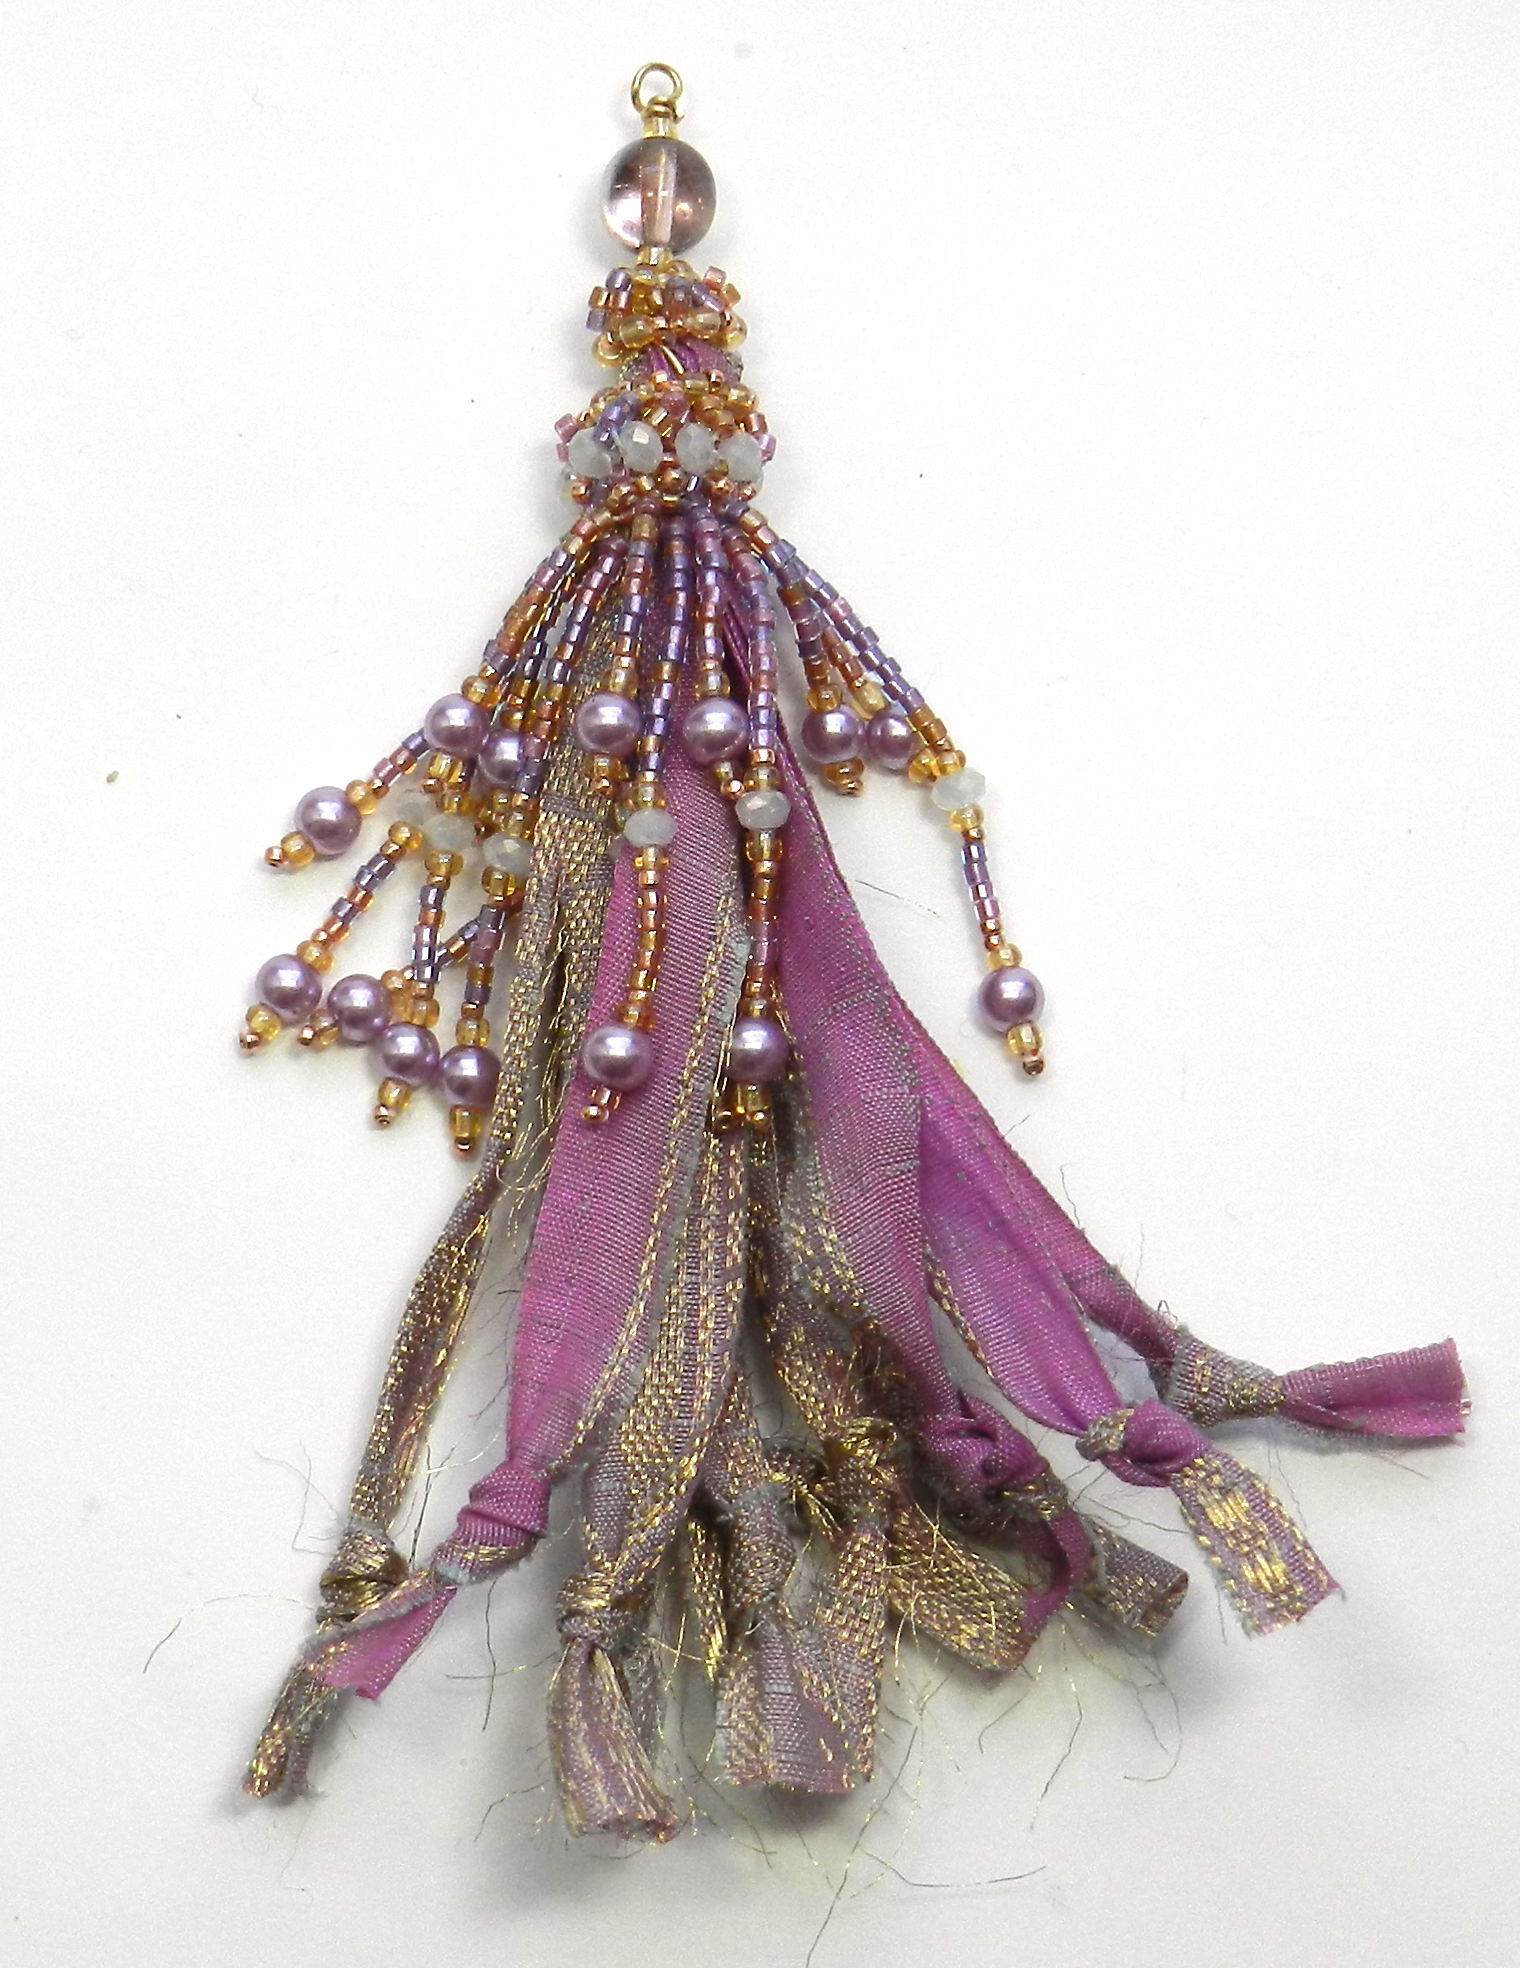
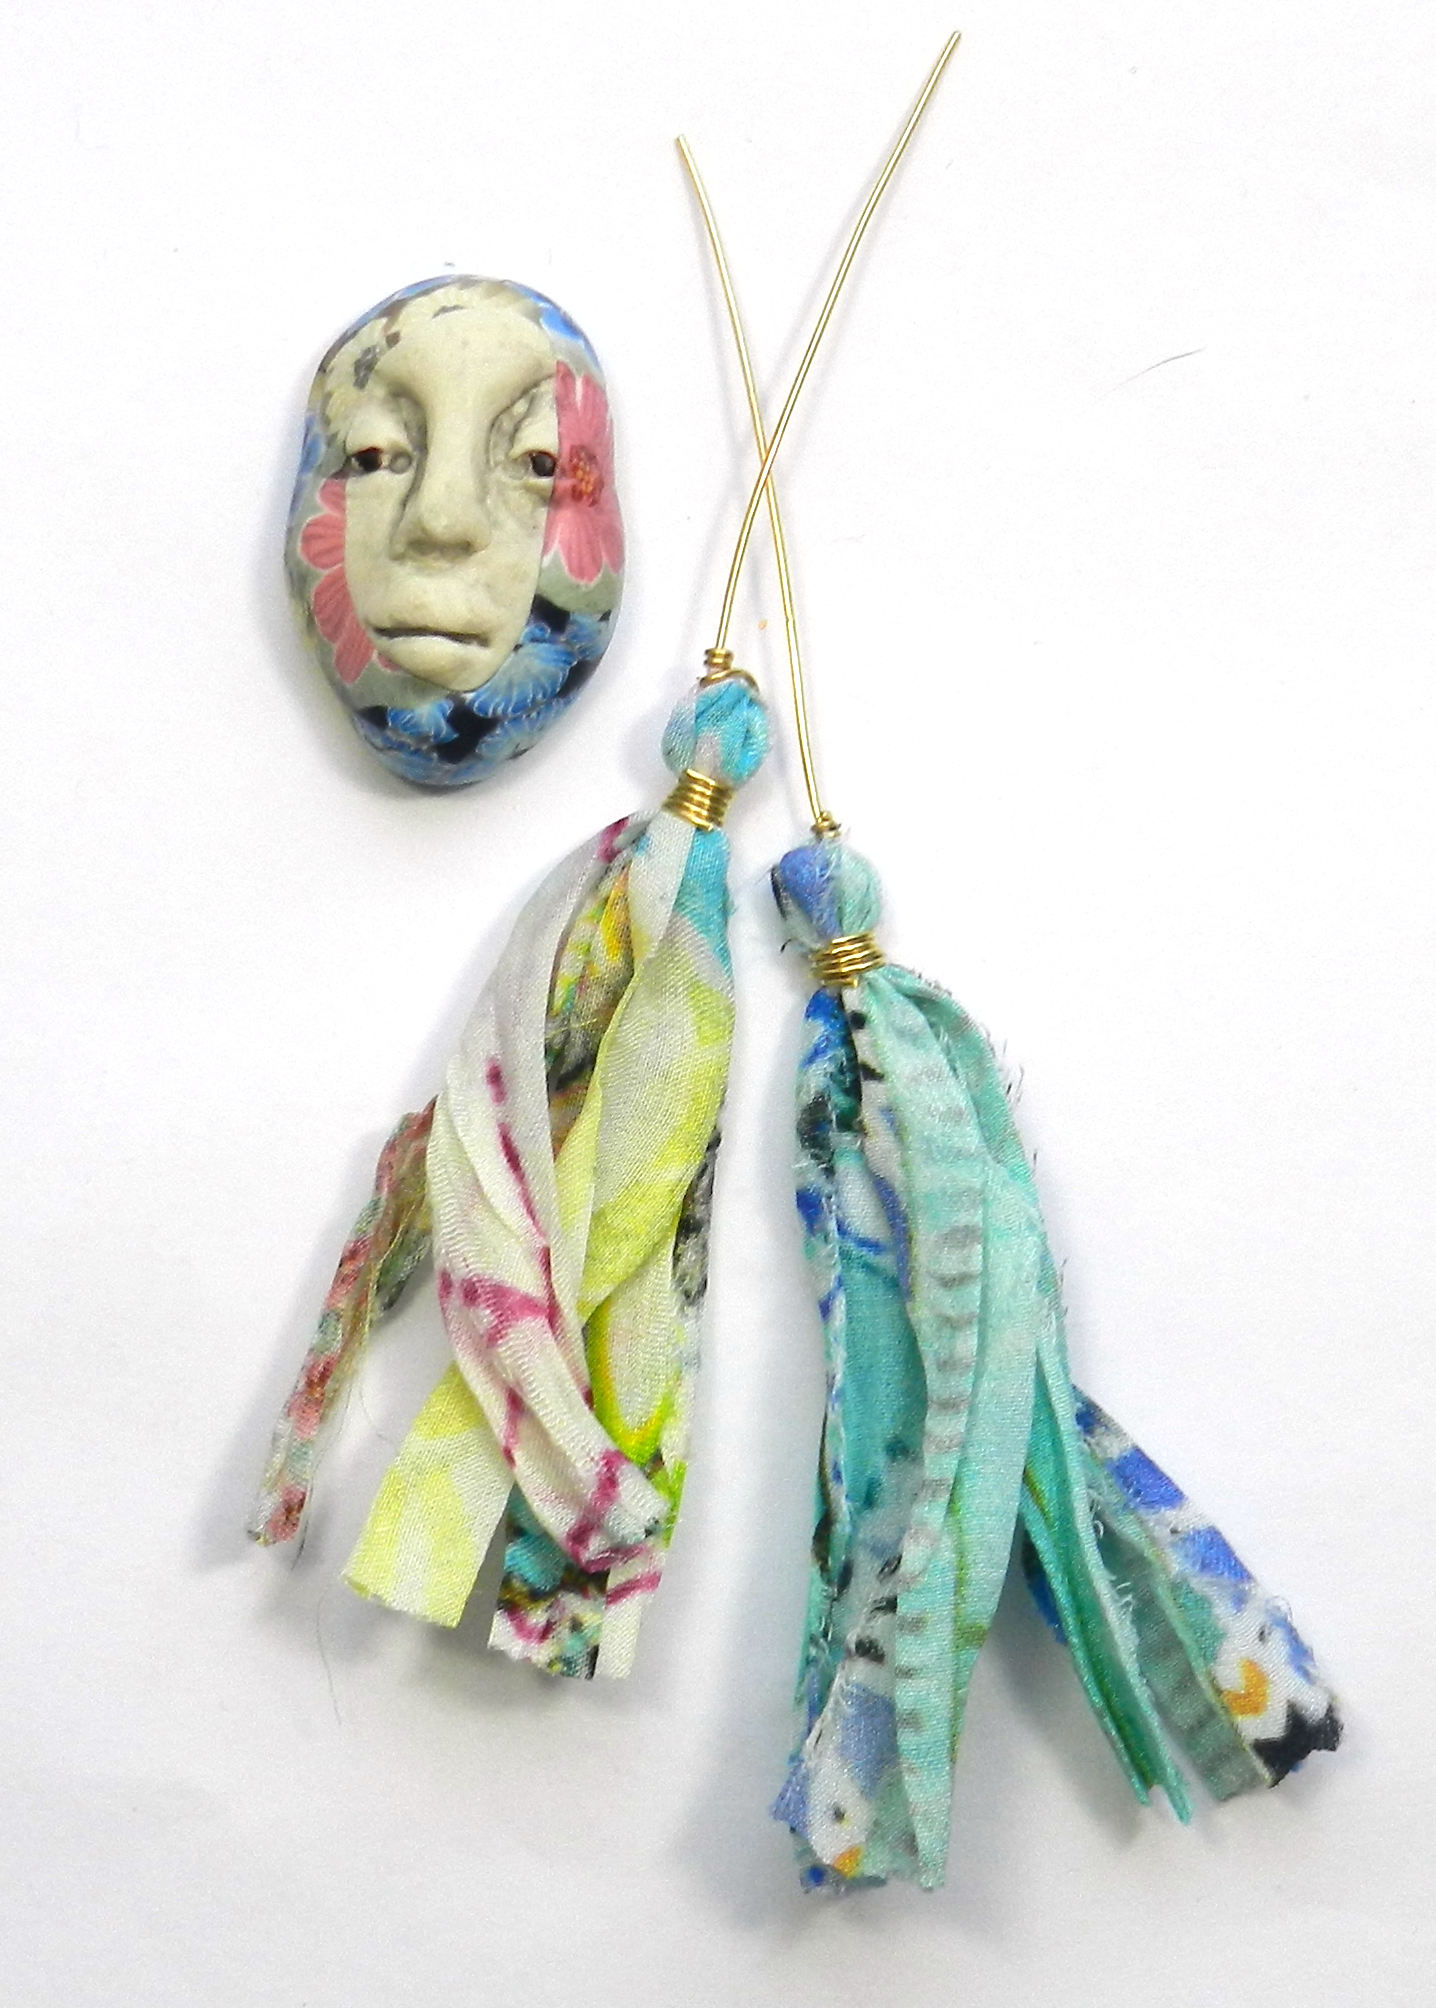
I purchased some beautiful vintage silk sari ribbons recently, and I got two kinds–sari silk chiffon prints, and sari trim with woven metallic threads. Both are beautiful bursts of color and pattern. I spent a few snowy afternoons turning ribbons into tassels with 22g brass wire.
Now I’m having a great time pairing them up with beads for earrings, or with polymer clay faces, destined to be focal elements in bead embroidery, jewelry, collage…
I want to do some bead embroidered pendants next. I love how the colors of the textiles and the polymer clay or ceramics go so well together, and of course, beads will also be involved.
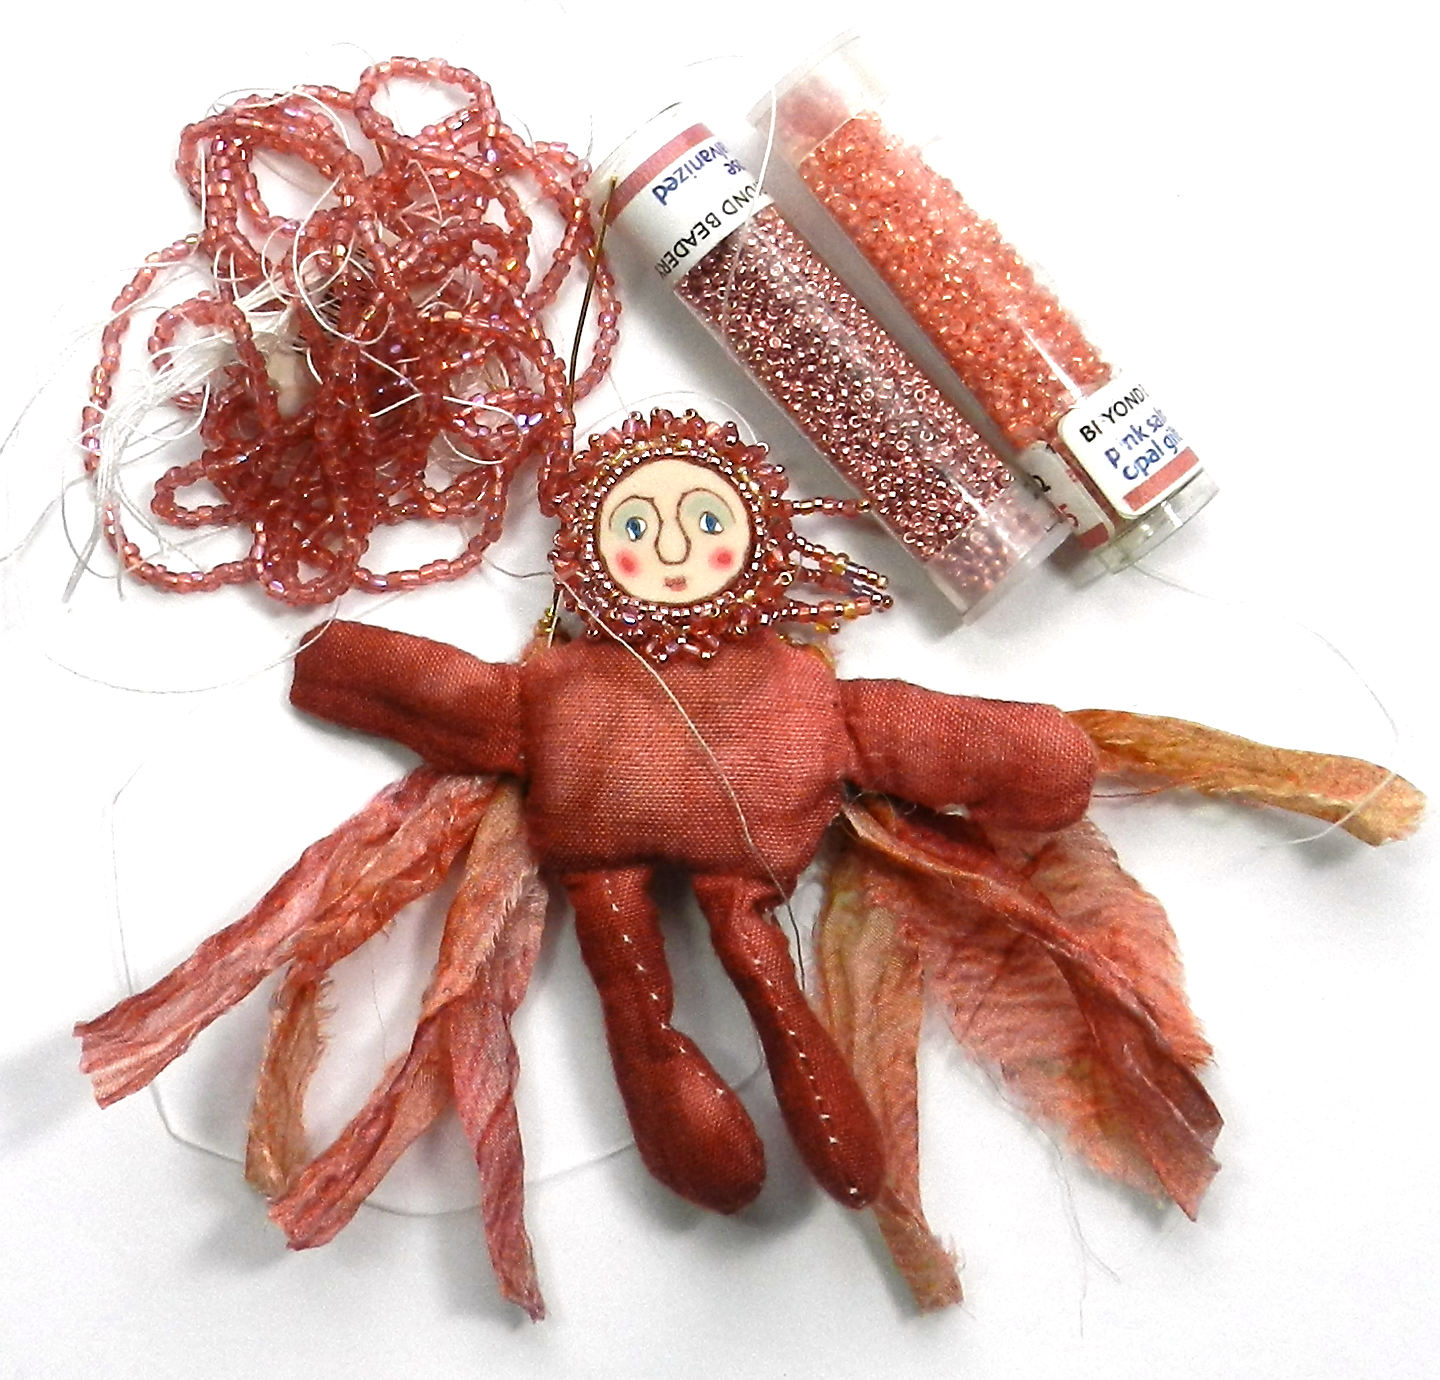
I’ve made some into art dolls, and they are a lot of fun to create! This pink 3 inch hand dyed doll is getting lots more beads, and will have silk chiffon tassels for wings draped down her back.
Nov 19, 2019
 Art Dolls are particularly fun projects for me because I love costuming and dress up, as long as I get to remain in comfy clothes and shoes–so with dolls I can indulge. Making art dolls can be a way of expressing and working though strong feelings, of pleasurably and creatively spending time by yourself or with like minded friends. Some dolls I make from cloth, paper or clay from my own patterns, but I also enjoy staring with a pre-made cloth body and dressing it up. I like the portability of these small projects. You can do a lot in a few hours or continue to add more and develop their style.
I’ve spent many years dyeing natural fibers with Procion MX Series cold water dyes, and built up a lovely cache of cottons, silks, and rayon. So, I put together kits with fabric, lace, ribbons and 3,5,and 8 inch cotton dolls. Then to some I added goodies like sequins, beads, Angelina fibers, dyed feathers, polymer clay or ceramic faces and vintage silk sari trim ribbon. I had a wonderfully colorful time adding ingredients to each kit, and now it is time to share the fun, so art doll kits are going up for sale in my shop here. I’ll be adding more all month!
Shown here is an art doll made from a 5″ art doll kit. I used scissors, a needle and thread, and some E-6000 to affix the polymer clay face to the body. I put a small heavy box on her as a weight as the glue dried to get a good bond. I used everything in the kit except a dozen beads or so. She looked great, but I wanted more..so I added some size 11 gold glass seed beads and size 15 glass purple beads. Much better! She still needs a bit of glitter, some feathers, some paper flowers…but I will come back to her another day. That’s my favorite way to play with dolls! In the meantime, I get to make up samples from the 3 and 8 inch doll kits next. Stay tuned!
-

-
3 and 5 inch dolls
-

-
5 inch doll kit
-

-
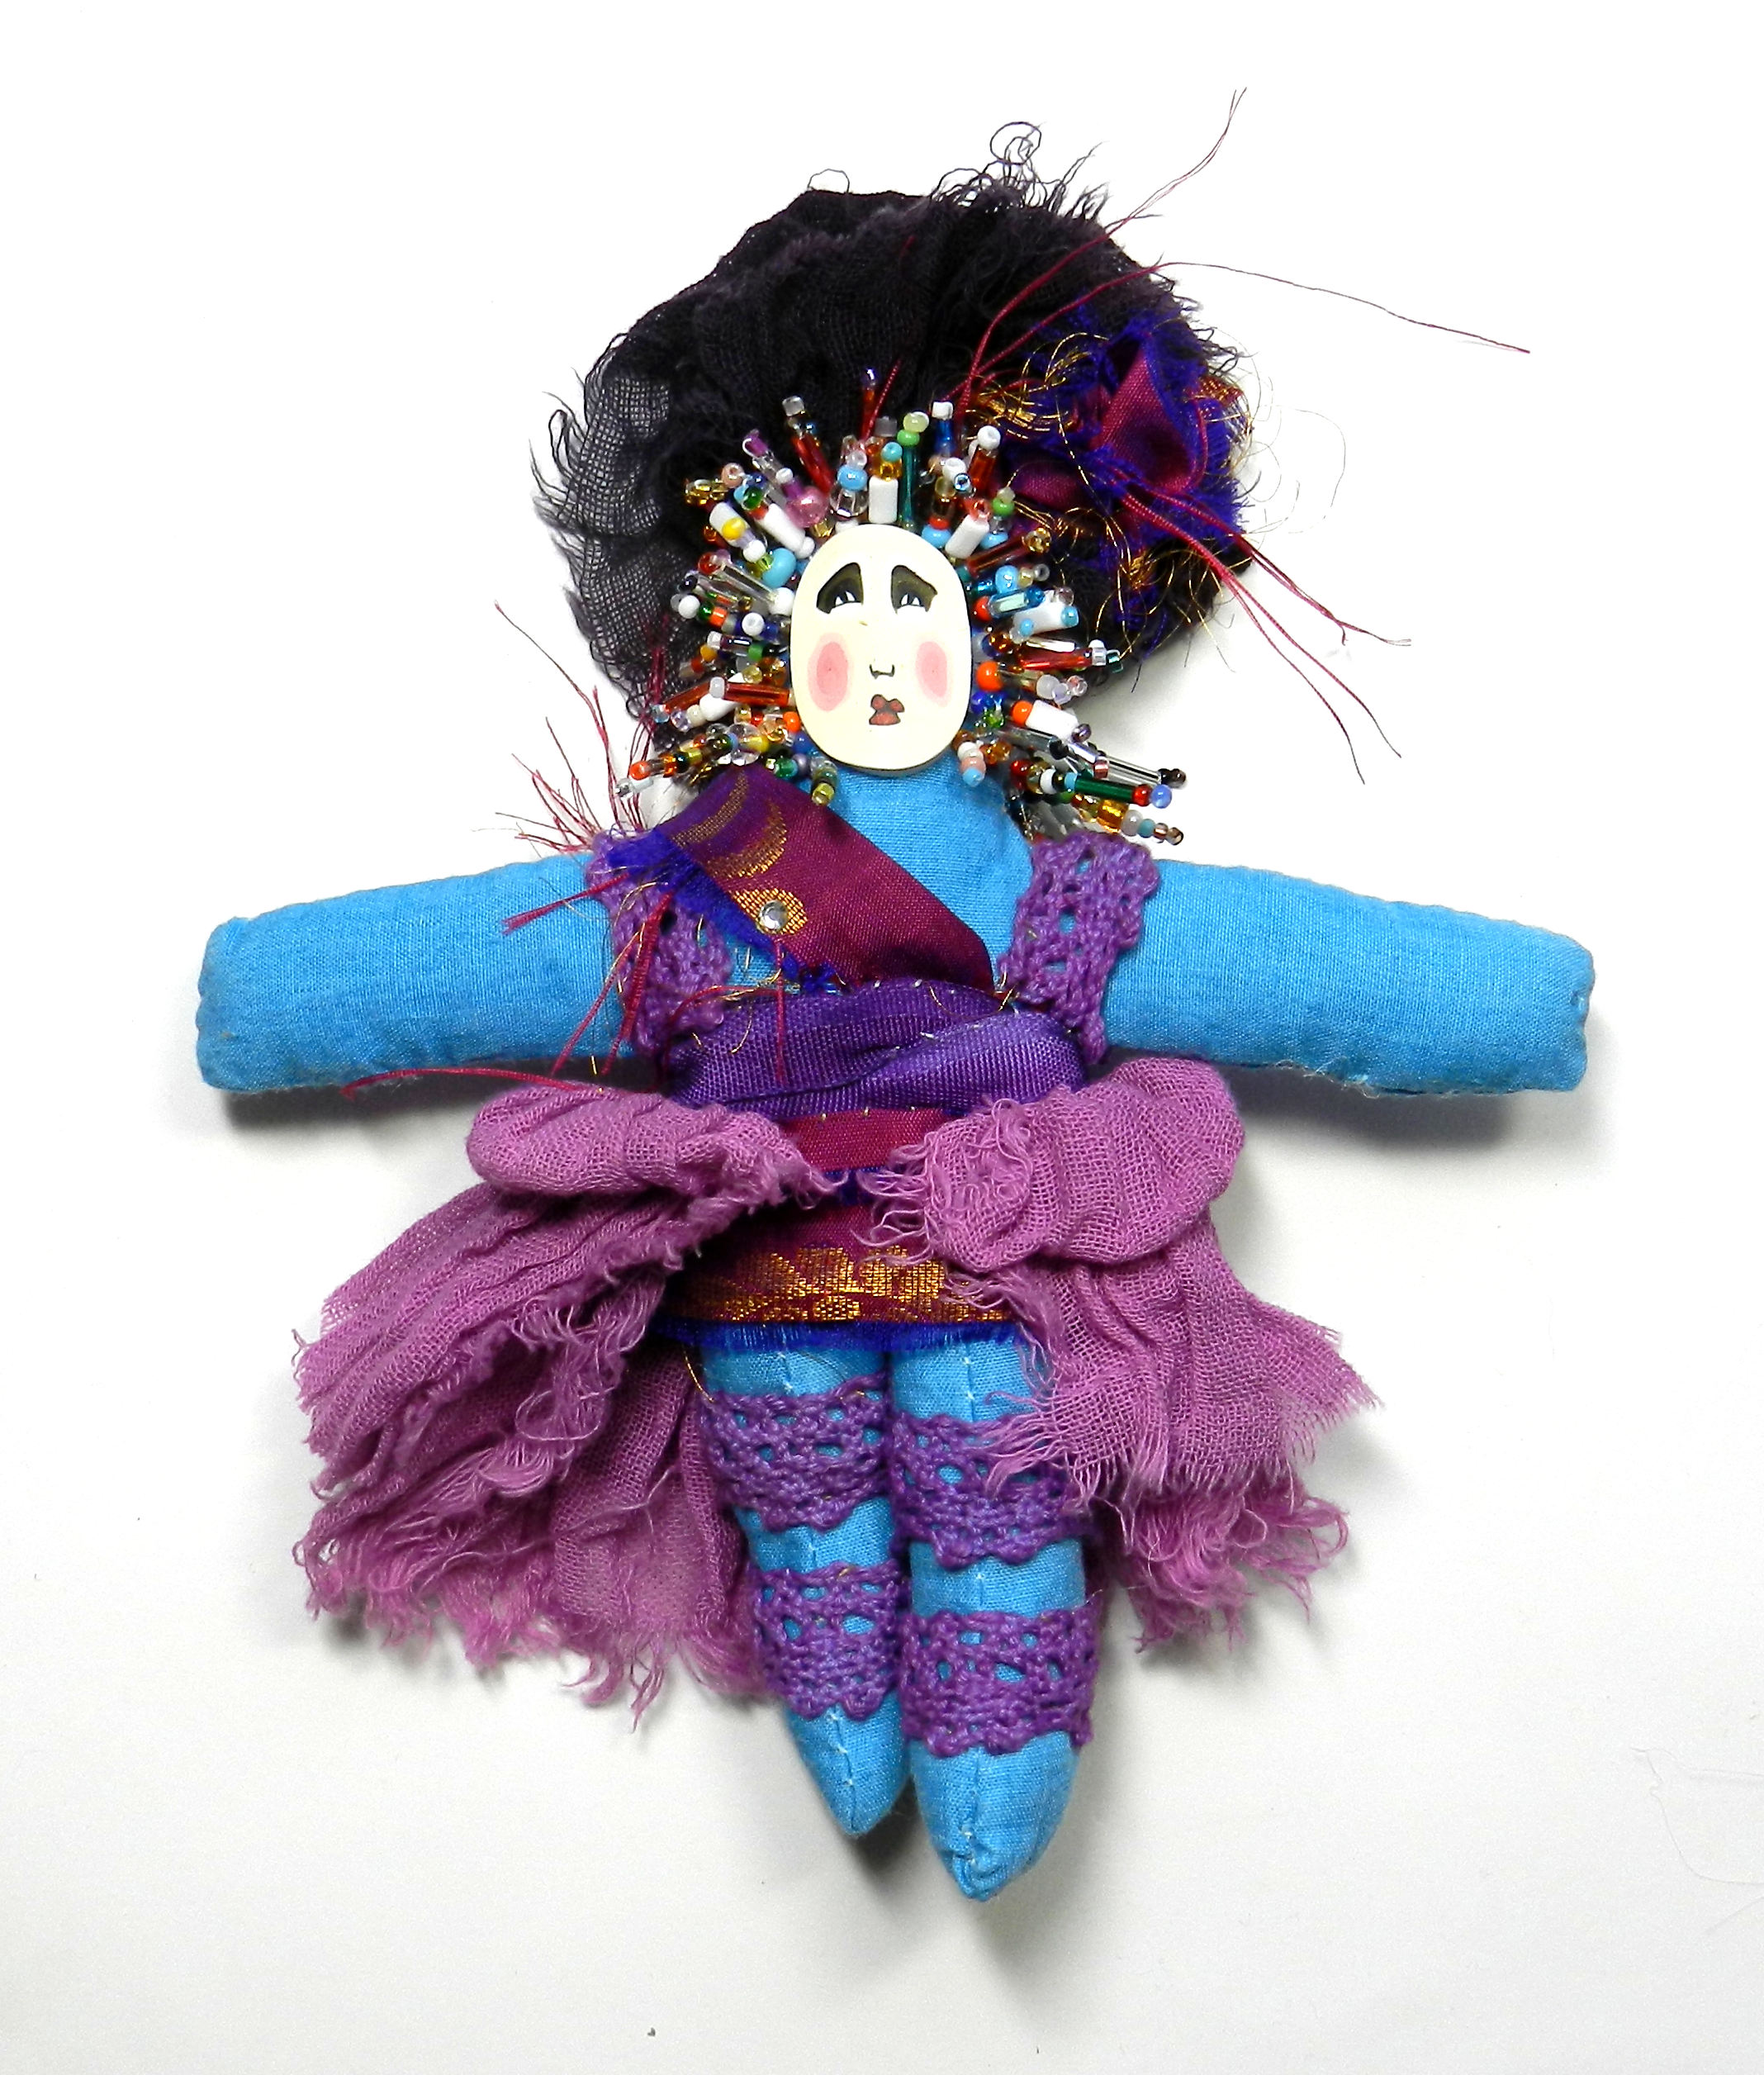
front
-
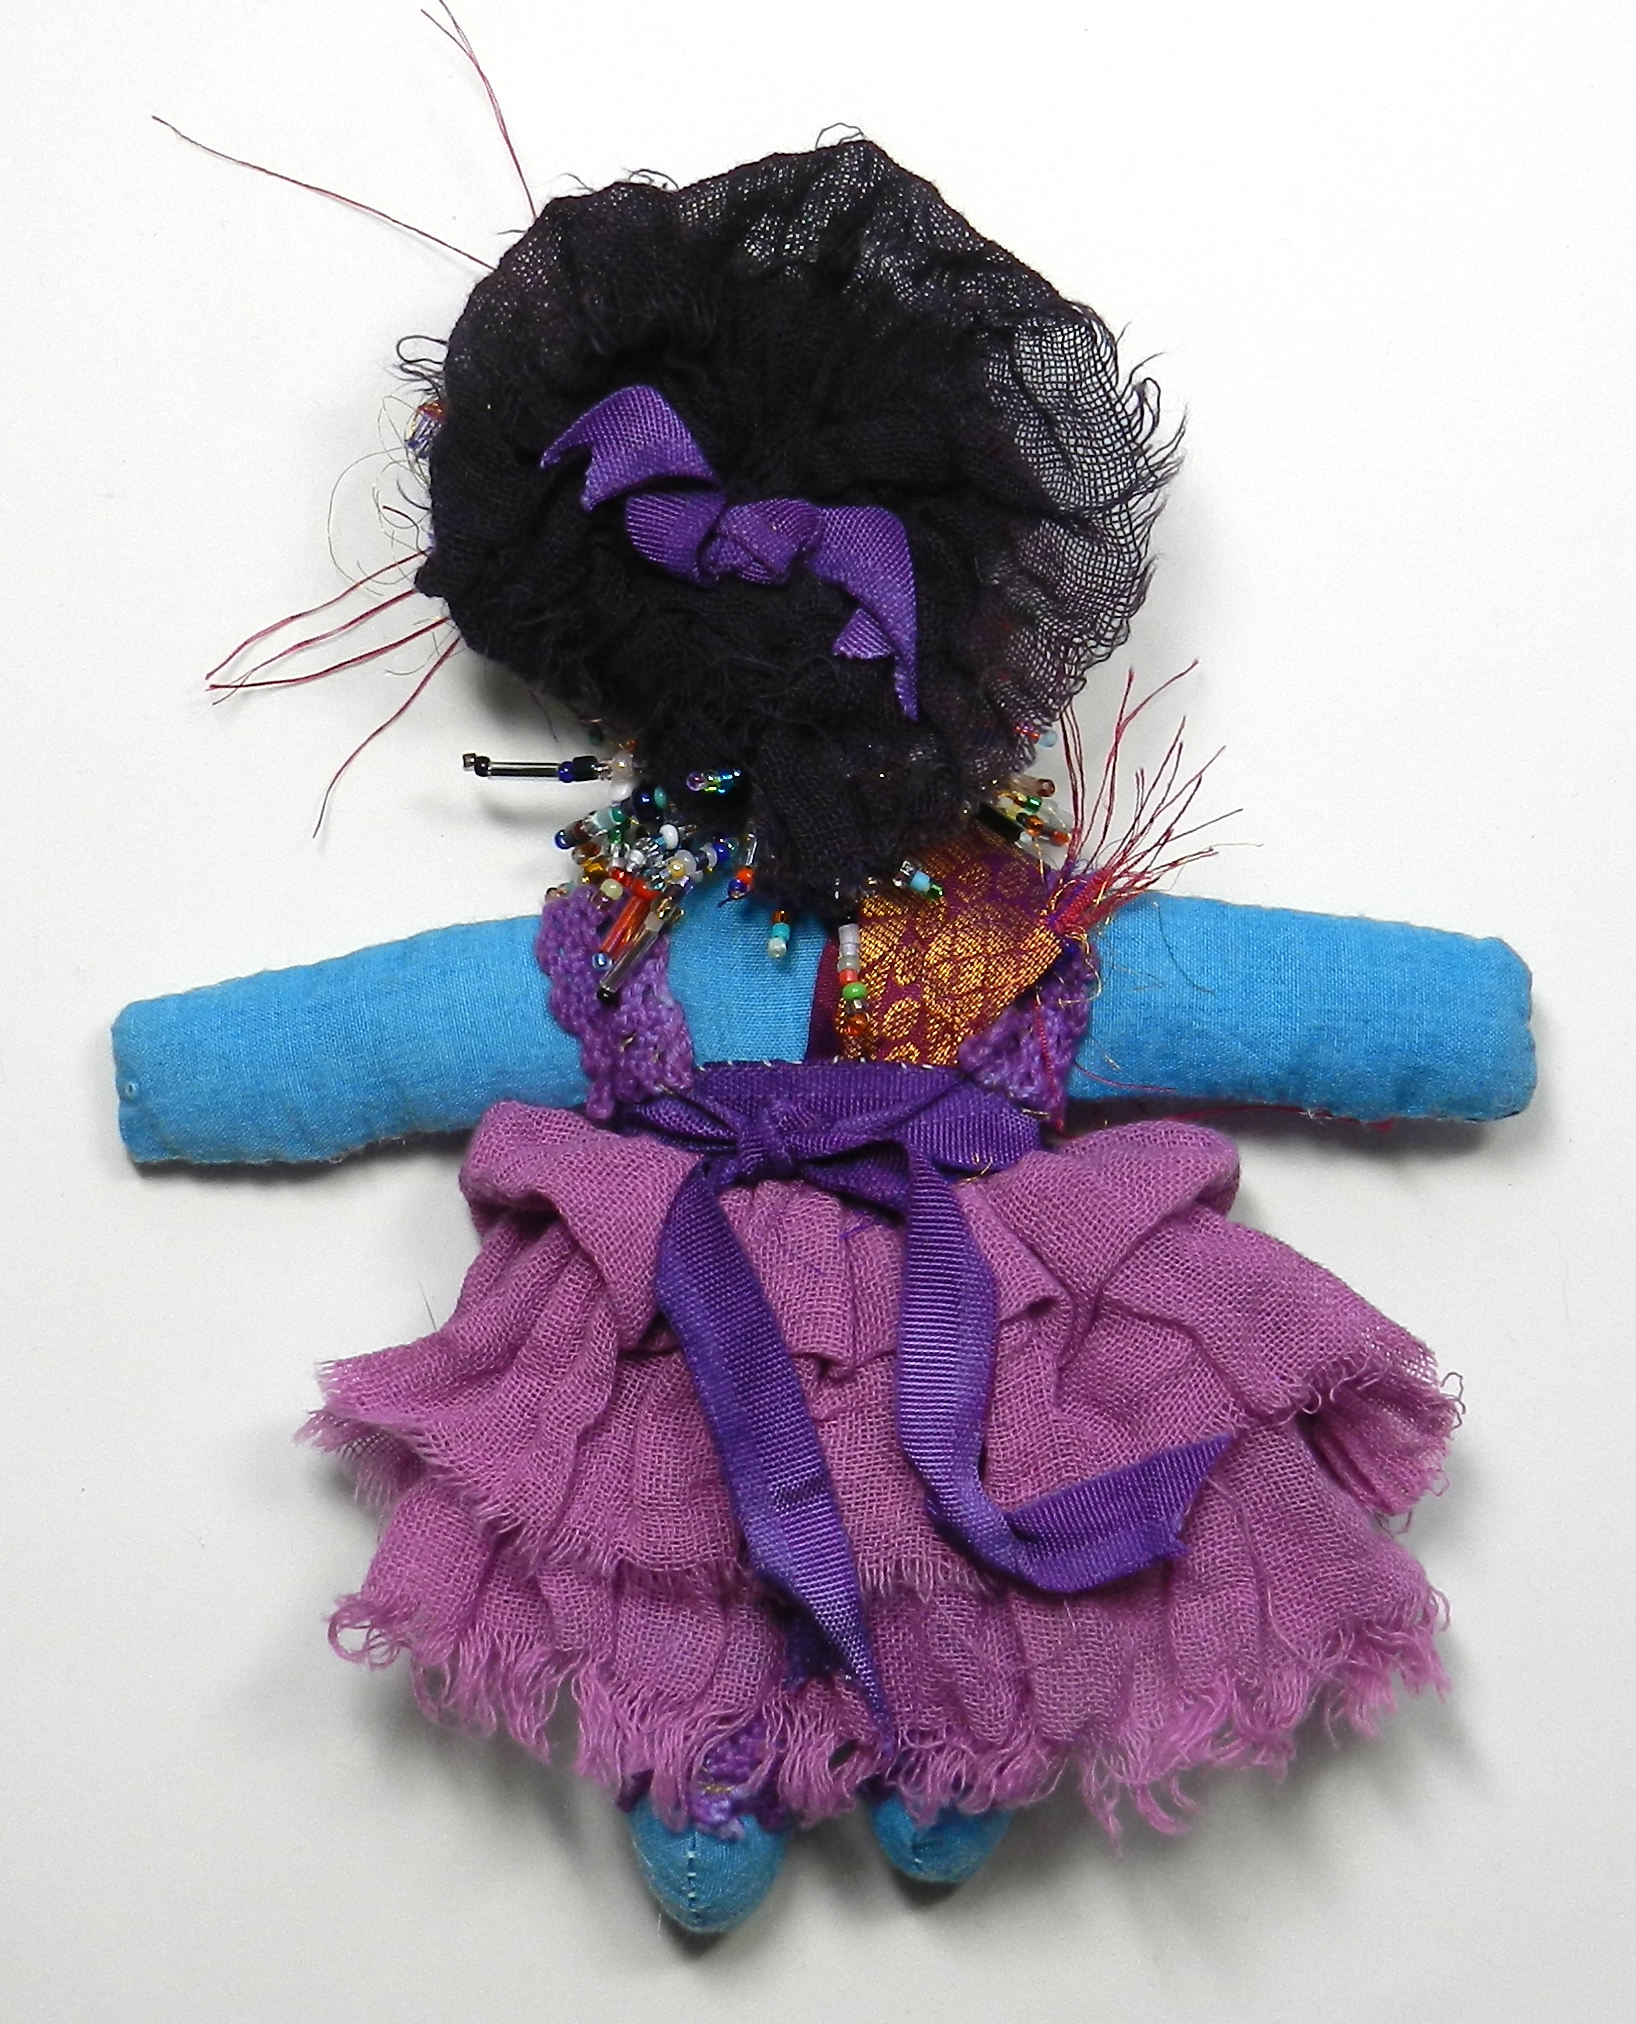
-
back
-

-
with more-front
-

-
with more-back
Jan 15, 2017
 There were are many challenges to be met in 2016, and the results of some remain to be seen. The challenge that my beady friends and I undertook turned out really wonderfully. Our group has been beading together for a while, and we share our discoveries of new stitches, new suppliers, and the occasional project.
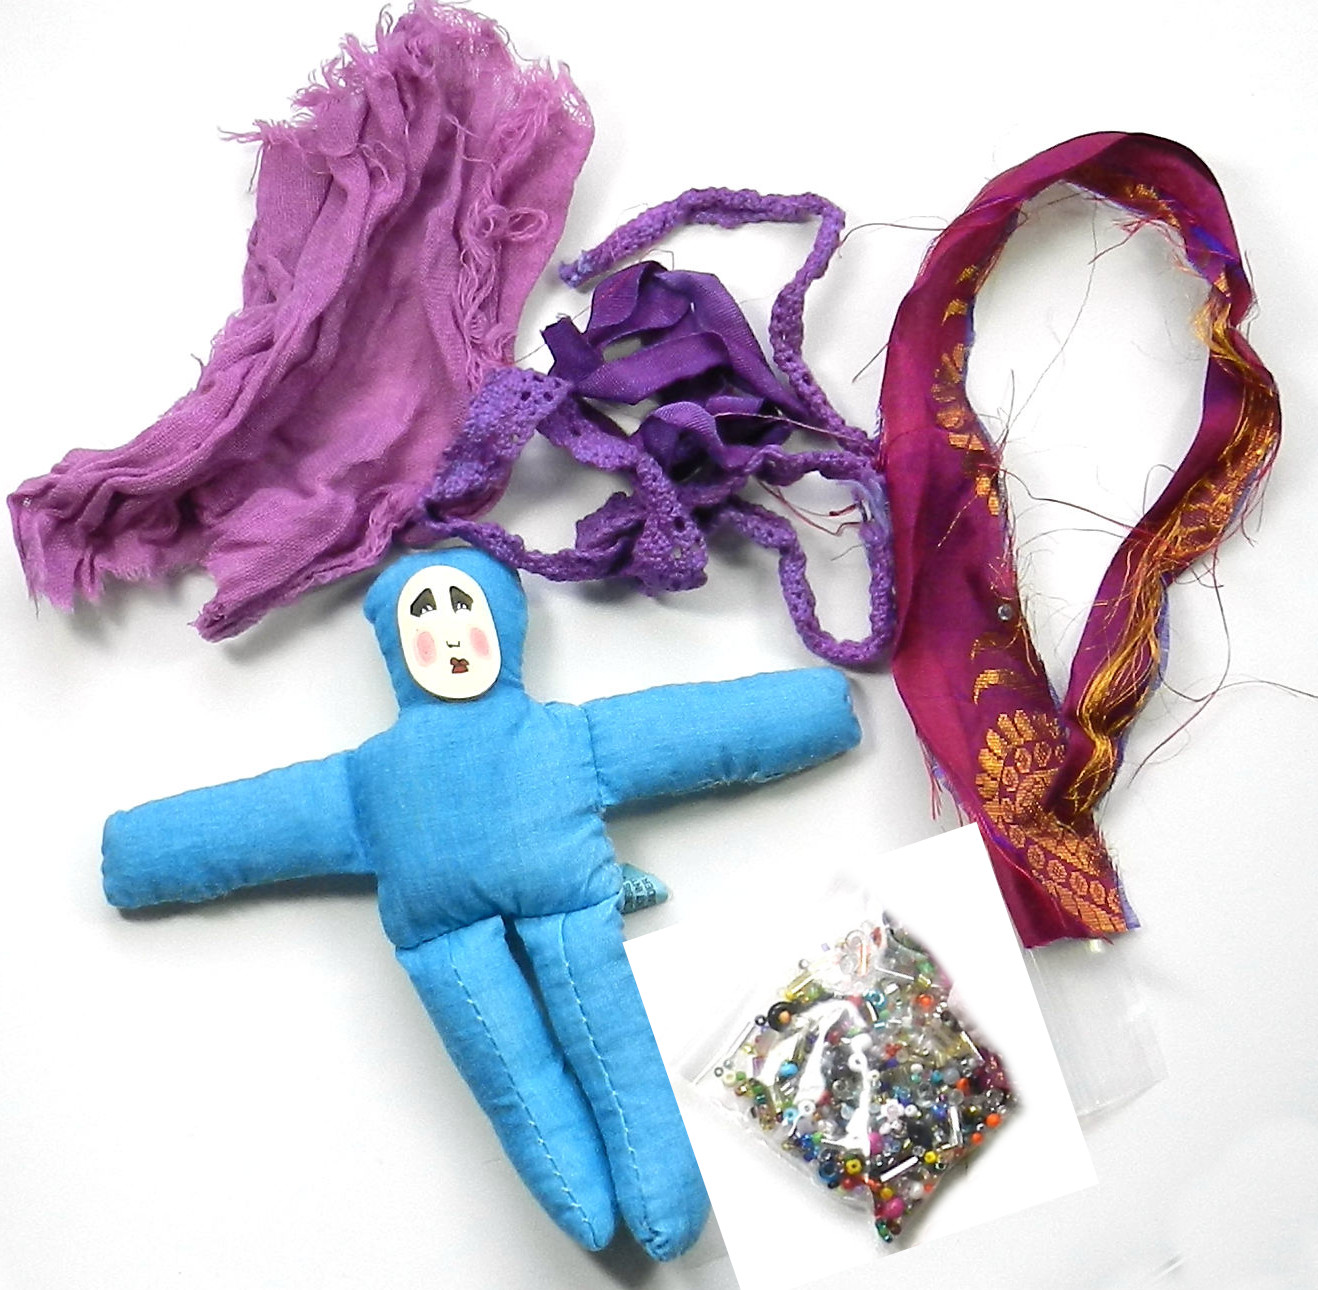
The parameters of this one when it started last year were that we use the two pieces of fabric and the packet of beads we were given. Anything else could be added..and it needed to end up as a piece of wearable art.
Last week we got together and three of us showed what we had made. We’ve still got several members’ work to be unveiled, and I am looking forward to seeing what they did!
Jan 12, 2016
It sure is snowy outside, but I’m growing a fresh crop of flowers (metal), several new classes to put on the calendar, and a brand new membership at Tinkermill in Longmont. Also an educational nonprofit, Tinkermill.org is a creative maker space, filled with all sorts of interesting people with skills–and tools–and space to use them. My family joined, and are eagerly awaiting orientation so as to get to work on projects that are too big for the kitchen table, or require tools I’ve not yet acquired!
Something that really iced the cake for me is the classroom space that is available there. I will be offering classes in the upcoming months both in Gahanna, Ohio and in Longmont, Colorado in the upcoming weeks, so sign up for the newsletter if you’d like to be notified when they are on the schedule. Media will include digital, metal, polymer clay, and textiles.
Nov 11, 2012

I’m home from Houston, after another wonderfully colorful and inspirational Quilt Festival. What fabulous things people can make with fabric and fibers of all kinds!
With an eye towards historical, vintage and cutting edge (literally; there are several booths selling scissors and sharp tools and pointy things of all sorts) textiles and fiber arts, there is so much to be seen at the George R Brown Convention Center that you just can not do it all in one day. It is as large as 9 football fields, with over 1000 vendors–and I was one!–plus amazing exhibits of quilts, textiles from around the world, art dolls and more.
I had a wonderful time and came home inspired, as always, with how to change my booth display ( more grids–they work really well for me, pare things down and keep back-stock), what to make for next time (more of the Painted Face Bags and more polymer clay Victorian Hands, more of my dyed fabric in wearable form that goes with more colorful jewelry!
But that’s next year…. now its time to finish up final projects at school and get little rest over the upcoming holidays. Maybe I’ll have time to learn how to learn to use the kumihimo braiding wheel my friends got for me at the show!
Aug 27, 2012
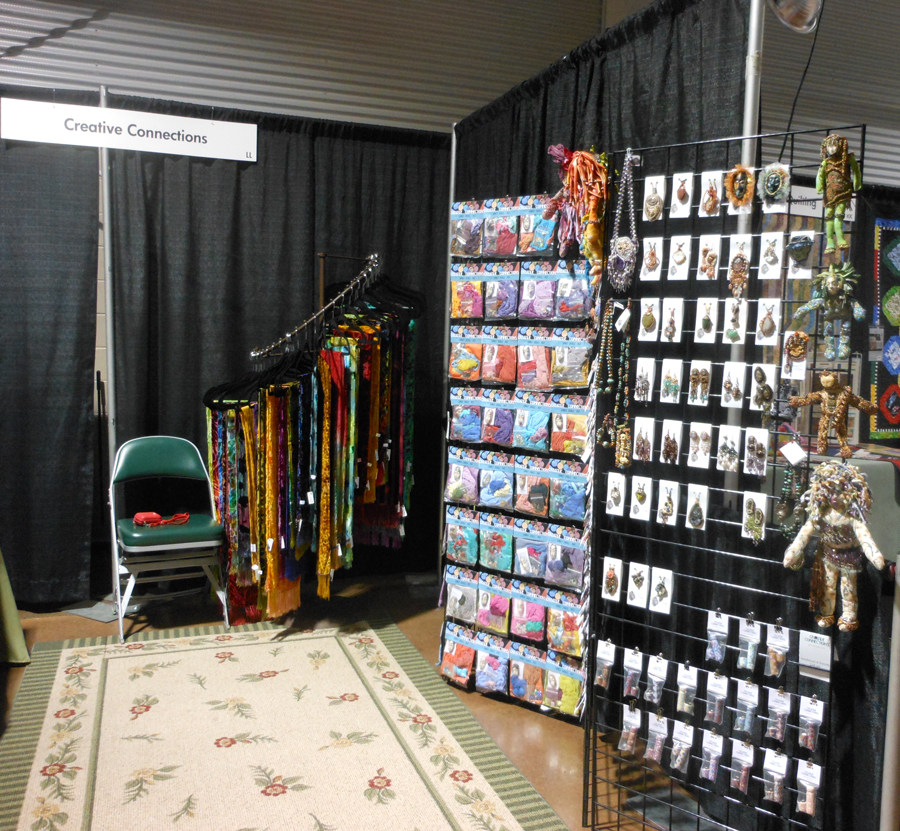
Laura Humenik of Lands Glory Artisan Jewelry and I had a booth at the Rocky Mountain Quilt Festival this year. I saw lots of beautiful quilts while there, and the dolls from the Hoffman challenge too. While sales were slow, it was good to get out and try my new grid display and new ways of presenting things in the booth. It’s also a great way to see what is popular in this area and what I need to make more of before the next upcoming shows. All in all, we were glad for a chance to try and new venue and see how everything looked set up in this configuration! I really do like my new grid displays. This time I have them set up like a folding screen. Here are some pics from the show–click the image to see a larger version.
Aug 5, 2012
 Quilters, beaders, and textile artists are some of the most colorful people I know!
There will be a lot of us–and a lot of color going on–at the Rocky Mountain Quilt Festival coming up this August 17-18-19 in Loveland, Colorado.
Please come see me and Laura Humenik at our booth #LL and see all the hand dyed scarves, ribbons, textiles, and Spirit Doll Kits. Shown here are some three inch tall colorful babes that are hand dyed cotton with polymer clay faces attached, all ready to decorate. Now I have to finish packing them up with sequins, and dyed feathers, ribbons, fabric and other trims! The colors are all a result of our Annual Dyeing Days color marathons.
We’ll have beads, cabochons, buttons, and all sorts of beautiful, colorful wearable art, and art-parts!
Title: Rocky Mountain Quilt Festival
Location: The Ranch | 5280 Arena Circle Loveland, CO 80538 Booth #LL
Link out: Click here
Description:
Fri. August 17, 2012 10 am – 5 pm
Sat. August 18, 2012 10 am – 5 pm
Sun. August 19, 2012 10 am – 4 pm
Start Date: 2012-08-17
End Date: 2012-08-19
Jul 11, 2012
 What a hot, busy summer it has been already, and its only halfway through July! We’ve set records here in Colorado for the heat, my computer stopped working and had to be completely rebuilt and we’ve been back and forth across the country several times for family and business. Lots of movement, lots of work, lots of change…including changes to websites! I’ve moved my website hosting and am totally rebuilding this Creative Connections site and my Polyclay Gallery Site. There are lots of updates, re-arrangements, and new pics to show and tell about.
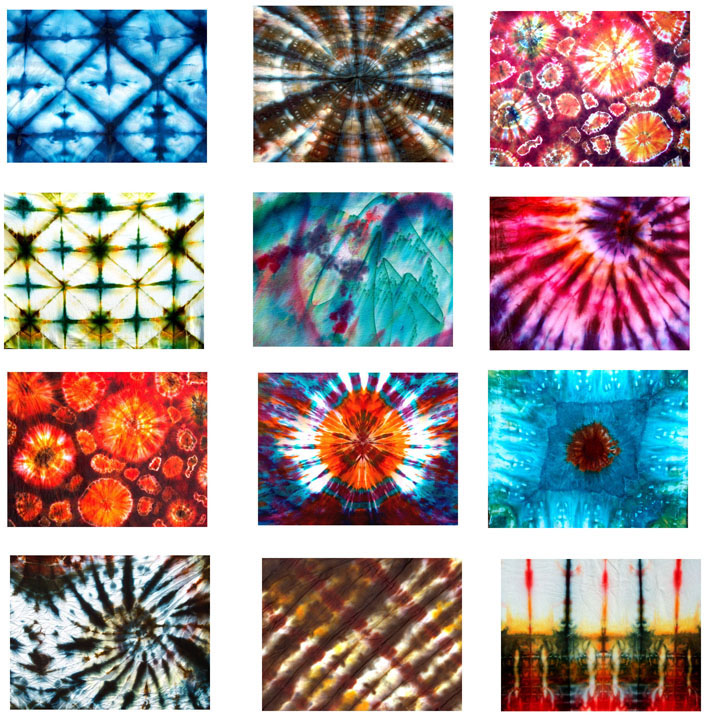
Seems like a LOOOOONG time since the Annual Dyeing Days at the start of the summer fun back at the end of May, but it wasn’t really that long ago. Traditionally the start of a season of color and creativity, our chromatic marathon this year was 14 days of exciting and exhausting work/play that resulted in beautiful clothing, yards of fabrics, lace, ribbons, and more. Read all about it at the Annual Dyeing Days link, and view the Tie Dye Gallery with pics from past years.
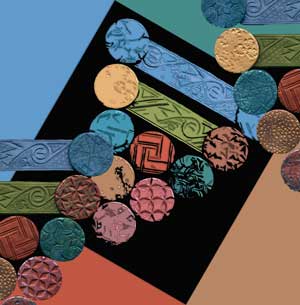
The fabric swatches shown at left are of Kona cotton, and making a sample swatch of each color used is a great idea–if only I had actually done each one (there’s at least a dozen I didn’t get, and that includes most of the orange/red/pink swatches; how did that happen?) and I also forgot to label the 45+ plastic sandwich bags of swatches, doll bodies, lace and ribbons as I was adding some of the liquid dye, so I have to guess which color is which now! That’s because I do the little bags at the end of the session, after all the yardage and clothing, to use up the ends of the dyes., and by day 12 or so I’m usually very spattered and tired. Oh well, next time…there’s always something to learn for next time!
Jun 20, 2010
 Yesterday my friend Laura of LandS Glory Artisan Jewelry and I set up shop for the day at the Lyons Outdoor Market in the beautiful foothills of the Rocky Mountains here in Colorado. It was a gorgeous day, and we got to see some lovely art, listen to live music and do a few hours of beading on Spirit Dolls. Laura and I both enjoy seed bead embroidery and finding just the right bits and pieces to go into the dolls. There’s no pre-planned design; rather, these pieces start as a collection of bits and pieces and parts and then as they come together, other bits and pieces seem to show up and present themselves, demanding to be used. “As the spirit moves” is the way Laura and I both prefer to work, rather than using any sort of drawings plans or patterns (other than the basic doll body outline pattern that I drafted).
This project got started a few months ago, but is just now really starting to come together. I pulled a few items for this doll that included some green tie dye fabric (click here to see the slide show of textiles from our annual Dyeing Days, beads, a glass cabochon made by my fusing friend Mad Margie that I beaded, and I made a ceramic face and two ceramic buttons for her breast plate.
I cut,sewed and stuffed the body. My least favorite part is stuffing, and sometimes I just use pre-made cotton bodies that I dye, but only for smaller dolls. Its worth the turning and stuffing drudgery to get to use my own textiles… and since we are only talking about less than an hour, I somehow manage to get through it!<g> Then comes the fun part, hours of beading, adding dyed trims and other costume fun.
These dolls come together in several sessions for me, a few hours at a time. Usually as I’m working, I’ll find other pieces to integrate into the piece–like some beautiful teal dyed cheesecloth, or peacock feathers. (they’ll be part of her skirt and head dress, eventually—along with more beads!)
This time, I lost a piece. One of her busty-buttons went away somewhere in my workspace. I’d already sewed one on, so I looked and looked…nowhere to be found. I thought about making a new one to match. I thought about taking the one off and using something different. Then I realized, as I looked at her again and again, that she was just right the way she was, with only one. After all, sometimes these things happen. She’s beautiful anyway, and I choose to see her as just right, not as missing half a pair. How we look at things is just as important as how things look.
She has a sort of Amazonian Dance Hall Warrior style going on, and I love seeing her progress. I’ve got a lot still to do, with adding hair, shoes, sewing on her skirt, and sequins and beads for the other arm and leg. And of course MORE BEADS!! I’ll post another picture of her when she’s finished, and here’s how she’s looking so far.

Nov 9, 2008
 Last week Judith Skinner and I were vendors for our third year at The International Quilt Festival in Houston Texas. The show is the absolute best in the world, and there are more beautiful quilts and amazing wearable art pieces than I could possibly imagine–and I have a VERY good imagination!! We go every year to promote our books, including Adapting Quilt Patterns To Polymer Clay and The Business Of Professional Art as well as to sell our polymer clay jewelry, beads, faces, and Spirit Doll kits. Next year we’ll be bringing new titles as well–I think its time to ship all the books ahead, though. We take all of our booth setup and displays and all merchandise with us, and things are getting heavier the more titles we add! This year we shipped some of the books, and that worked out very well. The Houston Polymer Clay Guild helped out with Receiving and made us welcome at a lovely evening reception too! It is always great to see our friends there again.
 In addition to seeing polymer clay vendors like Jennifer Patterson and Karyn Kozak, we get to explore as much of the show as we can. There are 20 rows of booths, and thats not counting the Quilt Display areas!!
There’s an area in the farthest back block for Embellishments, where you can find us in our PolyMarket Press Booth and many other suppliers of textiles, trims, buttons and beads, and other great stuff.
 Like Glitter! Barbara Trombley was there with her Art Institute Glitter. Not only do she and her sparkly assistant Nancy show off the uses of an incredible line of glitters that are compatible with polymer clay use, Barbara’s line of “Elements” make great inclusions in translucent polymer clay and all the supplies in their booth have possibilities when it comes to mixed media art that is so dear to many, including me!
As a certifiable color addict, I warn you to be careful when looking at her color samples. Many, many colors, in very many sizes–like seed beads and paint chips it can be an occasion for gazing a long time.

I also had the opportunity to meet Jenny Doh, editor at Belle Armoire magazine. It was lovely to see in person someone with whom I’ve worked well and happily as a writer of the Business Of Professional Arts column there. I rthoroughly enjoy working with talented, creative people, who are very good at what they do.
It was exciting to see the “Where Women Create” booth and to meet her and the other ladies there. WWC is all about the “inspiring work spaces of extraordinary women” to quote their website. Keep an eye out for this newly debuting magazine!
Click here to see more about this exciting show.
Jun 13, 2008
 Dyed in the wool comes this weekend…but LAST week we dyed the cottons and silks. While we rested up and things dried, we put together a quick 30 second video with an ambient music soundtrack.
I’m learning how to use a webcam and the digital camera as a video recorder, and playing with the hardware and software is how I learn best.
http://vids.myspace.com/index.cfm?fuseaction=vids.individual&videoid=36089812
Music provided by Bryan Helm. If you like it, take a listen to his podcasts at My Life In Sound.
Jun 6, 2008

We’ve had rain all the first part of this week, and we needed the moisture. It is beautiful in a sunny way today, and we’re starting into the annual dyeing days! Today is prep day–I’ll be mixing dyes, and getting them into the bottles. I just ran off the sheets of labels for the plastic bottles. This year we have:
#03 Golden Yellow
#05 Soft Orange
#8A Pagoda Red
#09 Scarlet
#13 Fuchsia Red
#14A Hot Pink
#15 Amethyst
#18A UltraViolet
#19 Plum
#19A Lilac
#21 Teal Blue
#23 Cerulean Blue
#25 Turquoise
#27 Midnight Blue
#28A AquaMarine
#37 Bronze
#44 BetterBlack
#45 Jungle Red
#47 Chartreuse
#50 JadeGreen
#60 Lavender
#62 PeacockBlue
#64 Orchid
#96 Lapis
#97 Citrus Yellow
#105 Pewter
#111 Black Cherry
#112 Periwinkle
#113 GoldenBrown
#115 Eggplant
#118 Yucca
#312 Strongest Red
#510 Basic Brown
 We use Procion MX series coldwater fiber reactive dyes. We’ve found that labeling the bottles after mixing them up makes it easier to tell what’s what, when you have lots of colors. We also have bagged swatches (that’s the picture at top) so that we know how the color is going to come out, mostly.
Another good tip I’ll share with you is to mix your dyes with water and then pour through a coffee filter into the bottle, that way those pesky little red or turquoise spots are not a problem.
 This year I’m dyeing lots more pieces of turned wood, because I LOVE how last years batch turned out. No ribbons this year–I did a lot of them last year.
They went into the current crop of Spirit Doll Kits along with the cotton and silk fabrics, and polymer clay faces. I’m selling them on Etsy.comwhich is an on-line site presenting handmade and vintage items. I’ll be adding lots more items in the upcoming weeks as I clean out the studio and help fund upcoming shows and projects.

I’ll also be dyeing some t shirt dresses and shorts for my own summertime wardrobe, and backdrop and curtain fabric that will be used in the Aunt Acid Show. They WERE beige muslin–how drab!! They were great when I did out door shows and needed backdrops that did not compete with the displays. But for this particular show, we can take LOTS of color. I’ve been gluing mosaic set pices, and things are coming along splendidly in a visual sense. Now for another big dose of color, and we’ll be onward into the Summer of More Love…and we happen to love art and music and humor, so I’d say these good times to “Be Happening”.
Speaking of summer time fun, I’ll be teaching a week long seminar on using dyed fabrics and polymer clays to make spirit dolls, icons, and masks this summer at Tougaloo College Summer Art Colony. July in Mississippi is time for some HOT ART!!

Dec 2, 2007
 I had fun with my creative co-workers decorating the Christmas window of the local bead store here in town. We just kept adding more and more…fused and slumped glass bowls, hand dyed silk scarves, dolls, the miniature quilt store, (which we decorated for Christmas too), a polymer clay covered wagon and even Golde in a box. She’s my full sized cloth doll, who shows up in many different roles here. This time she’s wrapped up like a present right in the front window, along with lots of other hand made gifts and goodies. The pictures here are all of the little store “Pieces”. It measures 2’x4′ and is in “fashion doll scale”.

Nov 16, 2007
 My, but what a lot of traveling I’ve done this Autumn! The Holiday Food and Gift show in Denver, The International Quilt Festival in Houston, and two days of classes in Columbus Ohio with the polymer clay guild there. I had a great time with them, and also got a chance to get together with family and friends.
I’ve got an upcoming Bead Buglearticle about the results from the millefiore caning, mimicking textiles, and beautiful beads classes. It should be on-line sometime this month.
Shown at left are a pair of earring dangles (no hooks on them yet!) made from canes made in those classes. I’ve been having fun making charms and dangles with baked cane slices using my leather mini-hole punch from Tool-Smith. It makes the cleanest easiest holes through baked polymer clay!
 The triangles at the bottom of the dangles show one way that color can be gradated in polymer clay canes. This kind of “3D” color gives the illusion of blend when it is taken very small. You can also see it in the petals of the rose shown here. Polymer clay artists David Forlano and Stephen Ford of “City Zen Cane” made this color stacking technique very popular at one time. Along with Judith Skinner’s “Skinner Blend”, these two techniques allow for the appearance of shaded parts in cane images. I love the way I can get a very graphic style in clay and then take it down in scale with reduction!
 The wedge from which the dangle slice was cut was a leftover piece from the making of the cane shown at left. The similar uses of form, color and multiple repeats are very much present in textile designs too. Sandra McCaw uses these kinds of color stacks in her caning process. Hers is far more precise than mine, and taken to much greater levels of reduction and recombining. Its always interesting to see how different artists can use similar materials and techniques in ways that suit their own styles.
Oct 22, 2007
 Judith Skinner and I are VERY busy getting things prepared because we will be doing the Houston International Quilt Festival November 1-4 at the George R. Brown Convention Center in Houston Texas. All sorts of new faces, jewelry, kits and beads are being created and packaged for sale. I’m having a particularly good time putting together Spirit Doll Kits, and utilizing my stockpiles of hand dyed silks, cottons and rayon in ribbons, lace, and cloth, and building up each set around a miniature polymer clay face mask.
So far I’ve got 75 kits in 3 different sizes and styles! (And I have one week to finish all the packaging and packing…eek!) Some have cotton jersey cloth thats been tie-dyed, or cotton or silk handkerchiefs or cotton plush velour; with three different sizes and pricepoints there’s lots from which to choose! Visit the polyclay.com website to see some of the others.
If you are in Houston at the start of November do come and see us at the Quilt Festival, where we will be in our PolyMarket Press booth, #1951. In addition to all sorts of polymer clay beads and embellishments, we’ll have our book “Adapting Quilt Patterns To Polymer Clay” and also the new book, “The Business Of Professional Art”.
Aug 17, 2007

The Columbus Ohio Polymer Clay Guild has invited me to return to my old hometown and offer three polymer clay classes!
I’ll be there at the Columbus Cultural Arts Center Saturday, Sept. 15 2007, 9-12:30 and 1-4:30 and Sunday, Sept. 16, 2007, 1-4:30 to offer the following:
CANEWORK–MILLEFIORE TECHNIQUE
MAKING BEAUTIFUL BEADS
CANEWORK–MIMICKING TEXTILE DESIGNS
Click here for all the information!
Jul 30, 2007

oi! What a summer full of work its been so far. I’ve been so busy I haven’t had a minute to stop and post here in a while. The garden is going full tilt–all the lettuce is gone and the raspberries are done for the season. (But we froze 16 lovely bags full which will be great in muffins later this year and next winter too.) Now my daily garden time is spent watering and pulling the weeds which tend to thrive wherever you water here in Colorado. We don’t have a big farm or even a little one, just a backyard in a small town with a few small plots and a few big black pots that trees once arrived in from a nursery. We recycle and reuse as creatively as we can…with the addition of some good dirt and even better compost from a local dairy, we have thriving tomatos, peppers, cucumbers, herbs and 5 kinds of squash plants!
In addition to an hour or so a day in the garden, I’ve been growing lots of website pages and blogs, both for myself and for other clients. That includes helping my husband with his musical podcasts and blogs, though he’s becoming very self sufficient at it these days. He’s got quite a bit of original music up for listening, and more to come. I’ve been hearing and enjoying it for years; now its YOUR turn!
I’ve been busy sorting and gathering and bagging beads too, preparing for show and for upcoming classes, kits, and bigger projects like the next books. Polymer clay masks are all ready to be photographed and mounted this week, with the frames prepared and databases for the artist information all prepared–its a serious lot of work just to get ready for some projects. The amount of effort that went into making all the masks is enormous, but its also been spaced out over five or six years and done by many different artists who participated. That sure helps!!I’m really looking forward to putting this one together, and its happening now, this very week. And for the next several months as well! Bryan will be mounting and framing the masks as I finish their photos. As I sort through them now, I’m really struck again by how wonderful they all are–so many extremely cool little pices of art! Shown at top are two from the 2006 mask swap made by Karen Cowles. Check out her website at www.choosetothrive.com
Right alongside of that giant miniature undertaking is production of new beads and new polymer clay faces and more masks! Before we show off the masks on the walls and in a new book, I’ll be traveling back to the ol’ stomping grounds in Ohio in September, where I am very pleased to be offering classes in Bead Making and Millefiore Caning through the local polymer clay guilds. More about that in my next post.
I’m also very excited to say that work is well underway on the many aspects of preparing for our “Really Big Show”, as Ed Sullivan used to say. Scripts, songs, websites and blogs, puppets and even the theatre itself all have to in place and running before we bring up the curtain. As every one who has ever participated in theatre of any kind knows, there are years of work that go into a single hour’s performance, and its done by many hands and with the use of all sorts of skills. We’re close to being able to share the progress, and thats what’s keeping me pretty busy at the moment. Visit again soon and find out more!
Jun 25, 2007

I’m going to play with dolls today, and let my project dreams roll around in my head while I do the day’s tasks early so that I can get to the parts that are more fun. There’s something about the heat on long summer days that really encourages day dreaming, memory drift,  and imaginative play. Perhaps its because its just too darn oppressively hot when its in the 90’s by midmorning to be comfortable in the physical world. Maybe brains let the thoughts sputter around more freely when warm, like kids playing in sprinklers. I don’t know and its really too warm to worry about it…maybe thats why its so much fun to hole up with a good book or a project in the shade! Especially if you get the heavier work done early–then its perfectly alright to spend a few hours on pursuits a but more whimsical!Not that I’m going to be entirely frivolous–the play is also work, but “funner”, as any kid would know. There are two big little projects to do this summer, and I’m making my way slowly with both. There are hundreds of miniature masks to be photographed for the upcoming “The Art Of Polymer Clay Masks” book, and its a perfect season for doing that–lots of light!

The other miniature project is another store. Last year saw the production of “Pieces” a miniature fabric store made and stocked with polymer clay. In it, I had the fun of combining my love of textile designs, miniatures and set design, quilts, and polymer clay. I had lots of help, too, as other polymer clay artists helped stock the shelves with miniature “bolts of fabric”–which were all polymer clay. Even the plants are polymer clay. It was originally intended as a display for use in the book “Adapting Quilt Patterns To Polymer Clay” by Judith Skinner and me. That was the official excuse—but it was also SO MUCH FUN!!! I still enjoy shuffling the hundreds of bolts into different piles, and someday they will all become parts of a wall hanging…but not today!
 Today, I’m thinking about the NEW store, which is in the same scale (1/6, which is also called fashion doll scale and also 1’=2″. click here for a page with more information about miniatures and a scale conversion chart). If Barbie were a quilt maker, she’d shop at “Pieces” for her fabrics. And, if she were shopping for things like cosmetics, perfume luggage, and fashionable accessories, they’d all be in some fabulous storefront.

 So here I am, dreaming of little perfume displays with framed antique labels for boudoir decorating pleasure, tiny luggage with labels from far away places and more. I’m also being practical about it–the luggage is to be made with polymer clay and formed around cookie cutters and petit-four cutters, and the perfume bottles made with beads and a bit more clay..I’ve been sorting the actual beads and will do more later! (There are kits and a how-to in the making)
The perfume labels for both bottles and art come from the same source as the luggage labels. I am thrilled to have at hand cd’s of vintage art from Stan and Russell at Twisted Papers. They have antique travel ephemera, vintage labels, and textile designs all on cds at very high resolution for artists to print and use. Because I can size them to different scales, they have all SORTS of uses!!
“Vintage Label Collection Vol 1: Perfume Health and Beauty Products” is a personal fave, as is the vintage travel series. I’m showing you just a couple of the fabulous pics that I’ll be using in making displays and products for my new little store–there are 306 images available on this cd alone!!! I have plans for transfers, charms, collages—lots of ideas for a hot summer day. See some of the travel labels and a bit more info about this treasure trove here at a previous blog post.
Jun 16, 2007
 I just love old ephemera. Even the word “ephemera” is wonderful–it has a faded paper sound to it when you say it out loud. Old ticket stubs and programs, maps, vintage valentines, designer’s sketches, antique advertising, sheet music… lovely old paper products. I’ve always enjoyed using things like that in collages, and we have boxes of carefully collected magazines that go beyond the usual National Geographics. (though we have some of those too!! One of the interesting things to remember about copyright law is that it pertains to making copies. So I can legally take these magazine photos, or catalog advertisements, or any paper ehemera and use them–without making any copies–in my artwork. If I want to make copies, I use artwork that is in the public domain, that I create myself, or that has permission granted for artists to use. This last catagory includes clip art that is installed in computer programs that come with your computer and all the Dover Pictorial Archive images. They have thousands of books with images in many catagories, and they are also now making them available on cds that come with the book. When purchased, the owner of the book has permission to use the images in their work, though not to just create a copy of the book or cd itself for sale. These images can be used in so many different ways! I have a Japanese Heraldic Crest symbol used on my business cards and printed materials. I’ve used them to make rubberstamps too, through Ready Stamps (for more about that, click here). Between Dover Pictorial Archive images and dingbat font images, I have had dozens of stamp sets made. They are my favorite tools!
 In addition to using images to make molds and stamps, transfers can be created using liquid polymer clay and a print out from my deskjet printer onto Epson Glossy Photo Paper. This is particularly fun to do with colorful graphics that can be scaled down in size for miniature and doll use. My newly found friends Stanley Pekarsky and Russell White of Twisted Papers have an absolute treasure-trove for all artists who share my love of ephemera. They have very high quality vintage images available on cds for artists to print and use. They feature collections of travel oriented and advertising art, postcards and valentines, ticket stubs and menus (like the two shown here). AND they have many cds of the fabric designs that belonged to the design firm for which one of them worked. They now have the rights to these lovely textile designs in several colorways, and those with the cds can use them to make cards, hangtags, all sorts of printed or web-based use! I have great plans for the weeks ahead…and I’ll show what I do with them later. I’m going to make miniature luggage and travel posters for my upcoming doll store as well as perfume ads and labels and all SORTS of things!! Thank you Stan and Russell, for collecting and sharing these fabulous images.
Take a look at their other site, Midnight Rainbow to see even more vintage goodies.
Jun 1, 2007
 We made it through the Big Dyeing Event and it all worked out very well. My hands and back are really tired, but the backyard has certainly been well watered with all the rinsing.
The ribbons, lace, scarves, cording, fabric, hats, bamboo beads, wooden pieces and tshirts have all been dyed, rinsed, and washed, and now I’m rolling and tagging and getting things ready for sales.
 Next up on the “to do” list is making more polymer clay faces to go with all the great new colors, and putting them together into Spirit Doll kits–I’m going to the Houston International Quilt Show again this year in the Fall, and so this Summer is going to involve a Big Production Push. Lots of things to get done….Musician Bill Nelson says in song “People who do things, are people who get things done”.
I’ve been busy writing articles for Belle Armoire and other magazines, and working on books to the point that I’ve been spending less time than I need to on the actual polymer clay work, and I’m really looking forward to getting back to that!
 Though I’ll be photographing as I go, because the dyeing process is part of one book, and the polymer clay masks are part of the next one up–“The Art Of Polymer Clay Masks”.
I have to work pretty steadily on that for the next two months in order to make it happen this year. It will be self-published through Lulu.com as is “Adapting Quilt Patterns To polymer Clay” with Judith Skinner.
I’m still working on migrating this site to the one that I maintain myself, but I havent figured out how to get tags to work there as they do here–in the meantime, I’ll make use of both lobes of my brain and both ftp sites and maintain both for a bit! Please do visit “the other side” to see the features available there that aren’t here.
May 28, 2007
 The Annual Dyeing Days are over for another year. Almost–I still have to rinse out the bottles and put then pools away in the garage, but not today!!
My hands are sore, and so is my back…but I do love the colors that we got this year. Eggplant was the new color in the group, and is true to its name. I think I still like Black Cherry better…but Chartreuse was the winner of the Most Used award this year.
I mixed up more of it than the other colors and STILL had to make up another batch the second day!
 For more information about this wonderful color, visit Maggie Maggio’s Smashing Color site–it is WONDERFUL and the section about chartreuse should have tipped me that its going to be A Popular Color.
We dyed shirts, hats, socks, fabric, lace, ribbons, doll bodies, and even wooden pieces. I think they are pine, and we got them in bags from a thrift store. It was a great find, though I’m not completely sure HOW they will be use, it will probably be in a puppet theater set or miniature diorama or some sort.
To read all about it, visit the new Dyes page at the Polyclay Gallery. It may take a few minutes to load as it is graphics-heavy.
May 24, 2007
 If I’m going to make colorful puns (and I am, just accept it) then the whole quote would have to be “We who are about to dye, solution you. ” Which is probably only funny to textile artists and those forced to take Latin in school…if that. But the colorful fun IS about to start here in my own backyard–after several days of unseasonable cold weather, we are ready to get saturated, with color and water both.
I spent yesterday mixing the dyes–42 bottles of saltwater and dye, ready to go. You see them here in a wading pool, and its just one of many. We have a soaking solution pool for the soda ash, a rinsing pool, and many many buckets. We have color swatches for reference, bagged items all tagged for  the color pots, and my presence is shortly required out there, so I’ll finish up here with this picture of Premo clay beads in a colorstrand that helps me keep track of mixes and blends. The goal is to dye lots of things that will go with the polymer clay beads, faces, and more. I’ll be back with pictures later this weekend!
May 11, 2007
 That’s the name of a comic strip character but its also what a lot of people liketo see in their polymer clay or textile or other wearable arts.
A great example of another place it all connects is with the JonesTones Foils that are often used in fabric embellishment, or on on already made clothing like tshirts, sweats, or even shoes.
It comes in sheets in solid colors or in holographic and oil slick effects. You can follow the package directions to create sparkling and metallic effects on cloth, and it can also be used with polymer clay. You can sometimes find it in hobby supply stores, or order online from Puffinalia.com
 To do that, roll out a sheet of clay. Place the foil pretty side up–so that you see it–and then burnish it onto the raw with your fingers. It particular helps if you have warm hands; a little heat really helps the transfer. I then use one of those credit-card come-ons that arrive in the mail. Use the edge to burnish the foil down in one direction, then another. Rip the sheet of foil away like a bandaid removal and the colorful part should transfer to the clay, leaving a clear sheet of acrylic. Sometimes only part of it transfers. You can do it again to fill in with the same foil or different, or use Pearl-ex mica powders to fill in spaces as it will not stick to the foil, only the exposed clay. The clay and foil can then be used in making beads, jewelry, collage and mosaic pieces and more.
 Another source of a very similar foil is the Dollar Nail Art Store. They have five foot long strips of foil a bit over an inch wide for a dollar! and they have them in a very wide variety of colors. They are used in exactly the same way as the Jones Tones foils on polymer clay. Intended for acrylic fingernail decoration, these strips are very useful in many decorative ways.
They also carry iridescent and holographic filaments, tiny rhinestones and pearls, a wide variety of glitter, and more. They even have rolls of teeeeeeny gold and silver strips for pin-striping! Everything at this site sells for a dollar. There is a minimum purchase and it was very easy to fly right on past that point, even just trying a few things I simply HAD to have….
Both kinds of foils will react with clay over time if left to sit. Some start to lose color. Some change color when baking, so don’t over do it in the oven—cure fot the needed amount of time and take them out promptly to minimize this. The green hologram/herringbone effect shown above turned silvery on baking, but with bits of green fading in and out. The fuchsia foil turned a silvery lavendar–you can see it in the decoration on the red hats of the polymer clay ladies here. I heard about the dollarnailart.com site from one of my online friends over at Polymer Clay Central. Its wonderful when people share their sources for interesting supplies!
May 8, 2007
 Tsk, another song title. And yet, it is appropriate at least a little bit. MY head is not blue, but the cloth on this wig head is several shades of sapphire, indigo, cerulean, peacock, sky and other blues.
Cotton stretch jersey was tied with rubber bands to produce a pattern of circles. A section of the finished cloth is shown below. Other folds are used to create stripes, diamonds, and swirls.
In just a few days, I’ll have blue and other colored splotches here and there in spite of nitrile gloves and the best intentions. Reduran, a hand cleaner specially made for dyers really does take a lot of it off, and a coating of clear nail polish helps protect fingers and toes a bit.
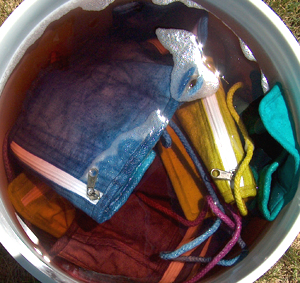
 We dye outside, and it gets messy, but cleans up pretty darn well, all things considered. The fixative, (soda ash) is only applied to the textiles and ribbons that are meant to be dyed, and with care, you can keep dye splashes and spills from being permanent where you DON’T want them. We do our fixative pre-soak with the water and soda ash in a plastic wading pool. Another is used for rinsing, and there are lots of buckets involved, for dip dyeing and for carting rinsed loads to the washing machine.
For a few days this week, my back yard will be an explosion of color!Here’s a list of the SPECIFIC colors, and you will note many blues! We print the list on labels using the computer, and then attach the labels to each bottle of dye as it is mixed up. Its very hard to tell the colors apart in liquid form otherwise. We also keep color swatches in labeled plastic bags for visual reference when dyeing. Its hard sometimes to recall WHICH blue is which! Labeling helps. Keeping track helps…and will also become part of blogs, articles, and a future book on dyeing. Books require many months and even years of preparation and gathering of information and images. This one probably wont see publication until 2009—but its on the list and the work rotation.
#03 Golden Yellow
#03A Clear Yellow
#05 Soft Orange
#06 Deep Orange
#09 Scarlet
#10A Chinese Red
#13 Fuchsia Red
#14A Hot Pink
#15 Amethyst
#17 Burgundy
#18A UltraViolet
#19 Plum
#19A Lilac
#20 DustyRose
#21 Teal Blue
#22 Cobalt Blue |
#23 Cerulean Blue
#25 Turquoise
#26 Sky Blue
#28A AquaMarine
#30A NewEmeraldGreen
#34 Rust Brown
#37 Bronze
#44 BetterBlack
#45 Jungle Red
#47 Chartreuse
#50 JadeGreen
#60 Lavender
#62 PeacockBlue
#64 Orchid
#65 Raspberry |
#70 SapphireBlue
#85 Seafoam
#96 Lapis
#97 Citrus Yellow
#105 Pewter
#108 CaymanIslandGreen
#111 Black Cherry
#112 Periwinkle
#113 GoldenBrown
#115 Eggplant
#117 Grape
#118 Yucca
#119 Red Violet
#312 Strongest Red
#510 Basic Brown |
May 7, 2007
 No, I don’t mean the song, I’m referring to the piles and bags and boxes of things I’m assembling to dye this week. We’ve got plain old white, summer white, navajo white, eggshell, offwhite, ivory, cream, even a bit of ecru. There are turned pieces of wood, bamboo beads, silk and rayon and cotton ribbons, silk chiffon and duponi yardage, silk handkerchiefs, cotton battenburg lace pieces, and cotton lace. There are circles and squares of silk stretched over wire, and there are doll bodies and fibers for hair in rayon, cotton, and wool! There are even a few more T-shirts. And that’s just MY pile; there are others coming to the Annual Dyeing Days. I’ll be taking a few pictures as we go and I’ll be sure to post so you can see the transformations.
 Much of the yardage, lace ribbons, and stretched pieces were purchased from Dharma Trading Co. and the doll bodies were found at Factory Direct Craft Supplies. I bought several dozen of the three, five and 8 inch bodies. These color up beautifully with the Procion Fiber Reactive Dyes, and can then be painted, beaded, and otherwise hand embellished. I attach polymer clay faces to some, and some I use paints to create faces.
Pre-made doll bodies are great as a starting point for those who get tired of sewing and stuffing.
 Of course, I like to do both–use the pre-mades and also sew, starting with my own pattern and my own dyed cloth. I’m putting together kits with the pattern, fabric, polymer clay face and a starter packet of embellishing items; beads, sequins, etc….click here to see some samples of the icondoll kits and more information about them. My favorite so far is the one shown in the header for this blog; I think I’ll keep her!
May 4, 2007
 When we do the annual Dyeing Days at our house, we get colorful from head to toe. All year long, everybody keeps an eye out for things that are composed of natural fibers that just might benefit from a jolt of new color. Tshirts are certainly a part of the pile, but we also dye jeans, shorts, socks and hats and other clothing.
Then there are the bolts of cloth, the spools of ribbons, the hanks of fiber and skeins of yarn. This year I have a bowl full of bamboo beads ready to get colorful. They started out as a placemat. They’ll soon be dyed to match silk and rayon ribbons and more. Bamboo and other wood and vegetable fiber items can be dyed beautifully using Procion Fiber Reactive Dyes. When my kids were little, we used their wooden blocks as part of the tied resists when we dyed a batch of clothing, and the resulting wooden blocks were really gorgeous. We liked the shirts too–but the blocks were the visual winner THAT year, and we hadn’t intended it at all.
 In addition to my wardrobe of colorful, comfortable cotton socks, shown above, here is a picture of 12 pieces of cotton cloth that were dyed a few years ago using bound dye resists like string, rubber bands, and wooden clothespins. (Those soaked up the color too, but werent as nice as the wooden blocks, which were made of nicer wood.) The cloth is 100% cotton jersey and cotton flannel.
I get my dyes and more from Dharma Trading Co. who have had “Fiber Art Supplies and Clothing Blanks Since 1969”. The selection of dyeable goods there is staggering. They have clothing and accessories, fabric by the bolt or yard, ribbons, banners, fibers and household items. All are in black and white, and can be dyed, painted, and embellished with a myriad of textile arts techniques. Take a look there if you enjoy color!
And if you do, be sure to visit Maggie Maggio’s Smashing Color site. Its a visual treat and a great informational source for artists who use color.