Jan 12, 2014
 I graduated from Front Range Community College with my Media Graphic Design degree, and I’m going to continue taking ceramics, jewelry, and other art class as I can afford them. We have some GREAT classes and instructors there, and I will stay on as a student or community member of the FRCC Art Club. We are seeking new officers there, as Josh and I are no longer full time students on this campus.
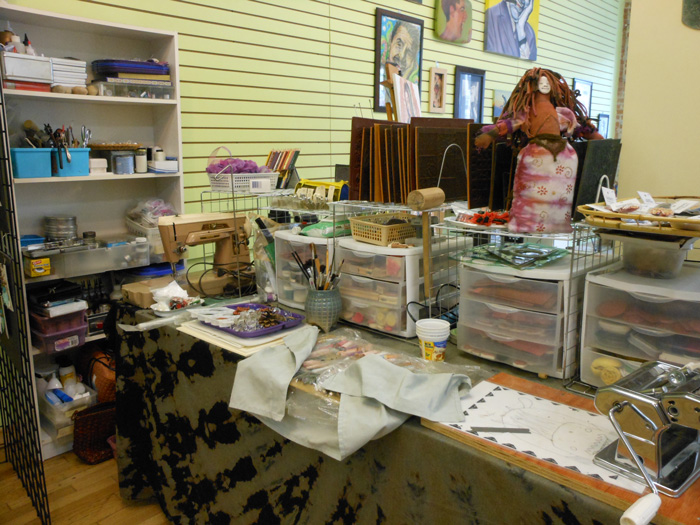
One of the things I’m doing in this new year is new art and instruction in a new studio space. Located at 364 Main Street in Longmont, the Kay Carol & Priscila | Gallery and Working Art Studios is home to 4 artists in residence, instructors, art groups and community organizations who meet there, and a gallery plus meeting/classroom/workshop space. I’m very fortunate to be there, and I have started a website there with a calendar and a page that lists upcoming classes and events.
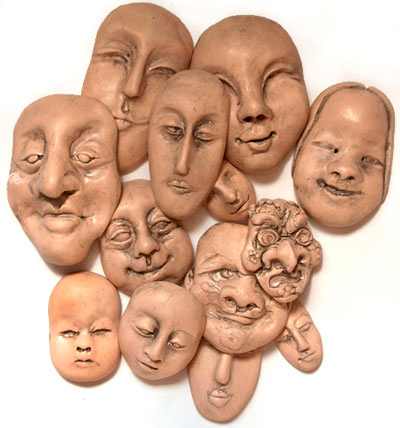
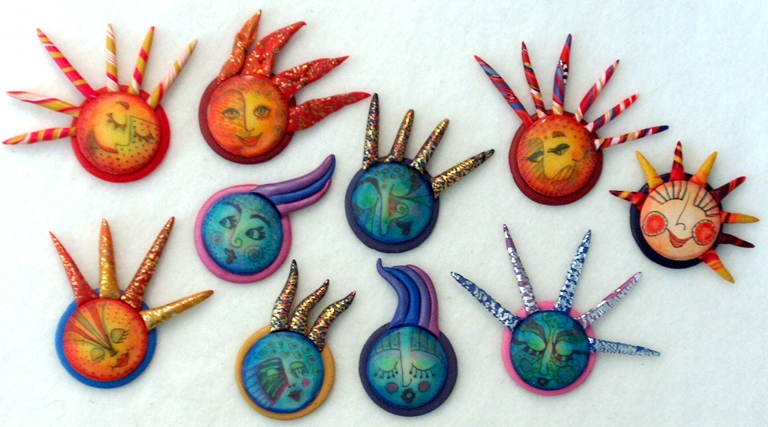
I’ve already had fun with several Spirit Doll sessions, and here you see the new faces and molds I made during the polymer clay face sculpting class. I’m looking forward to using them with polymer, ceramic, bronze and silver in the upcoming months. They’ll be useful in the upcoming Miniature Mask Swap, and in the month long exhibit of masks and art from my PolyMarket Press books in June. That may sound like a long way off, but as I have so many things to make and write about for upcoming books as well as hundreds of masks to mount into large frames, fabric to paint, jewelry to finish and more, it seems like only a few weeks away. However–now I have a workspace in which to do it!
Please do come see me there during open gallery hours 10:40am-4pm Fridays and Saturdays. Or, book a class with a friend or a group. Individual instruction is available as well–we are dedicated to spreading the creativity around.
Jan 1, 2011
 Happy New Year to all!
Last year was certainly busy–so chock full of Things To Do that I see I haven’t had time to blog since August.
I continued taking classes at Front Range Community College, and as part of that I learned more about ceramics, metal work and jewelry, WordPress and Drupal and other Open Source Code solutions, and finished the layout of my new book in Adobe InDesign. (The new title from Polymarket Press is “A Collection Of Polymer Clay Masks” and it is available now! Click here to order an autographed copy)
There are some GREAT classes to be had at community colleges, and I’m getting a lot of value out of the ones I take as a student.
Beginning in 2011, I’ll also be teaching 4 classes in polymer clay there through the FRCC Continuing Education program. Click here to see the listings.
I’m also excited to be an instructor at the fourth annual Cabin Fever Clay Festival in Laurel, MD. This year’s line up includes many wonderful instructors, and they are also honoring Judith Skinner for her contribution of the Skinner Blend and her work throughout the years. Having written “Adapting Quilt Patterns To Polymer Clay“ with her, I know first hand what a very talented and lovely person she is, and I’m very happy to see her recognized in this way. She’ll be teaching a class about ways to use the Skinner Blend, and I’ll be Making Faces! Teaching a class in sculpting faces, that is, and in making molds. We’ll even be shrinking our faces from the molds to make smaller versions–learn how at the CFCF this February 18-23. Click here for the Registration Form.
Aug 17, 2010
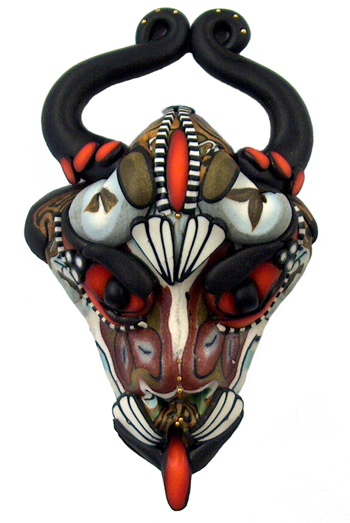 I’ve switched from the active production of masks, faces, and beads to taking pictures and editing, racing towards my deadline to put together “A Collection Of Polymer Clay Masks” and have it in print by Halloween. It can be done!!–but only if I put in some serious Photoshop hours. So that’s what I’m doing; going through miniature polymer clay masks I’ve made and collected since 1997.
In the process of participating in and hosting “swaps” for these among polymer clay artists around the world, I’ve amassed an amazing grouping of these little beauties–each measured to fit inside a 3 inch square.
After I photograph them, my husband will mount them all in framed pieces for display. We have one such piece with over 50 masks–now we’ll have several, and we’ll be doing a gallery showing along with the book when its all said and done. The book will also include photographs of full sized masks contributed by artists for this publication.
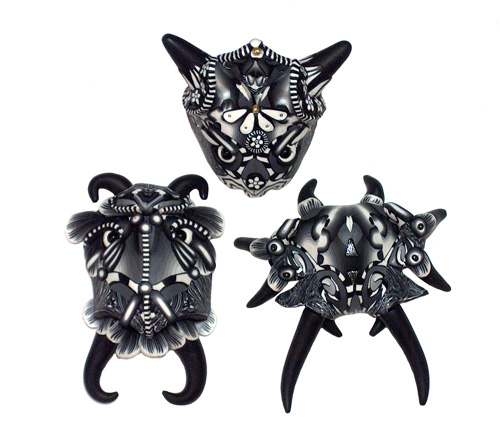
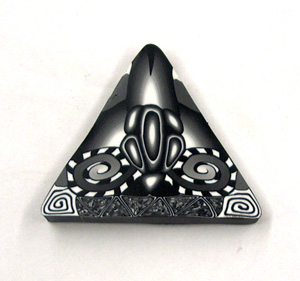 As I was going through my carefully wrapped boxes and bags of masks, and going through my file folders on the computer, I found images I took during a tutorial by Donna Kato and Shane Smith. They had been making mini-masks using scraps of canes, and didn’t have enough leftover bits at this point at our retreat, so they made a cane up special for it, and then Shane made some masks to show us how they were done. We each got a few inches of the cane to play with, and I got their permission to do a tutorial with the photos. I’ve got a “Making Faces and Figures” book planned out and in the works, but its not the one I’m working on now–it’ll be a companion to this one that will show how-to, and I that is NEXT years’ project. For now, here’s a look at the cane that started these masks, and the finished pieces by Shane. Thanks so much to Donna and Shane!
Jun 20, 2010
 Yesterday my friend Laura of LandS Glory Artisan Jewelry and I set up shop for the day at the Lyons Outdoor Market in the beautiful foothills of the Rocky Mountains here in Colorado. It was a gorgeous day, and we got to see some lovely art, listen to live music and do a few hours of beading on Spirit Dolls. Laura and I both enjoy seed bead embroidery and finding just the right bits and pieces to go into the dolls. There’s no pre-planned design; rather, these pieces start as a collection of bits and pieces and parts and then as they come together, other bits and pieces seem to show up and present themselves, demanding to be used. “As the spirit moves” is the way Laura and I both prefer to work, rather than using any sort of drawings plans or patterns (other than the basic doll body outline pattern that I drafted).
This project got started a few months ago, but is just now really starting to come together. I pulled a few items for this doll that included some green tie dye fabric (click here to see the slide show of textiles from our annual Dyeing Days, beads, a glass cabochon made by my fusing friend Mad Margie that I beaded, and I made a ceramic face and two ceramic buttons for her breast plate.
I cut,sewed and stuffed the body. My least favorite part is stuffing, and sometimes I just use pre-made cotton bodies that I dye, but only for smaller dolls. Its worth the turning and stuffing drudgery to get to use my own textiles… and since we are only talking about less than an hour, I somehow manage to get through it!<g> Then comes the fun part, hours of beading, adding dyed trims and other costume fun.
These dolls come together in several sessions for me, a few hours at a time. Usually as I’m working, I’ll find other pieces to integrate into the piece–like some beautiful teal dyed cheesecloth, or peacock feathers. (they’ll be part of her skirt and head dress, eventually—along with more beads!)
This time, I lost a piece. One of her busty-buttons went away somewhere in my workspace. I’d already sewed one on, so I looked and looked…nowhere to be found. I thought about making a new one to match. I thought about taking the one off and using something different. Then I realized, as I looked at her again and again, that she was just right the way she was, with only one. After all, sometimes these things happen. She’s beautiful anyway, and I choose to see her as just right, not as missing half a pair. How we look at things is just as important as how things look.
She has a sort of Amazonian Dance Hall Warrior style going on, and I love seeing her progress. I’ve got a lot still to do, with adding hair, shoes, sewing on her skirt, and sequins and beads for the other arm and leg. And of course MORE BEADS!! I’ll post another picture of her when she’s finished, and here’s how she’s looking so far.

Apr 9, 2010
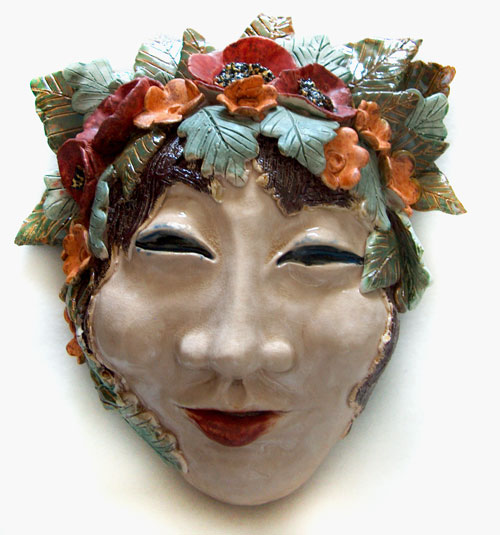 That’s a line from an old Cowsill’s song, an early Family Band that doesn’t get as much nostalagia air time as say, the Osmond or Jackson Family does now that everybody is all grown up. “She was the flower girl–well, I don’t know just why, she simply caught my eye….”
And here’s my own flower girl, a life-size ceramic mask glazed with cone-06 low fire glazes. I might have to do some more of these big masks as they are indeed fun, though pretty heavy compared to the miniature ceramic masks I make more often. And speaking of those, I am now arranging my summer schedule, and THIS year I’m taking the summer off from school to finish photos and editing for my new book “A Collection Of Polymer Clay Masks”. It is on-track for release this Fall. That’ll keep me busy, and I’ve also scheduled a trunk show and classes at Nomad Beads in Boulder where I’ll be selling miniature ceramic and polymer faces, beads, and more! Come see all the goodies on display Mother’s Day weekend, May 8-9 at Nomad Beads, 1909 9th in Boulder Colorado, and say hi; I’ll be there creating beaded Spirit Dolls and jewelry.
Dec 12, 2009
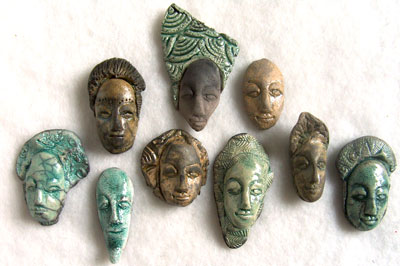
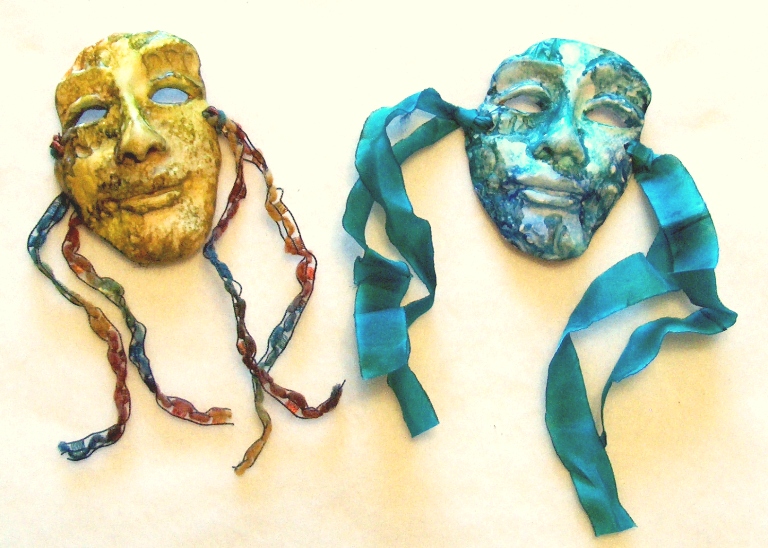
 These are some of the miniature faces I made in my ceramics class, raku glazed and fired. I like the fiery nature of taking these out of the kiln while still red hot and dumping them into the trash can with shredded paper, then coming back an hour later to see how they look!
I made a lot of different faces using some of my own silicon molds that I created using my polymer clay originals. Thats something else I really enjoy—the creative connections that different media allow.
 These first four faces are all made from the same mold, but look very different, partly because of the varying glazes. The fourth one has no glaze at all on the face, and the bare clay turns black when fired.
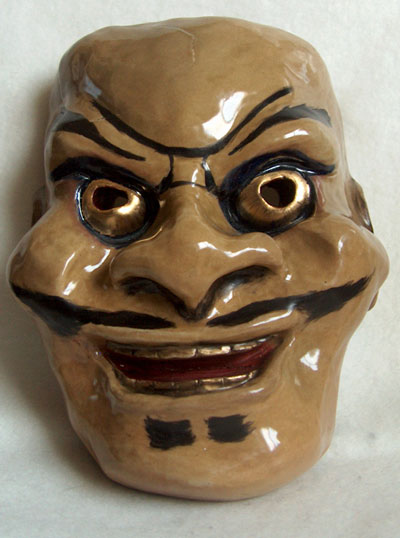
Here are two masks that are full sized replications of traditional Noh mask characters, the Maiden and the Fox God. The Maiden’s chin broke during the bisque firing, so I painted her with acrylics.
The Fox is glazed and details were added after firing, like the gold leaf around the eyes using a Krylon pen.
In addition to faces, I also got to try my hand at throwing on the wheel, and managed to create several cups, a teapot, three lidded vessels and two small vases. I had a great time in my ceramics class and look forward to taking ceramics2 next semester!!
Aug 1, 2009
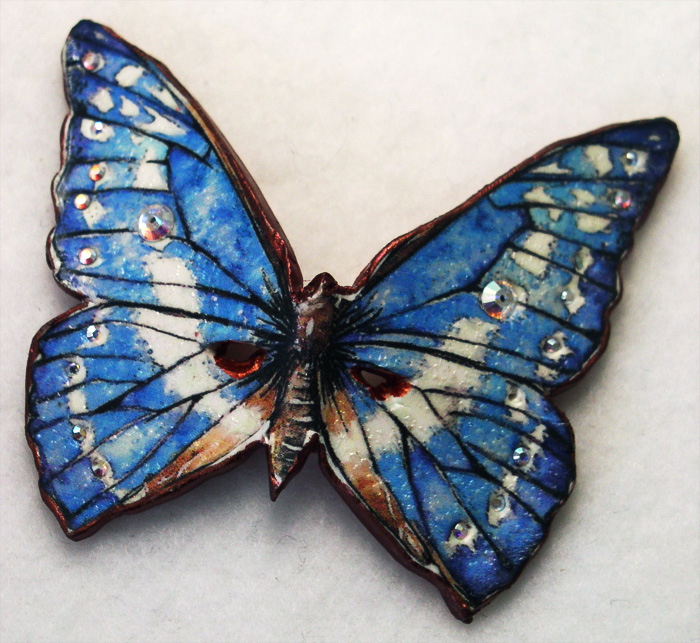 In the most recent polymer clay miniature mask swap (an annual event prized by all who participate) I not only traded my own masks for a collection of 100 wonderful miniatures made by others, I also received some great goodies as gifts!
Patty Barnes did an entire collection of vibrant butterfly masks and all ten were different.
 She’s using a transfer technique and embellishing with sequins and swarovski crystals. It was very hard to choose, by my efforts were rewarded with not just one, but an additional butterfly mask as a gift. It made it easier to let the others fly on to their new homes!
Rebecca Wells- Stout sent an additional mask as well, and I love the extruded red hair on this one! She’s beautifully fierce. Rebecca has used slices of canes and crystals to dress her up.
Rev. Byrd Tetzlaff sent along this colorful character that she calls “Charlie Chaplin on acid” and I can see exactly why she’d say that! I’m told the man had a great deal of energy and was a colorful character himself but not as much as this version, which I like very much!
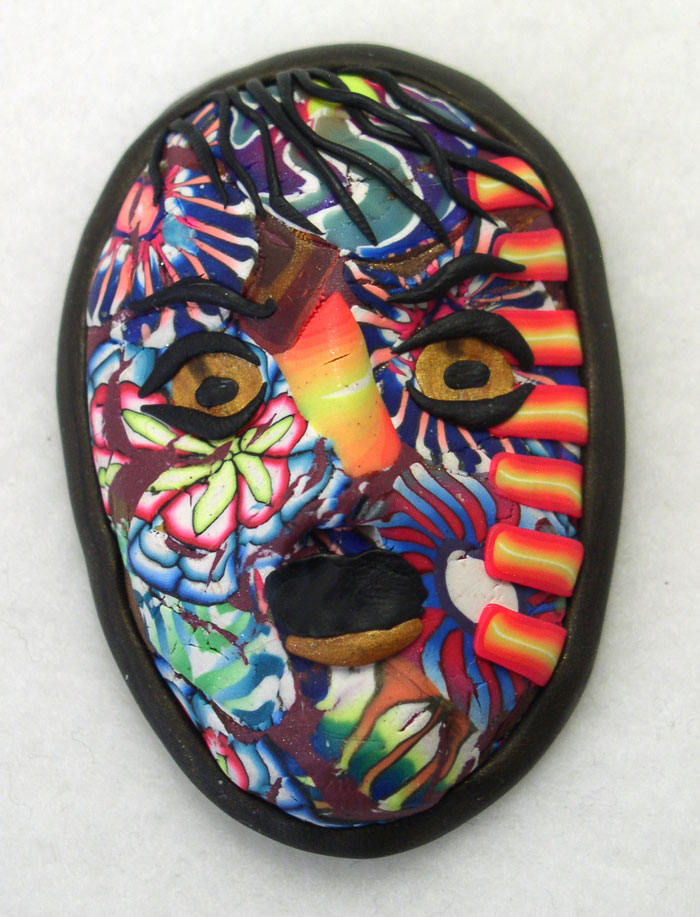 These are only a few of the hundreds of masks that I’ve collected from my years of making and swapping miniature polymer clay masks. Next up for Fall semester at college I’ve arranged an independent study course to combine my Adobe InDesign, Photoshop and Illustrator classes and skills into creating new books, and the mask book is one of the projects involved. So after having a delay of more than a year, I’ve got the tools and the skills and (hopefully) the time all coming together to allow me to work on this long awaited project!! Stay tuned for more developments as they happen.
Jun 22, 2009
 Click the pic to see a larger version.
These whimsical wonders are 10 more miniature polymer clay masks from the 2009 Internet Mask Swap. Created by Ellen Bellenot Rumsey, these little works of art are each small enough to fit in a three inch square. She’s used an amazing array of textures and colorful pearl-ex powders. The mica in the powders and in the gold polymer clay give it all incredible glowing lustre.
I’m taking a few hours away from my school work to catch up on taking pictures from the Mask Swap and from the Dyeing Days. These are two huge annual events that take around a week to put together and somehow managed to both happen within a month of each other this year, and along with going back to school full time. We got tremendous amounts done and both events went very well, but I havent had any time to chronicle and share the results.In fact, the massive amount of reading and computer time I put in for the 4 classes I’m taking leave my eyes feeling as though they look very much like the ones in these masks.
I’m going to play hooky from homework once in a while and get some pictures up, so look for more soon! IS it playing hooky to take pics and edit them in photoshop when your classes are in digital photography and photoshop2? hmmm, perhaps I should take an ethics class and see if my homework there answers the question there…
May 16, 2009
Whew! What a huge undertaking, and what wonderful, amazing small rewards! I mean small as in “miniature”, or specifically “fits inside a three inch square” (more or less). Several years ago I was invited to take part in a Polymer Clay Miniature Mask Swap by Sherry Bailey. I was in one of the several groups, and sent in my masks. Shortly thereafter I got my box of goodies, and kicked myself all around the room for not having been in every group—there were pictures included and I missed out on some real gems. I vowed never to repeat THAT mistake! And also to be in another mask swap ASAP. I ended up taking over the job and expanding the number of participants (my artistic greed knows little about bounderies or sensible work loads in some areas…)
So for the last few years, there’ve ben annual swaps that attract wonderful artists who ALSO want collections of these minimarvels. When announced, interested parties sign up for one, two, or three groups of ten. The SwapMistress (thats me, in this case) keeps track of who signs up, and fills the groups. We do a total of ten groups of ten people. For each group, the participant sends in ten masks, all signed/with a card and bagged. When they are all here, my husband and I alphabetize the incoming boxes for easier finding, and then start filling up Group Bags by lining up the brown paper lunch bags. Starting with 10 bags marked “A” we check the All Powerful List and take out each participant’s set one at a time–If Mary is in group A, we put one of her masks in each bag, and the same with the other 9 participants. At the end, each person in Group A will get a Group A bag mailed back to them, containing one of their own and one of each of the other 9 people’s masks. Sounds fairly simple, right? It kindof is…except then we do it for B, C, D, E, F, G, H I and J groups. This generally takes a full day–there are a thousand little masks. Then, the next day, my dear sweet hubby and I start packing boxes. If Mary was in Group A, D and F, we pull an A, D and F bag and put it aside for her in a grocery bag marked with her name and the groups (cross checking is pretty important!! ) with the mailing lable and postage she sent. This also takes a day or so…and then there’s the packing and sealing of the boxes, and three hours or so at the Post Office.
I, being the SwapMistress and therefore In Charge, get to violate the “three groups” thing and be in ALL ten groups. This is great because I get to keep one from every person in every group–no more missed gems!! Except of course for the people that make it harder to choose by sending ten that are all different for their sets. Then I still only get to keep one, but I DO have the opportunity to unbag and photograph them all, then rebag before putting them into the group bags. So I say it again—its a huge undertaking, but OH-so-worth-the -effort. I end up making and giving away 100 miniature masks, and getting 100 masks to keep. All are individual works of art showing a vast array of techniques. All have miniature size and polymer clay in common, and “masks” as a theme, but all are astoundingly different interpretations of that theme. I will be photographing the collection that I have gathered over this decade, and putting them in a book, but I’ll share a few of them here on this blog, and you can see some masks from previous years here.
The group of ten Warm and Cool Masks shown above was sent in by Karen Cowles. The two masks below made using the alcohol inks on polymer clay were sent in by Nina Owens. The light was fading and I only had time to take a few pics. I took more the next day, so watch for future posts! You can also see more at other participants’ blogs like these by Laurel Steven and Tonja . Click the pics to see them larger.
Aug 17, 2008
Book Cover–Making Faces Molds & Forms, originally uploaded by sarajane helm.
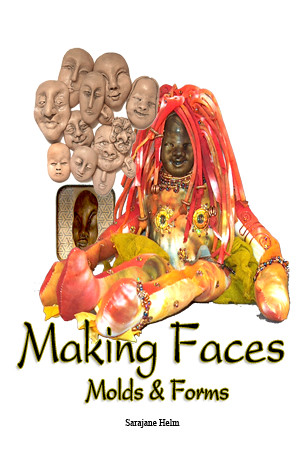
This is the front cover of my newest book–“Making Faces Molds & Forms”
It is a how-to guide to sculpting faces from polymer clay and using 2part RTV silicones to make molds; and thats just a start! Then I show how to use the molds to make many different faces, and use them in doll making, altered art, collage, jewelry, and more.
This book will debut in late October 2008, in time for the International Quilt Festival in Houston Texas.
(Its ALMOST finished!!)
Jul 25, 2008

I just returned from the Tougaloo College Summer Art Colony in Jackson Mississippi. This year was #12 for this week long celebration of art. Its also the second time that I’ve been there as an instructor. Our class made masks, spirit dolls, icons and boxes, beads and more…all with polymer clay. Click here to read more about it and follow the links to see what we made!
The mask shown above is a full sized domino style mask. We also made a lot of miniature masks, making the original sculpt and then creating silicone molds using Amazing Mold Putty by Alumilite. The bacground in the banner is a digital picture of the night sky with full moon as sseen from campus. The picture didnt come out all that well–but parts of it are beautiful, and as instructor Carmen Hathaway (Digital Dreams) tells her students, the original photograph is just the starting point. I would have eagerly taken her class–or any of the other classes given by VERY talented instructors. Seeing what other artists do, and speaking openly with them about making and marketing art is tremendously inspiring and helpful. I had a wonderful time at the Artists Colony, and I encourage everyone to spend some time this summer viewing the work of other artists and making more of your own!
Jul 25, 2008

I went to Jackson Mississippi and conducted a week long seminar at Tougaloo College Summer Art Colony where we explored the uses of polymer clay. We had a wonderful time!
The only “downside” to the week were travel oriented, and even that wasnt too unexpected or awful. My luggage is ALWAYS gone through, so I’m careful to put all my blades in metal tool boxes (lunchboxes from
American Science and Surplus ) that have a flat magnet on the lid. Meant to hold a business card, I put these magnets on the inside of the lid, and they do a great job of holding all the extremely sharp blades flat to the surface so that nobody gets hurt. The pointed sticks, though, people will just have to watch for themselves when rummaging through my things. And the multiple X-Acto knives, and the cookie cutters…. Ok, so I have potentially dangerous luggage. I find it to be MOST dangerous when I’m hauling both 49 pound check-in bags and my 30 pound carry-on and the ten pound purse by myself across the concourse, trying to make it to the next stop. A pasta machine can leave a pretty good bruise, if you arent carefull! But the BIGGEST danger was to my luggage itself this time. After 5 years of vigorous travel experiences, my favorite toolbox got a little smashed. Its fixable—just a few pieces broke, includint the nose of the face. I was wondering when it WOULD break, actually! We tell students about “The ToyBox Test” in which I rated the strenghths of various brands of clay by making miniature teapots and putting them in my son’s toybox with the tonka trucks, etc. and then checking on them several weeks later. The FIMO and CFC (this became Premo) teapots were OK, the Cernit teapot had a ding in its spout, and the Sculpy teapot was some colorful chunky dust on the bottom of the box. This test can also be done as The Bottom Of The Purse Test for those without a toybox and helpful assistants. Or, The Airport Test! This Premo clay made it through quite a few trips before coming to its smashing conclusion. And since I felt a little bashed myself (can they MAKE those airplane aisles and seats any narrower??) I do understand!

Jun 6, 2008

We’ve had rain all the first part of this week, and we needed the moisture. It is beautiful in a sunny way today, and we’re starting into the annual dyeing days! Today is prep day–I’ll be mixing dyes, and getting them into the bottles. I just ran off the sheets of labels for the plastic bottles. This year we have:
#03 Golden Yellow
#05 Soft Orange
#8A Pagoda Red
#09 Scarlet
#13 Fuchsia Red
#14A Hot Pink
#15 Amethyst
#18A UltraViolet
#19 Plum
#19A Lilac
#21 Teal Blue
#23 Cerulean Blue
#25 Turquoise
#27 Midnight Blue
#28A AquaMarine
#37 Bronze
#44 BetterBlack
#45 Jungle Red
#47 Chartreuse
#50 JadeGreen
#60 Lavender
#62 PeacockBlue
#64 Orchid
#96 Lapis
#97 Citrus Yellow
#105 Pewter
#111 Black Cherry
#112 Periwinkle
#113 GoldenBrown
#115 Eggplant
#118 Yucca
#312 Strongest Red
#510 Basic Brown
 We use Procion MX series coldwater fiber reactive dyes. We’ve found that labeling the bottles after mixing them up makes it easier to tell what’s what, when you have lots of colors. We also have bagged swatches (that’s the picture at top) so that we know how the color is going to come out, mostly.
Another good tip I’ll share with you is to mix your dyes with water and then pour through a coffee filter into the bottle, that way those pesky little red or turquoise spots are not a problem.
 This year I’m dyeing lots more pieces of turned wood, because I LOVE how last years batch turned out. No ribbons this year–I did a lot of them last year.
They went into the current crop of Spirit Doll Kits along with the cotton and silk fabrics, and polymer clay faces. I’m selling them on Etsy.comwhich is an on-line site presenting handmade and vintage items. I’ll be adding lots more items in the upcoming weeks as I clean out the studio and help fund upcoming shows and projects.

I’ll also be dyeing some t shirt dresses and shorts for my own summertime wardrobe, and backdrop and curtain fabric that will be used in the Aunt Acid Show. They WERE beige muslin–how drab!! They were great when I did out door shows and needed backdrops that did not compete with the displays. But for this particular show, we can take LOTS of color. I’ve been gluing mosaic set pices, and things are coming along splendidly in a visual sense. Now for another big dose of color, and we’ll be onward into the Summer of More Love…and we happen to love art and music and humor, so I’d say these good times to “Be Happening”.
Speaking of summer time fun, I’ll be teaching a week long seminar on using dyed fabrics and polymer clays to make spirit dolls, icons, and masks this summer at Tougaloo College Summer Art Colony. July in Mississippi is time for some HOT ART!!

Feb 27, 2008
 I’ve been having fun playing with face masks, dolls, and beads. All the cotton jersey that I’ve previously dyed has been cut into fat quarters for making into doll bodies and spirit doll kits. I’ve got some premade bodies that were dyed as well, and I’ve put together dozens of kits. Now I’m ready to make more sample versions so people can see what can be done with the kits. Here’s the start of one floral doll. She still needs lots of beads though! It is important to remember that spirit dolls take several sessions to really come together.
 It all takes a long time….but eventually it’ll all be organized together into a how-to book and a lovely display of dolls, kits, and polymer clay faces. This book comes AFTER the new “The Art Of Polymer Clay Masks” in its release date.
 I’m working on the text and pictures at the same time. It’s making for a very busy winter, when you also factor in my “Day Job” building web pages for other artists, musicians, and local businesses.
Feb 10, 2008

I just put up a tutorial page about using my digital camera, a portable studio box from Digital Concepts, and Adobe Photoshop. I use one of Melanie West’s miniature masks from the swap last year to illustrate the setup and the process of fixing images for better use.
 This is the setup that I used to do photos throughout the book “Adapting Quilt Patterns To Polymer Clay” and also for photos on my webpages and in upcoming books.
I’ve been doing a lot of work lately taking photos for my own business endeavors including The Polyclay Gallery, and for other clientele locally. Practice and camera familiarity really do help to improve the skills involved and to get me more usable images. And having good lighting sure counts for a lot!
But truth be told, for me it is the Adobe Photoshop program that lets me really make the pictures look much better. No matter what I’m shooting–beads, dolls, jewelry or step-outs to show the process in a tutorial, it is all made better looking with Photoshop. Cropping, resizing, and image editing are only the tip of the iceburg when it comes to this powerful set of tools.
 The Adobe Photoshop Elements version contains everything most artist would need for use. Versions like CS2 or CS3 are more powerful by far, but contain much that may not be needed by the individual who just wants to document their work beautifully. Professional graphic artists of all sorts can enjoy a lot of potential in presenting their work if they have good digital images.
I really enjoy my digital camera, whether using it outdoors for the big wide world or indoors for beads, jewelry, masks, and how-to tutorials.
There’s a lot more to come; I’m working on several projects at once. Do take a peek at some of the photos on the links here!
Jan 27, 2008
 “What Mask Today?”
Thats the question that is posed in Valerie Aharoni’s beautifully articulated miniature polymer clay mask. Shown here in closed and open versions, Valerie’s mask has a variety of different looks, depending upon how it is arranged.
Submitted to the Internet Miniature Mask Swap 2006, hers is a colorful take on an age-old issue. It’ll be included in the upcoming book “The Art Of Polymer Clay Masks”, due out later this year from PolyMarket Press. There are hundreds of masks included in the collection, and most, like this one, measure less than 3″x3″ and are made of polymer clay. I’ll be featuring them here in this blog as I continue to work on the book, and you can also see more at the other side of this Creative Connections blog and at the Polyclay Gallery website. I’d say I’m about one third of the way done with photographs. If only seeing them all like this didn’t give me such an urge to go hide in my studio and make more!

Jan 27, 2008
 It is Winter time, windy and cold, and the wolf is at the door….
Well, not precisely at the door. This big bad winter wolf is a picture of a miniature mask made by Patricia Edmonds using polymer clay, measuring less than 3″x3″. And instead of at the door, it is in the folder with the pictures that have been photoshopped and are ready for inclusion in the new book “The Art Of Polymer Clay Masks”. But before I can get onto the job of laying out all the cool pics onto the pages, I have about another 200 to photograph. So I’ll be busy for quite a while,  staying warm in the studio with the help of the lights!
Shown next is a miniature polymer clay mask created for the swap by Bernadette Mangie. This Little Red Cap has no fear of the Wolf; she’s used to them!
These masks are both from the Internet miniature mask swap 2006. Do remember that you are seeing them at close to actual size!
There were over 90 in that swap alone, and I have a lovely collection now that reaches back to 1997. Before I can host another one of these swaps, I am pledged to catalogue the collection. Then Bryan will mount them all into framed groupings.
Jan 6, 2008
 Work is well started on photographs for this years new book “The Art Of Polymer Clay Masks”. There are somewhere around 350 miniature masks in my collection from a decade of Miniature Mask Swaps with my claying friends on the Internet. I’ve had them all tucked away awaiting the time for photos–and thats now! I’ll be posting more as I go with peeks at masks from the upcoming book. Most of the masks fit inside a square 3inches by 3inches. There will also be photos of some full sized masks in the book.
Its exciting, unwrapping all the little goodies from years past and taking the pics–but its daunting too. There sure are a LOT to go!! I’m lucky that each is different and its a fun, visually interesting and mentally challenging project, because it’ll be consuming most of my time for the next several months.
 The mask seen above is only a few inches tall and made of polymer clay by Sherry Bailey, who started the first Internet Miniature Mask swap in which I participated back in 1997. The mask seen below is also very reminiscent of a treasure from the past–but made last year by Jeanne Rhea.
Dec 30, 2007
 The Christmas and Solstice Holiday decorations are all put away into the closet for another year, and I’ve even straightened up and vacuumed my workspaces. (Seeing the floor is a rare event).
That includes both the polymer clay and sewing room and the computer and photo space. Both are set for some serious production pushes.
I’ve got the new database for this book all set up and the digital photo work station is up and running. (More about that in a later post).
I’m going through all the submitted images of polymer clay masks that have been sent to me so far, and photographing the masks from many years of Internet Miniature Mask Swaps.
In the next few months I’ll be archiving the work of many artists and more than 300 masks. I wont’ know the exact count till its all done! And when all the pictures are taken and all the information documented, I’ll be more than half way to the next book “The Art Of Polymer Clay Masks“. Due out in June of 2008, I’ll be putting up images of some of the little lovelies (and full sized ones too!) that will be featured in the book.
Shown here is “Blue Ice Mask” by Linda Weeks, featuring polymer clay, feathers, and rhinestones. This is just one of the lovely mask images she’s submitted for the book, and its very appropriate for the weather today!
Oct 22, 2007
 Judith Skinner and I are VERY busy getting things prepared because we will be doing the Houston International Quilt Festival November 1-4 at the George R. Brown Convention Center in Houston Texas. All sorts of new faces, jewelry, kits and beads are being created and packaged for sale. I’m having a particularly good time putting together Spirit Doll Kits, and utilizing my stockpiles of hand dyed silks, cottons and rayon in ribbons, lace, and cloth, and building up each set around a miniature polymer clay face mask.
So far I’ve got 75 kits in 3 different sizes and styles! (And I have one week to finish all the packaging and packing…eek!) Some have cotton jersey cloth thats been tie-dyed, or cotton or silk handkerchiefs or cotton plush velour; with three different sizes and pricepoints there’s lots from which to choose! Visit the polyclay.com website to see some of the others.
If you are in Houston at the start of November do come and see us at the Quilt Festival, where we will be in our PolyMarket Press booth, #1951. In addition to all sorts of polymer clay beads and embellishments, we’ll have our book “Adapting Quilt Patterns To Polymer Clay” and also the new book, “The Business Of Professional Art”.
Sep 22, 2007
 I am currently seeking high resolution, professional quality digital images of polymer clay masks for review and possible inclusion in The Art Of Polymer Clay Masks.
This new book is scheduled for release in June 2008 through PolyMarket Press.
Images need to at 300dpi resolution. Masks can be miniature or full sized, wearable or wallhanging, but must feature polymer clay as a primary material.
I will be showcasing my accumulated collection of miniature masks from previous Internet Mask Swaps as well as showing larger pieces by myself and by other artists. I have more than 350 already, but more is better. This book will be pictures and some information, with another book taking care of how-to aspects of making masks. This book is meant to spotlight the art itself–so send in pictures of your very best masks.
The deadline for sending images to me on a cd for review is January 15th. Email me for the mailing address at sjpolyclay@comcast.net if you are interested in participating. CDs WILL NOT BE RETURNED. All accepted artwork will be credited to the artist by name in the printed book.
Thank you in advance for your potential interest in this project!
Sep 2, 2007

There I was, standing in the aisle at Hobby Lobby looking for the mold making product I needed to locate for my students in the Making Faces And Molds class that I’m presenting today at our local bead store. And when I found it, I saw a familiar face–several of them in fact!
I recently did a photo tutorial/project and some promotional samples for the company that makes Amazing Mold Putty. I have the full tutorial on my website for those that want to see how its done.
I had not yet seen the store promotional piece in its final print form until I saw it in the aisle, and I have to say, they did a wonderful job! I’m very pleased with how good it looks. And, its always great to see your work in print out in public! Take a look for yourself at Hobby Lobby in the aisle with the polymer clays and tools. Take a little look here; I’ve reduced the scans to fit this blog.
 I’ll be showing all sorts of pictures and faces in the books on miniature masks and faces that will be coming out NEXT year on PolyMarket Press. What was planned as one book grew into two.
One is a photo-book of hundreds of miniature polymer clay masks and also larger scale masks.
The second is be a how-to book. Look for “The Art Of Polymer Clay Masks” and “Making Faces” in 2008.
PolyMarket Press is my small but growing publishing empire. Judith Skinner and I created our debut book last year, “Adapting Quilt Patterns To Polymer Clay”. We each have plans for more books to come, so you can tell that we enjoyed the experience enough to do it again!
Jul 30, 2007

oi! What a summer full of work its been so far. I’ve been so busy I haven’t had a minute to stop and post here in a while. The garden is going full tilt–all the lettuce is gone and the raspberries are done for the season. (But we froze 16 lovely bags full which will be great in muffins later this year and next winter too.) Now my daily garden time is spent watering and pulling the weeds which tend to thrive wherever you water here in Colorado. We don’t have a big farm or even a little one, just a backyard in a small town with a few small plots and a few big black pots that trees once arrived in from a nursery. We recycle and reuse as creatively as we can…with the addition of some good dirt and even better compost from a local dairy, we have thriving tomatos, peppers, cucumbers, herbs and 5 kinds of squash plants!
In addition to an hour or so a day in the garden, I’ve been growing lots of website pages and blogs, both for myself and for other clients. That includes helping my husband with his musical podcasts and blogs, though he’s becoming very self sufficient at it these days. He’s got quite a bit of original music up for listening, and more to come. I’ve been hearing and enjoying it for years; now its YOUR turn!
I’ve been busy sorting and gathering and bagging beads too, preparing for show and for upcoming classes, kits, and bigger projects like the next books. Polymer clay masks are all ready to be photographed and mounted this week, with the frames prepared and databases for the artist information all prepared–its a serious lot of work just to get ready for some projects. The amount of effort that went into making all the masks is enormous, but its also been spaced out over five or six years and done by many different artists who participated. That sure helps!!I’m really looking forward to putting this one together, and its happening now, this very week. And for the next several months as well! Bryan will be mounting and framing the masks as I finish their photos. As I sort through them now, I’m really struck again by how wonderful they all are–so many extremely cool little pices of art! Shown at top are two from the 2006 mask swap made by Karen Cowles. Check out her website at www.choosetothrive.com
Right alongside of that giant miniature undertaking is production of new beads and new polymer clay faces and more masks! Before we show off the masks on the walls and in a new book, I’ll be traveling back to the ol’ stomping grounds in Ohio in September, where I am very pleased to be offering classes in Bead Making and Millefiore Caning through the local polymer clay guilds. More about that in my next post.
I’m also very excited to say that work is well underway on the many aspects of preparing for our “Really Big Show”, as Ed Sullivan used to say. Scripts, songs, websites and blogs, puppets and even the theatre itself all have to in place and running before we bring up the curtain. As every one who has ever participated in theatre of any kind knows, there are years of work that go into a single hour’s performance, and its done by many hands and with the use of all sorts of skills. We’re close to being able to share the progress, and thats what’s keeping me pretty busy at the moment. Visit again soon and find out more!
Jun 25, 2007

I’m going to play with dolls today, and let my project dreams roll around in my head while I do the day’s tasks early so that I can get to the parts that are more fun. There’s something about the heat on long summer days that really encourages day dreaming, memory drift,  and imaginative play. Perhaps its because its just too darn oppressively hot when its in the 90’s by midmorning to be comfortable in the physical world. Maybe brains let the thoughts sputter around more freely when warm, like kids playing in sprinklers. I don’t know and its really too warm to worry about it…maybe thats why its so much fun to hole up with a good book or a project in the shade! Especially if you get the heavier work done early–then its perfectly alright to spend a few hours on pursuits a but more whimsical!Not that I’m going to be entirely frivolous–the play is also work, but “funner”, as any kid would know. There are two big little projects to do this summer, and I’m making my way slowly with both. There are hundreds of miniature masks to be photographed for the upcoming “The Art Of Polymer Clay Masks” book, and its a perfect season for doing that–lots of light!

The other miniature project is another store. Last year saw the production of “Pieces” a miniature fabric store made and stocked with polymer clay. In it, I had the fun of combining my love of textile designs, miniatures and set design, quilts, and polymer clay. I had lots of help, too, as other polymer clay artists helped stock the shelves with miniature “bolts of fabric”–which were all polymer clay. Even the plants are polymer clay. It was originally intended as a display for use in the book “Adapting Quilt Patterns To Polymer Clay” by Judith Skinner and me. That was the official excuse—but it was also SO MUCH FUN!!! I still enjoy shuffling the hundreds of bolts into different piles, and someday they will all become parts of a wall hanging…but not today!
 Today, I’m thinking about the NEW store, which is in the same scale (1/6, which is also called fashion doll scale and also 1’=2″. click here for a page with more information about miniatures and a scale conversion chart). If Barbie were a quilt maker, she’d shop at “Pieces” for her fabrics. And, if she were shopping for things like cosmetics, perfume luggage, and fashionable accessories, they’d all be in some fabulous storefront.

 So here I am, dreaming of little perfume displays with framed antique labels for boudoir decorating pleasure, tiny luggage with labels from far away places and more. I’m also being practical about it–the luggage is to be made with polymer clay and formed around cookie cutters and petit-four cutters, and the perfume bottles made with beads and a bit more clay..I’ve been sorting the actual beads and will do more later! (There are kits and a how-to in the making)
The perfume labels for both bottles and art come from the same source as the luggage labels. I am thrilled to have at hand cd’s of vintage art from Stan and Russell at Twisted Papers. They have antique travel ephemera, vintage labels, and textile designs all on cds at very high resolution for artists to print and use. Because I can size them to different scales, they have all SORTS of uses!!
“Vintage Label Collection Vol 1: Perfume Health and Beauty Products” is a personal fave, as is the vintage travel series. I’m showing you just a couple of the fabulous pics that I’ll be using in making displays and products for my new little store–there are 306 images available on this cd alone!!! I have plans for transfers, charms, collages—lots of ideas for a hot summer day. See some of the travel labels and a bit more info about this treasure trove here at a previous blog post.
Jun 1, 2007
 We made it through the Big Dyeing Event and it all worked out very well. My hands and back are really tired, but the backyard has certainly been well watered with all the rinsing.
The ribbons, lace, scarves, cording, fabric, hats, bamboo beads, wooden pieces and tshirts have all been dyed, rinsed, and washed, and now I’m rolling and tagging and getting things ready for sales.
 Next up on the “to do” list is making more polymer clay faces to go with all the great new colors, and putting them together into Spirit Doll kits–I’m going to the Houston International Quilt Show again this year in the Fall, and so this Summer is going to involve a Big Production Push. Lots of things to get done….Musician Bill Nelson says in song “People who do things, are people who get things done”.
I’ve been busy writing articles for Belle Armoire and other magazines, and working on books to the point that I’ve been spending less time than I need to on the actual polymer clay work, and I’m really looking forward to getting back to that!
 Though I’ll be photographing as I go, because the dyeing process is part of one book, and the polymer clay masks are part of the next one up–“The Art Of Polymer Clay Masks”.
I have to work pretty steadily on that for the next two months in order to make it happen this year. It will be self-published through Lulu.com as is “Adapting Quilt Patterns To polymer Clay” with Judith Skinner.
I’m still working on migrating this site to the one that I maintain myself, but I havent figured out how to get tags to work there as they do here–in the meantime, I’ll make use of both lobes of my brain and both ftp sites and maintain both for a bit! Please do visit “the other side” to see the features available there that aren’t here.
May 14, 2007

Time to turn to another set of projects–we have made a timing adjustment to the dye schedule, and are waiting another week. When the white cotton crochet hats with wired brims arrived last week from Dharma Trading Co. and were tried on and instantly admired by both of us, my friend and I realised we had a math problem. That’s when 2 Hats+46 Dye Colors = Another Order (placed that very day). So our dyeing days have been postponed but we’ll be better prepared in another week, as the pale piles accumulate.
A creative mind is able to adapt to a change in scheduling. Just turn to a different project; there are ALWAYS at least ten different Things To Do visible in the corner of my mind’s eye, and thats because they block the view of all the rest of the list. A little bit done here, a few hours of concentrated effort there, and a wide variety of things do– eventually–get done.
 I’m going to do a bit of polymer clay work today, and put away the messes I’ve made from taking things out for classes at my local bead store, and have some fun! That includes the glitter and metal leaf, the clay and the Jones Tones foils. One of the uses of little bits and scraps of clay is to take small amounts of colored clay and add metal leaf. This is a VERY thin sheet of metal, and can be found in silver, gold, copper, and anodized color bursts, swirls and patterns. It sticks to raw clay without any adhesive.
 Place it all on a solid color background, roll it out, and you have a multi-colored sparkly confetti-style design. Portions of this were placed on chunks of polymer clay and pressed into a mold of my own making.
Today I’m going to take some actual clay time where I can listen to music and make faces. These will go in the spirit doll kits. The faces shown here are from the 2006 Miniature Mask Swap. Its just one of 90 designs that were traded between polymer clay artists. AFTER the dyeing happens, I’ll be taking pictures of them all. That’s too big a project for the next few days, but it is the next on the list. But for today, I’m going to putter around the studio a bit!
May 14, 2007

Time to turn to another set of projects–we have made a timing adjustment to the dye schedule, and are waiting another week. When the white cotton crochet hats with wired brims arrived last week from Dharma Trading Co. and were tried on and instantly admired by both of us, my friend and I realised we had a math problem. That’s when 2 Hats+46 Dye Colors = Another Order (placed that very day). So our dyeing days have been postponed but we’ll be better prepared in another week, as the pale piles accumulate.
A creative mind is able to adapt to a change in scheduling. Just turn to a different project; there are ALWAYS at least ten different Things To Do visible in the corner of my mind’s eye, and thats because they block the view of all the rest of the list. A little bit done here, a few hours of concentrated effort there, and a wide variety of things do– eventually–get done.
 I’m going to do a bit of polymer clay work today, and put away the messes I’ve made from taking things out for classes at my local bead store, and have some fun! That includes the glitter and metal leaf, the clay and the Jones Tones foils. One of the uses of little bits and scraps of clay is to take small amounts of colored clay and add metal leaf. This is a VERY thin sheet of metal, and can be found in silver, gold, copper, and anodized color bursts, swirls and patterns. It sticks to raw clay without any adhesive.
 Place it all on a solid color background, roll it out, and you have a multi-colored sparkly confetti-style design. Portions of this were placed on chunks of polymer clay and pressed into a mold of my own making.
Today I’m going to take some actual clay time where I can listen to music and make faces. These will go in the spirit doll kits. The faces shown here are from the 2006 Miniature Mask Swap. Its just one of 90 designs that were traded between polymer clay artists. AFTER the dyeing happens, I’ll be taking pictures of them all. That’s too big a project for the next few days, but it is the next on the list. But for today, I’m going to putter around the studio a bit!
 I graduated from Front Range Community College with my Media Graphic Design degree, and I’m going to continue taking ceramics, jewelry, and other art class as I can afford them. We have some GREAT classes and instructors there, and I will stay on as a student or community member of the FRCC Art Club. We are seeking new officers there, as Josh and I are no longer full time students on this campus.


 These are some of the miniature faces I made in my ceramics class, raku glazed and fired. I like the fiery nature of taking these out of the kiln while still red hot and dumping them into the trash can with shredded paper, then coming back an hour later to see how they look!
 These first four faces are all made from the same mold, but look very different, partly because of the varying glazes. The fourth one has no glaze at all on the face, and the bare clay turns black when fired.




 We use Procion MX series coldwater fiber reactive dyes. We’ve found that labeling the bottles after mixing them up makes it easier to tell what’s what, when you have lots of colors. We also have bagged swatches (that’s the picture at top) so that we know how the color is going to come out, mostly.
 This year I’m dyeing lots more pieces of turned wood, because I LOVE how last years batch turned out. No ribbons this year–I did a lot of them last year.

 I’ve been having fun playing with face masks, dolls, and beads. All the cotton jersey that I’ve previously


 This is the setup that I used to do photos throughout the book “Adapting Quilt Patterns To Polymer Clay” and also for photos on my webpages and in upcoming books.
 The Adobe Photoshop Elements version contains everything most artist would need for use. Versions like CS2 or CS3 are more powerful by far, but contain much that may not be needed by the individual who just wants to document their work beautifully. Professional graphic artists of all sorts can enjoy a lot of potential in presenting their work if they have good digital images.
 “What Mask Today?”
 It is Winter time, windy and cold, and the wolf is at the door….
 staying warm in the studio with the help of the lights!
 Work is well started on photographs for this years new book “The Art Of Polymer Clay Masks”. There are somewhere around 350 miniature masks in my collection from a decade of Miniature Mask Swaps with my claying friends on the Internet. I’ve had them all tucked away awaiting the time for photos–and thats now! I’ll be posting more as I go with peeks at masks from the upcoming book. Most of the masks fit inside a square 3inches by 3inches. There will also be photos of some full sized masks in the book.
 The mask seen above is only a few inches tall and made of polymer clay by Sherry Bailey, who started the first Internet Miniature Mask
  The Christmas and Solstice Holiday decorations are all put away into the closet for another year, and I’ve even straightened up and vacuumed my workspaces. (Seeing the floor is a rare event).
 Judith Skinner and I are VERY busy getting things prepared because we will be doing the Houston International Quilt Festival November 1-4 at the George R. Brown Convention Center in Houston Texas. All sorts of new faces, jewelry, kits and beads are being created and packaged for sale. I’m having a particularly good time putting together Spirit Doll Kits, and utilizing my stockpiles of hand dyed silks, cottons and rayon in ribbons, lace, and cloth, and building up each set around a miniature polymer clay face mask.
 I am currently seeking high resolution, professional quality digital images of polymer clay masks for review and possible inclusion in The Art Of Polymer Clay Masks.
 I’ll be showing all sorts of pictures and faces in the books on miniature masks and faces that will be coming out NEXT year on

 and imaginative play. Perhaps its because its just too darn oppressively hot when its in the 90’s by midmorning to be comfortable in the physical world. Maybe brains let the thoughts sputter around more freely when warm, like kids playing in sprinklers. I don’t know and its really too warm to worry about it…maybe thats why its so much fun to hole up with a good book or a project in the shade! Especially if you get the heavier work done early–then its perfectly alright to spend a few hours on pursuits a but more whimsical!Not that I’m going to be entirely frivolous–the play is also work, but “funner”, as any kid would know. There are two big little projects to do this summer, and I’m making my way slowly with both. There are hundreds of
 Today, I’m thinking about the NEW store, which is in the same scale (1/6, which is also called fashion doll scale and also 1’=2″. click here for a page with more information about miniatures and a
 So here I am, dreaming of little perfume displays with framed antique labels for boudoir decorating pleasure, tiny luggage with labels from far away places and more. I’m also being practical about it–the luggage is to be made with polymer clay and formed around cookie cutters and petit-four cutters, and the perfume bottles made with beads and a bit more clay..I’ve been sorting the actual beads and will do more later! (There are kits and a how-to in the making)
 We made it through the
  Though I’ll be photographing as I go, because the dyeing process is part of one book, and the polymer clay masks are part of the next one up–“The Art Of Polymer Clay Masks”.
 I’m going to do a bit of polymer clay work today, and put away the messes I’ve made from taking things out for classes at my local bead store, and have some fun! That includes the glitter and metal leaf, the clay and the Jones Tones foils. One of the uses of little bits and scraps of clay is to take small amounts of colored clay and add metal leaf. This is a VERY thin sheet of metal, and can be found in silver, gold, copper, and anodized color bursts, swirls and patterns. It sticks to raw clay without any adhesive.
 Place it all on a solid color background, roll it out, and you have a multi-colored sparkly confetti-style design. Portions of this were placed on chunks of polymer clay and pressed into a
