May 2, 2024
I have recently drawn up some new doll patterns and put together kits that can be used with them. I’ve gone through my extensive stash of hand dyed silks, cotton, ribbons and lace as well as vintage textiles, sequins and beads, and put together some great project potentials for slow stitching, art doll making or…whatever!
SO much sorting, bagging and photographing meant I was due a treat, so I made up one of the kits, just to see what I could do with it. I used my new 18″ doll pattern printed at 80%, which made up into a 14″ doll, and finished up the muslin in the kit entirely.
I added to the kit: thread, embroidery floss, wool mohair, polyester stuffing, acrylic paint, a small piece of fusible interfacing, and some thin peach colored ribbon. I used up everything but a few beads and sequins!
By the time she was done, she had become a redheaded beauty with an underlayer of garments, a beaded and embroidered overdress, a vintage silk ribbon corselette, lace purse and a hat lavishly covered with ribbons. Her embroidered shoes sparkle with sequins and beads
I sewed pieces directly onto the doll for the underlayer. Then, with the addition of the skirt and accessories, she can have several different outfits!
Oct 22, 2020
Since I last posted here, I’ve been spending some time and effort turning textiles and beads I already have into new dolls and wearable art, and exploring new techniques along the way as I go. For months I spent an hour or so most weekdays embellishing dolls with beads, silk ribbons, dyed textiles…I also did some sewing using versions I altered of Patti Culea’s wonderful doll patterns from her books. I had used parts of her patterns before–she designed wonderful hands and feet for her dolls–but I had never made a doll just as it was in her designs.I jump around from instructions on my own curve, but you can miss things that way too. So I made one of my 2020 projects to get out my stash of dyed cotton jersey and try the patterns as given, and THEN mess with them more…
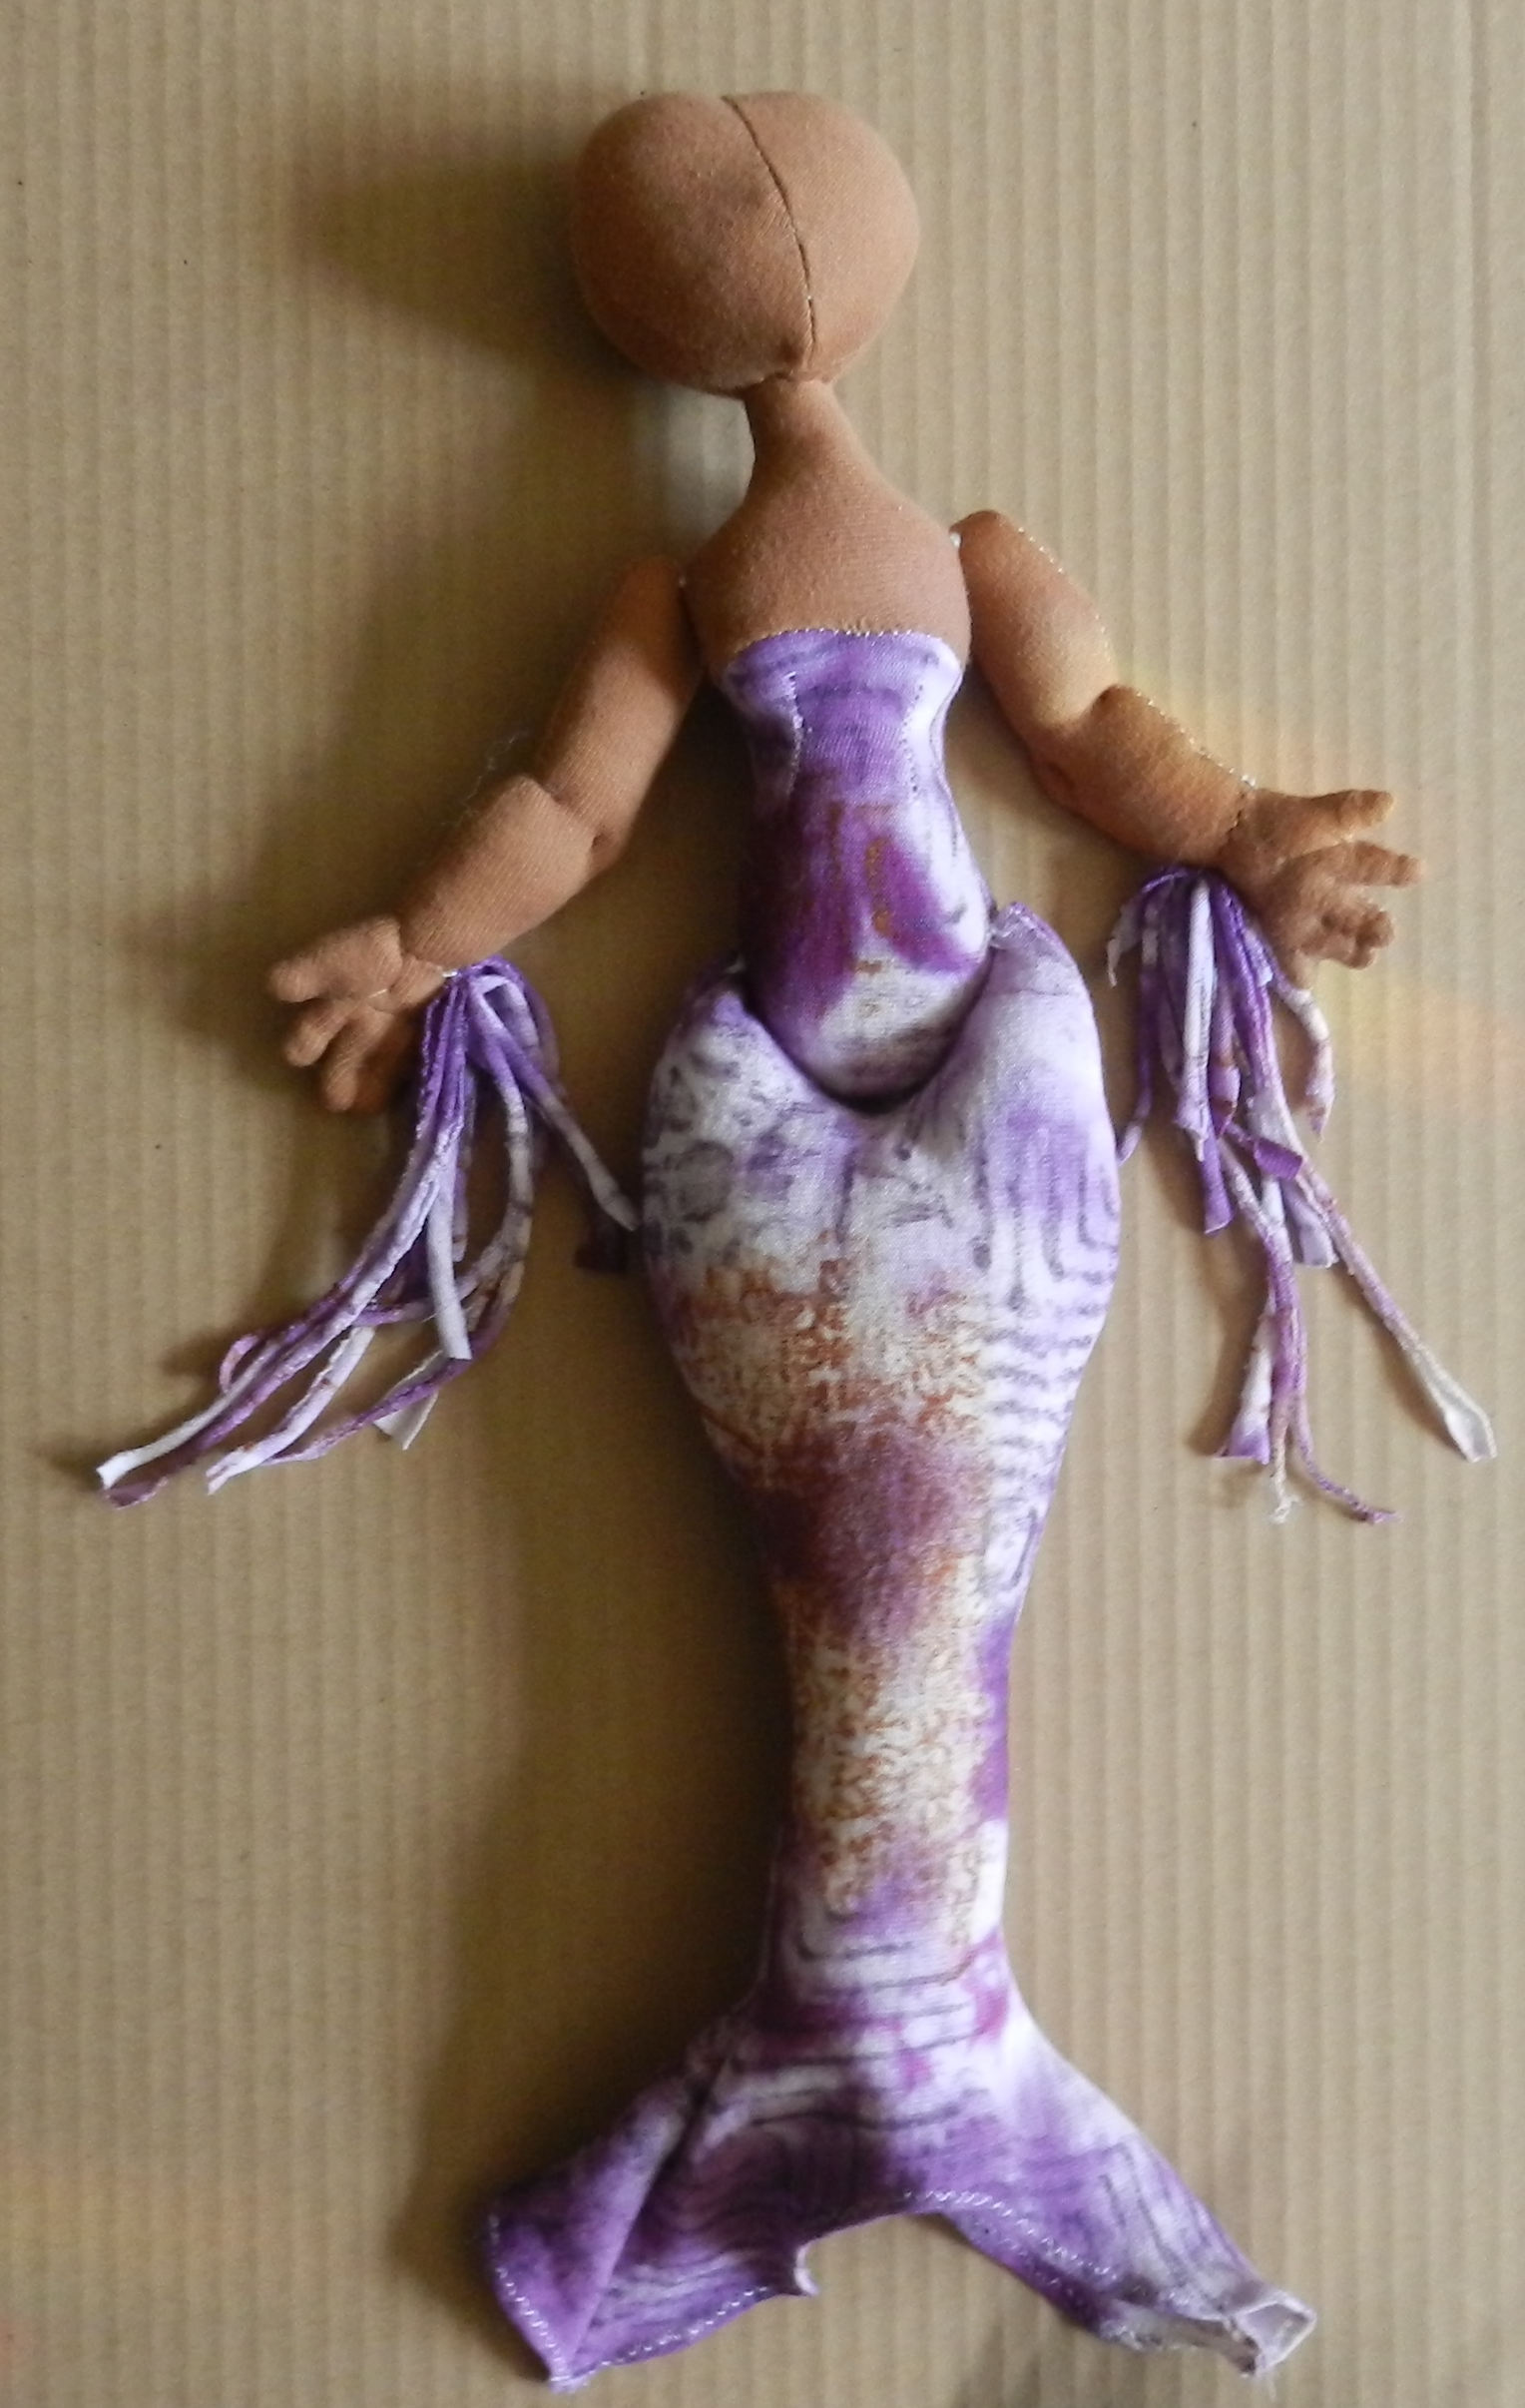
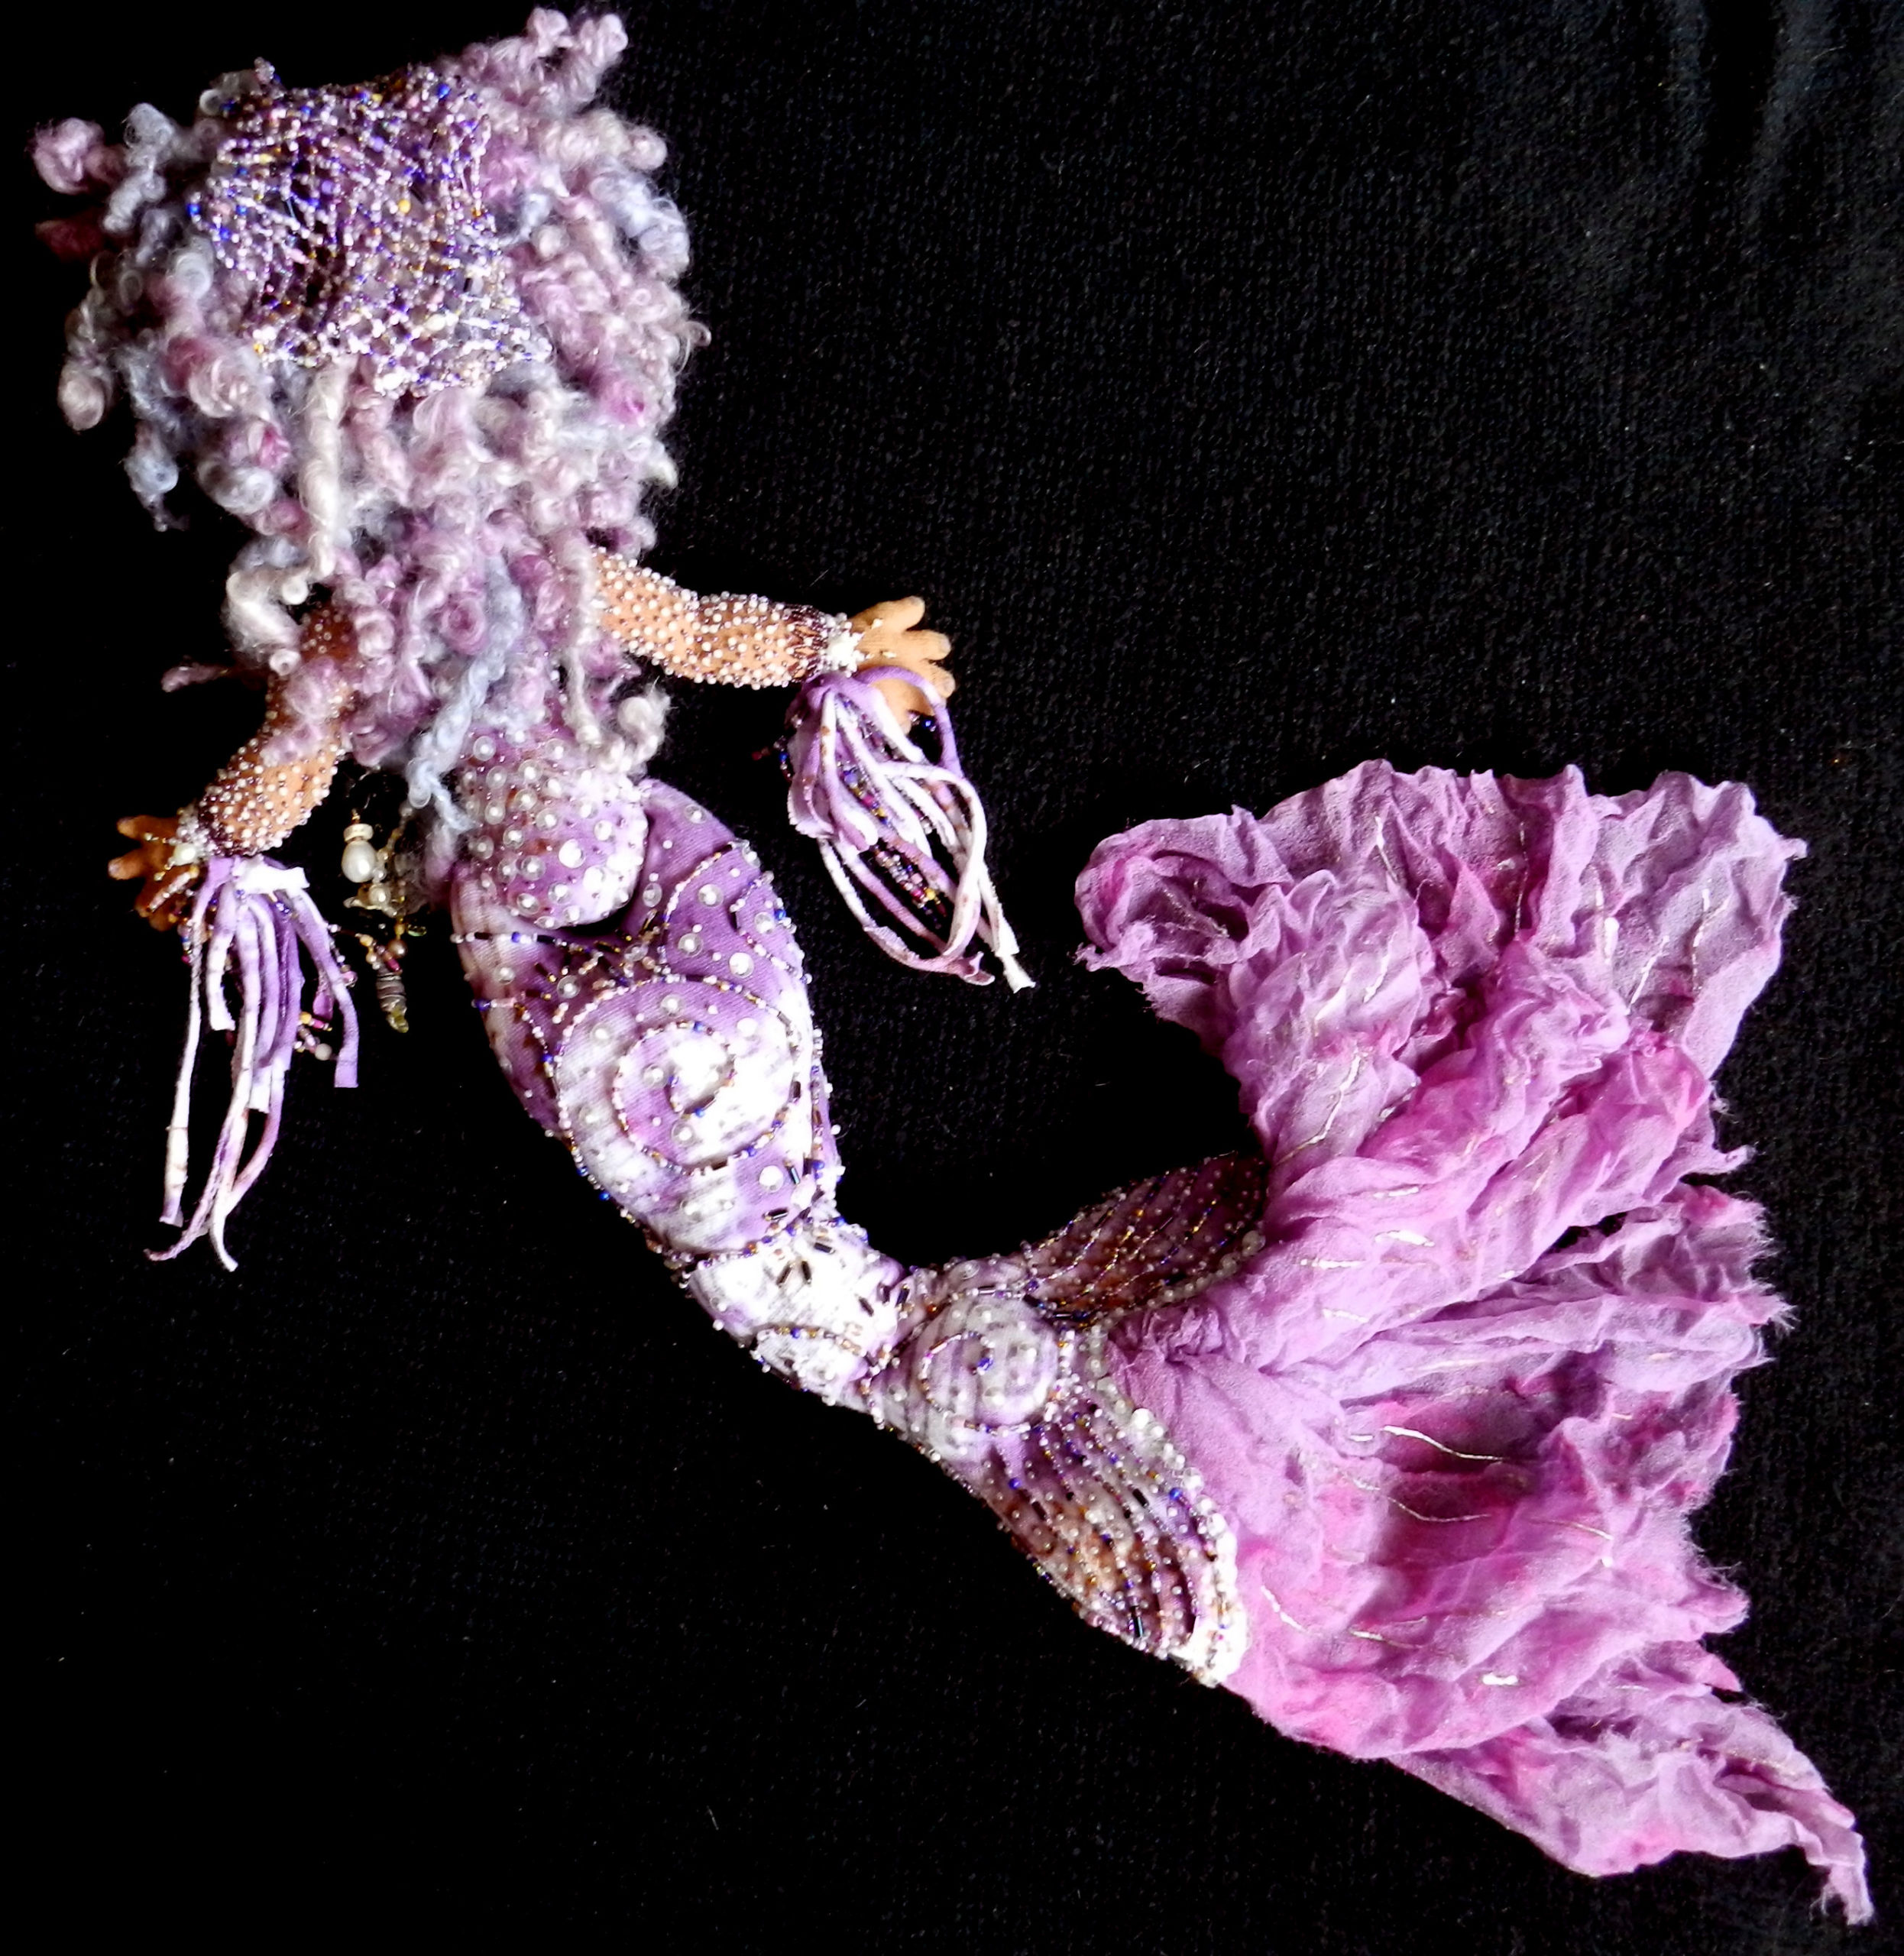
I played with scale and body shape and ended up with 3 dolls that need to have some clothes made for them (coming later this year!) and one that had a mermaid tail instead of legs, with moveable hips and shoulder joints. I used Procion coldwater fiber reactive dyes with some over painting using Shiva Oil paint sticks to give the body and tail fabric some color. Then it was stuffed with polyester fiberfill and wire to create a bendable bottom armature. Dyed silk gauze gives her tail a flowing purple flourish. Her face and nails were painted with acrylics, and I sewed on many sessions-worth of beads and sequins to her body, arms, and tail flukes.
I made her some polymer clay seashells, starfish and black coral, and fashioned her some necklaces, earrings, and hair decorations. Several of these still need to be glued into place in her hair, Her hair is where it all started so it is fitting that that is where she finishes up. Several years ago I was given a skein of beautiful hand dyed and mixed fibers that I knew instantly I wanted to use on a special doll. This one makes great use of it, and I have enough left to wig up a blue fairy as well! But that’s another project. I quite enjoyed this mermaid and would like to make more, but smaller, as the beading took a long while. She is 18″ from head to flukes, and more added for her piled up hair and gauzy tail! I’d like to get the pattern tweaked to about half that. After all, I have lots more fabric, sequins, and beads, and this seems like a good time for more fairies, mermaids, dolls and divas. I’m happier doing some beautiful distractions along with the realities.
mermaid-lower-body-detail
Nov 19, 2019
 Art Dolls are particularly fun projects for me because I love costuming and dress up, as long as I get to remain in comfy clothes and shoes–so with dolls I can indulge. Making art dolls can be a way of expressing and working though strong feelings, of pleasurably and creatively spending time by yourself or with like minded friends. Some dolls I make from cloth, paper or clay from my own patterns, but I also enjoy staring with a pre-made cloth body and dressing it up. I like the portability of these small projects. You can do a lot in a few hours or continue to add more and develop their style.
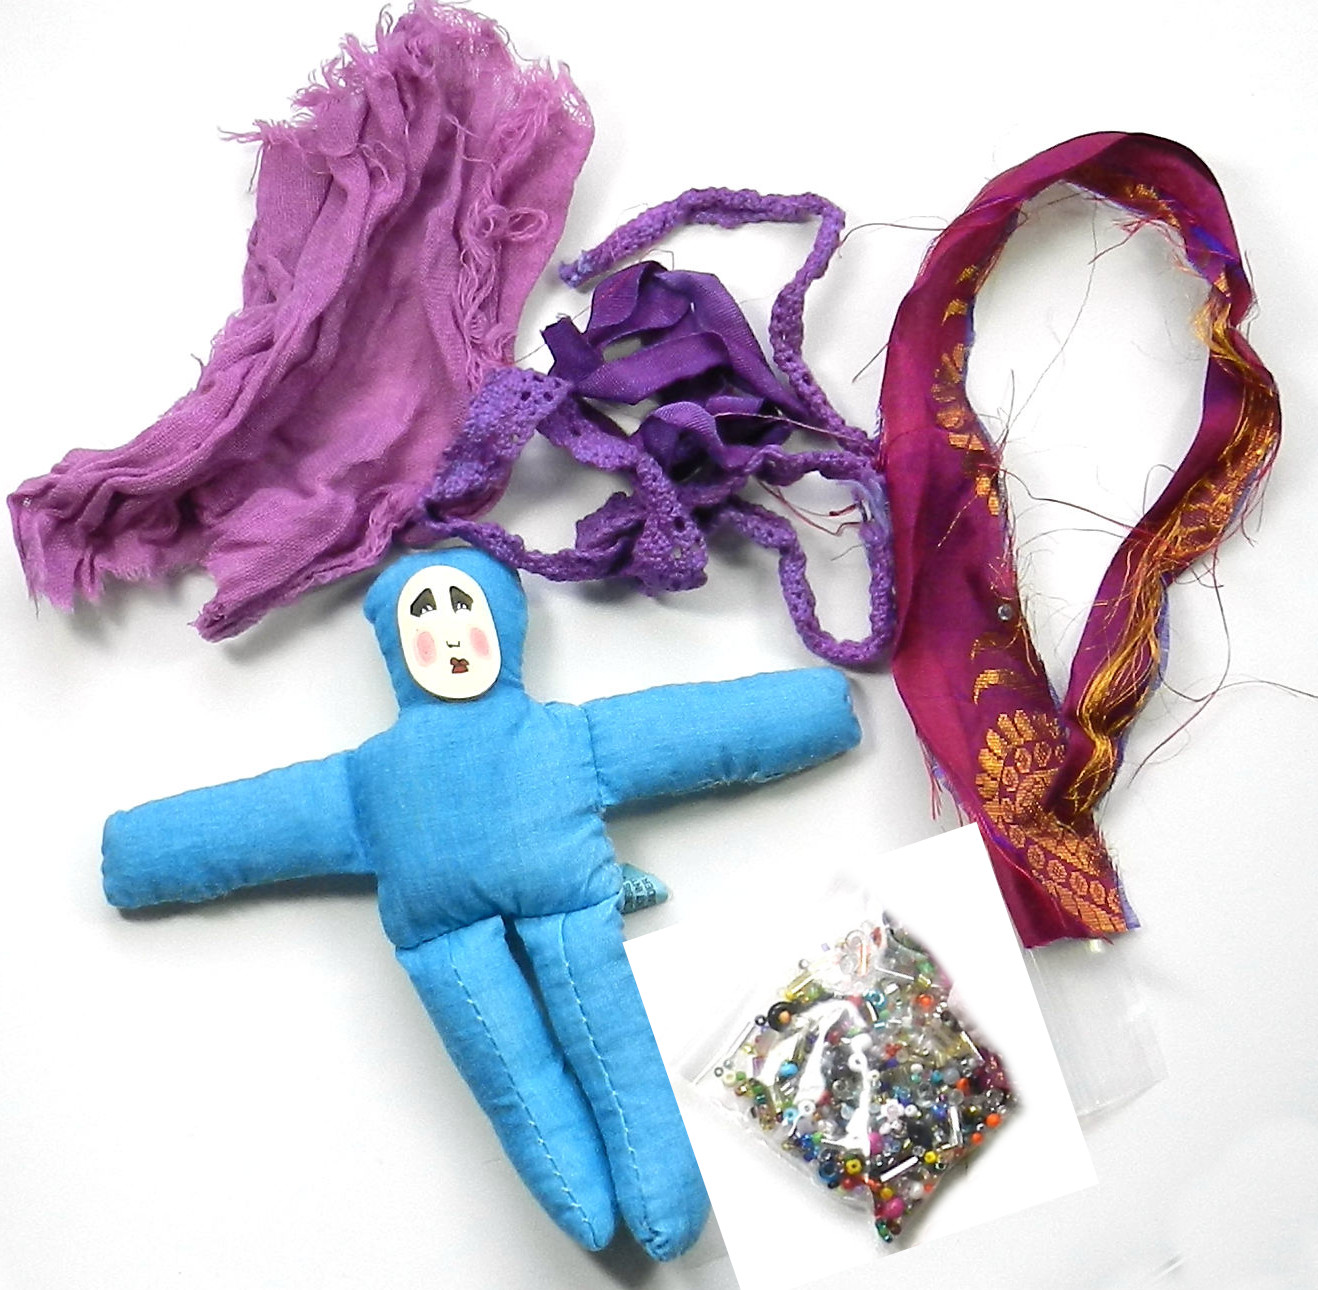
I’ve spent many years dyeing natural fibers with Procion MX Series cold water dyes, and built up a lovely cache of cottons, silks, and rayon. So, I put together kits with fabric, lace, ribbons and 3,5,and 8 inch cotton dolls. Then to some I added goodies like sequins, beads, Angelina fibers, dyed feathers, polymer clay or ceramic faces and vintage silk sari trim ribbon. I had a wonderfully colorful time adding ingredients to each kit, and now it is time to share the fun, so art doll kits are going up for sale in my shop here. I’ll be adding more all month!
Shown here is an art doll made from a 5″ art doll kit. I used scissors, a needle and thread, and some E-6000 to affix the polymer clay face to the body. I put a small heavy box on her as a weight as the glue dried to get a good bond. I used everything in the kit except a dozen beads or so. She looked great, but I wanted more..so I added some size 11 gold glass seed beads and size 15 glass purple beads. Much better! She still needs a bit of glitter, some feathers, some paper flowers…but I will come back to her another day. That’s my favorite way to play with dolls! In the meantime, I get to make up samples from the 3 and 8 inch doll kits next. Stay tuned!
-

-
3 and 5 inch dolls
-

-
5 inch doll kit
-

-
front
-
-
back
-

-
with more-front
-

-
with more-back
Jan 12, 2016
It sure is snowy outside, but I’m growing a fresh crop of flowers (metal), several new classes to put on the calendar, and a brand new membership at Tinkermill in Longmont. Also an educational nonprofit, Tinkermill.org is a creative maker space, filled with all sorts of interesting people with skills–and tools–and space to use them. My family joined, and are eagerly awaiting orientation so as to get to work on projects that are too big for the kitchen table, or require tools I’ve not yet acquired!
Something that really iced the cake for me is the classroom space that is available there. I will be offering classes in the upcoming months both in Gahanna, Ohio and in Longmont, Colorado in the upcoming weeks, so sign up for the newsletter if you’d like to be notified when they are on the schedule. Media will include digital, metal, polymer clay, and textiles.
Jun 20, 2013
 I’ve made great progress on projects this Spring, and I’m celebrating the Summer Solstice working on more.
I’ve learned a lots recently–from odd count peyote stitch and right angle weave beading to making my first ball jointed doll in polymer clay.
Meet Aurora Rose! I really like how she turned out; not bad for the first try. Of course, I’ve made a few dolls of various sorts before…but I also know that each one gives you experience in new things, and she certainly did.
I rearranged my living room and laundry room to provide more work space and access to all my fabric and my sewing machine. After a good cleaning and oiling, it runs like a champ, and its been doing so since 1960. I just love my heavy old Singer, and wouldn’t trade it for the newer models.
I got patterns for her clothing from Matisse Fashions (Brenda is an incredible seamstress/designer) and found that I remembered how to sew pretty well but will no doubt improve with more practice this summer. Lots to do!
She’s show here in a variation of the pleated chemise and drawers patterns. I didn’t add the waistband, and left it a bit long to be a set of cool cotton pj’s made of fine cotton lawn and embroidered with peach roses and teal green leaves.
Dharma Trading Co. carries cotton lawn and many other wonderful fabrics for use in doll making and clothing too.
See more info and pictures of how Aurora Rose came together here.
Aug 27, 2012
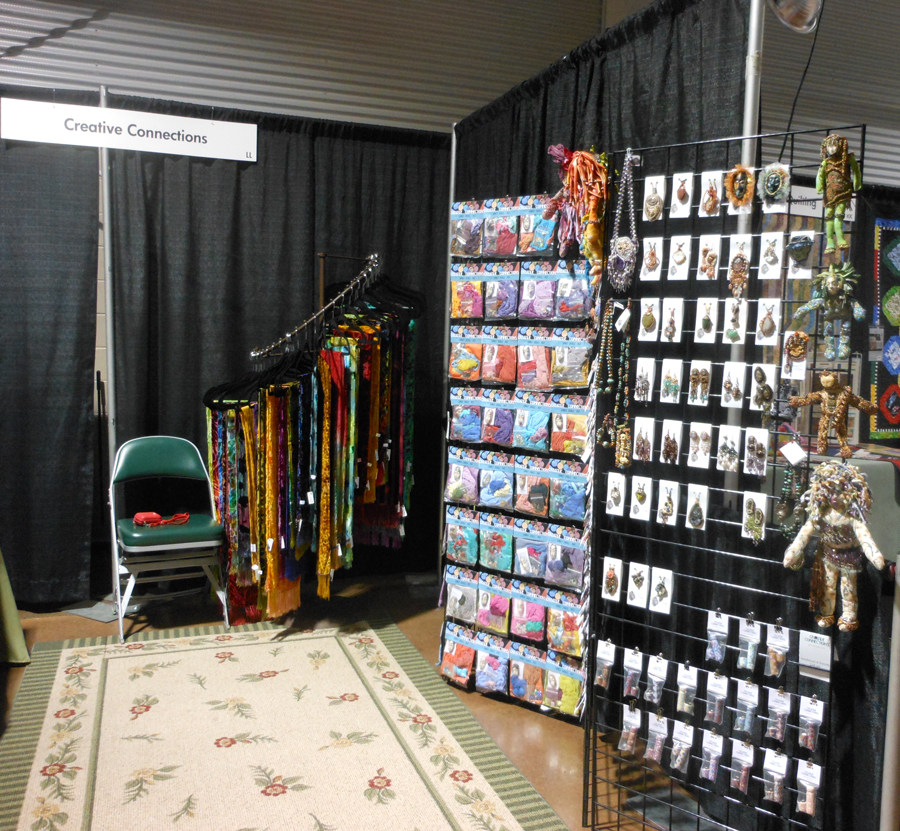
Laura Humenik of Lands Glory Artisan Jewelry and I had a booth at the Rocky Mountain Quilt Festival this year. I saw lots of beautiful quilts while there, and the dolls from the Hoffman challenge too. While sales were slow, it was good to get out and try my new grid display and new ways of presenting things in the booth. It’s also a great way to see what is popular in this area and what I need to make more of before the next upcoming shows. All in all, we were glad for a chance to try and new venue and see how everything looked set up in this configuration! I really do like my new grid displays. This time I have them set up like a folding screen. Here are some pics from the show–click the image to see a larger version.
Dec 31, 2011
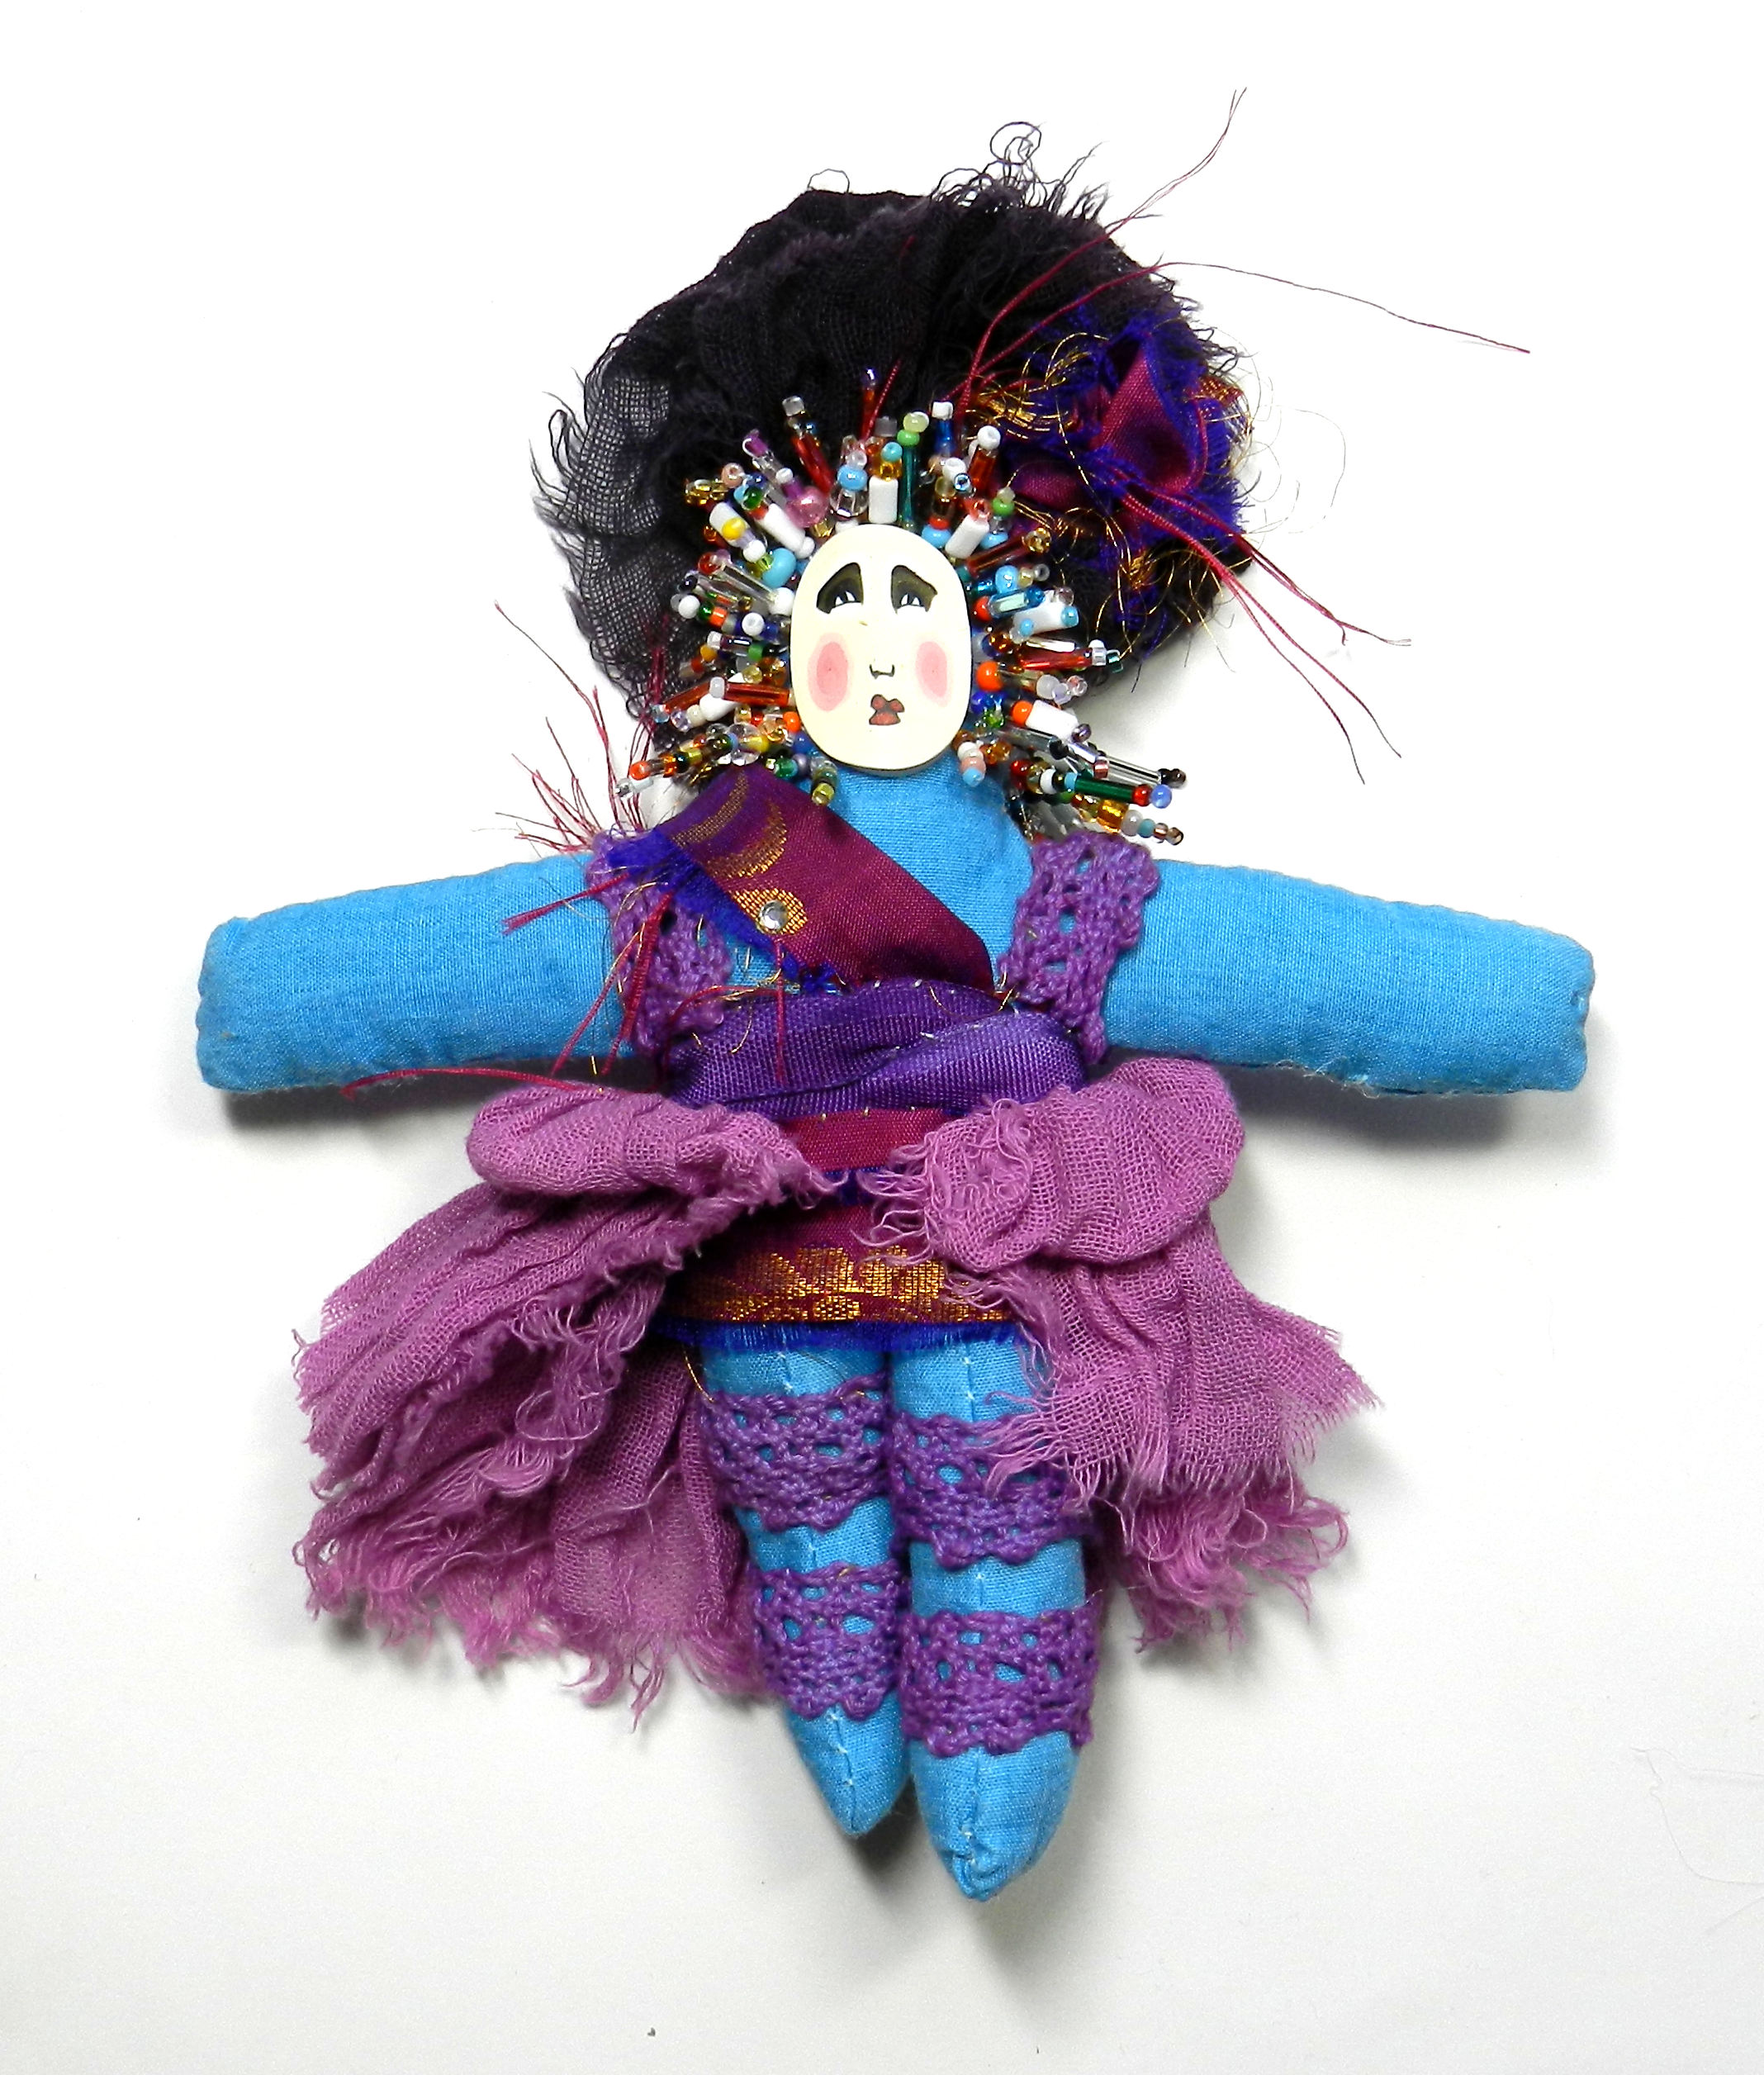
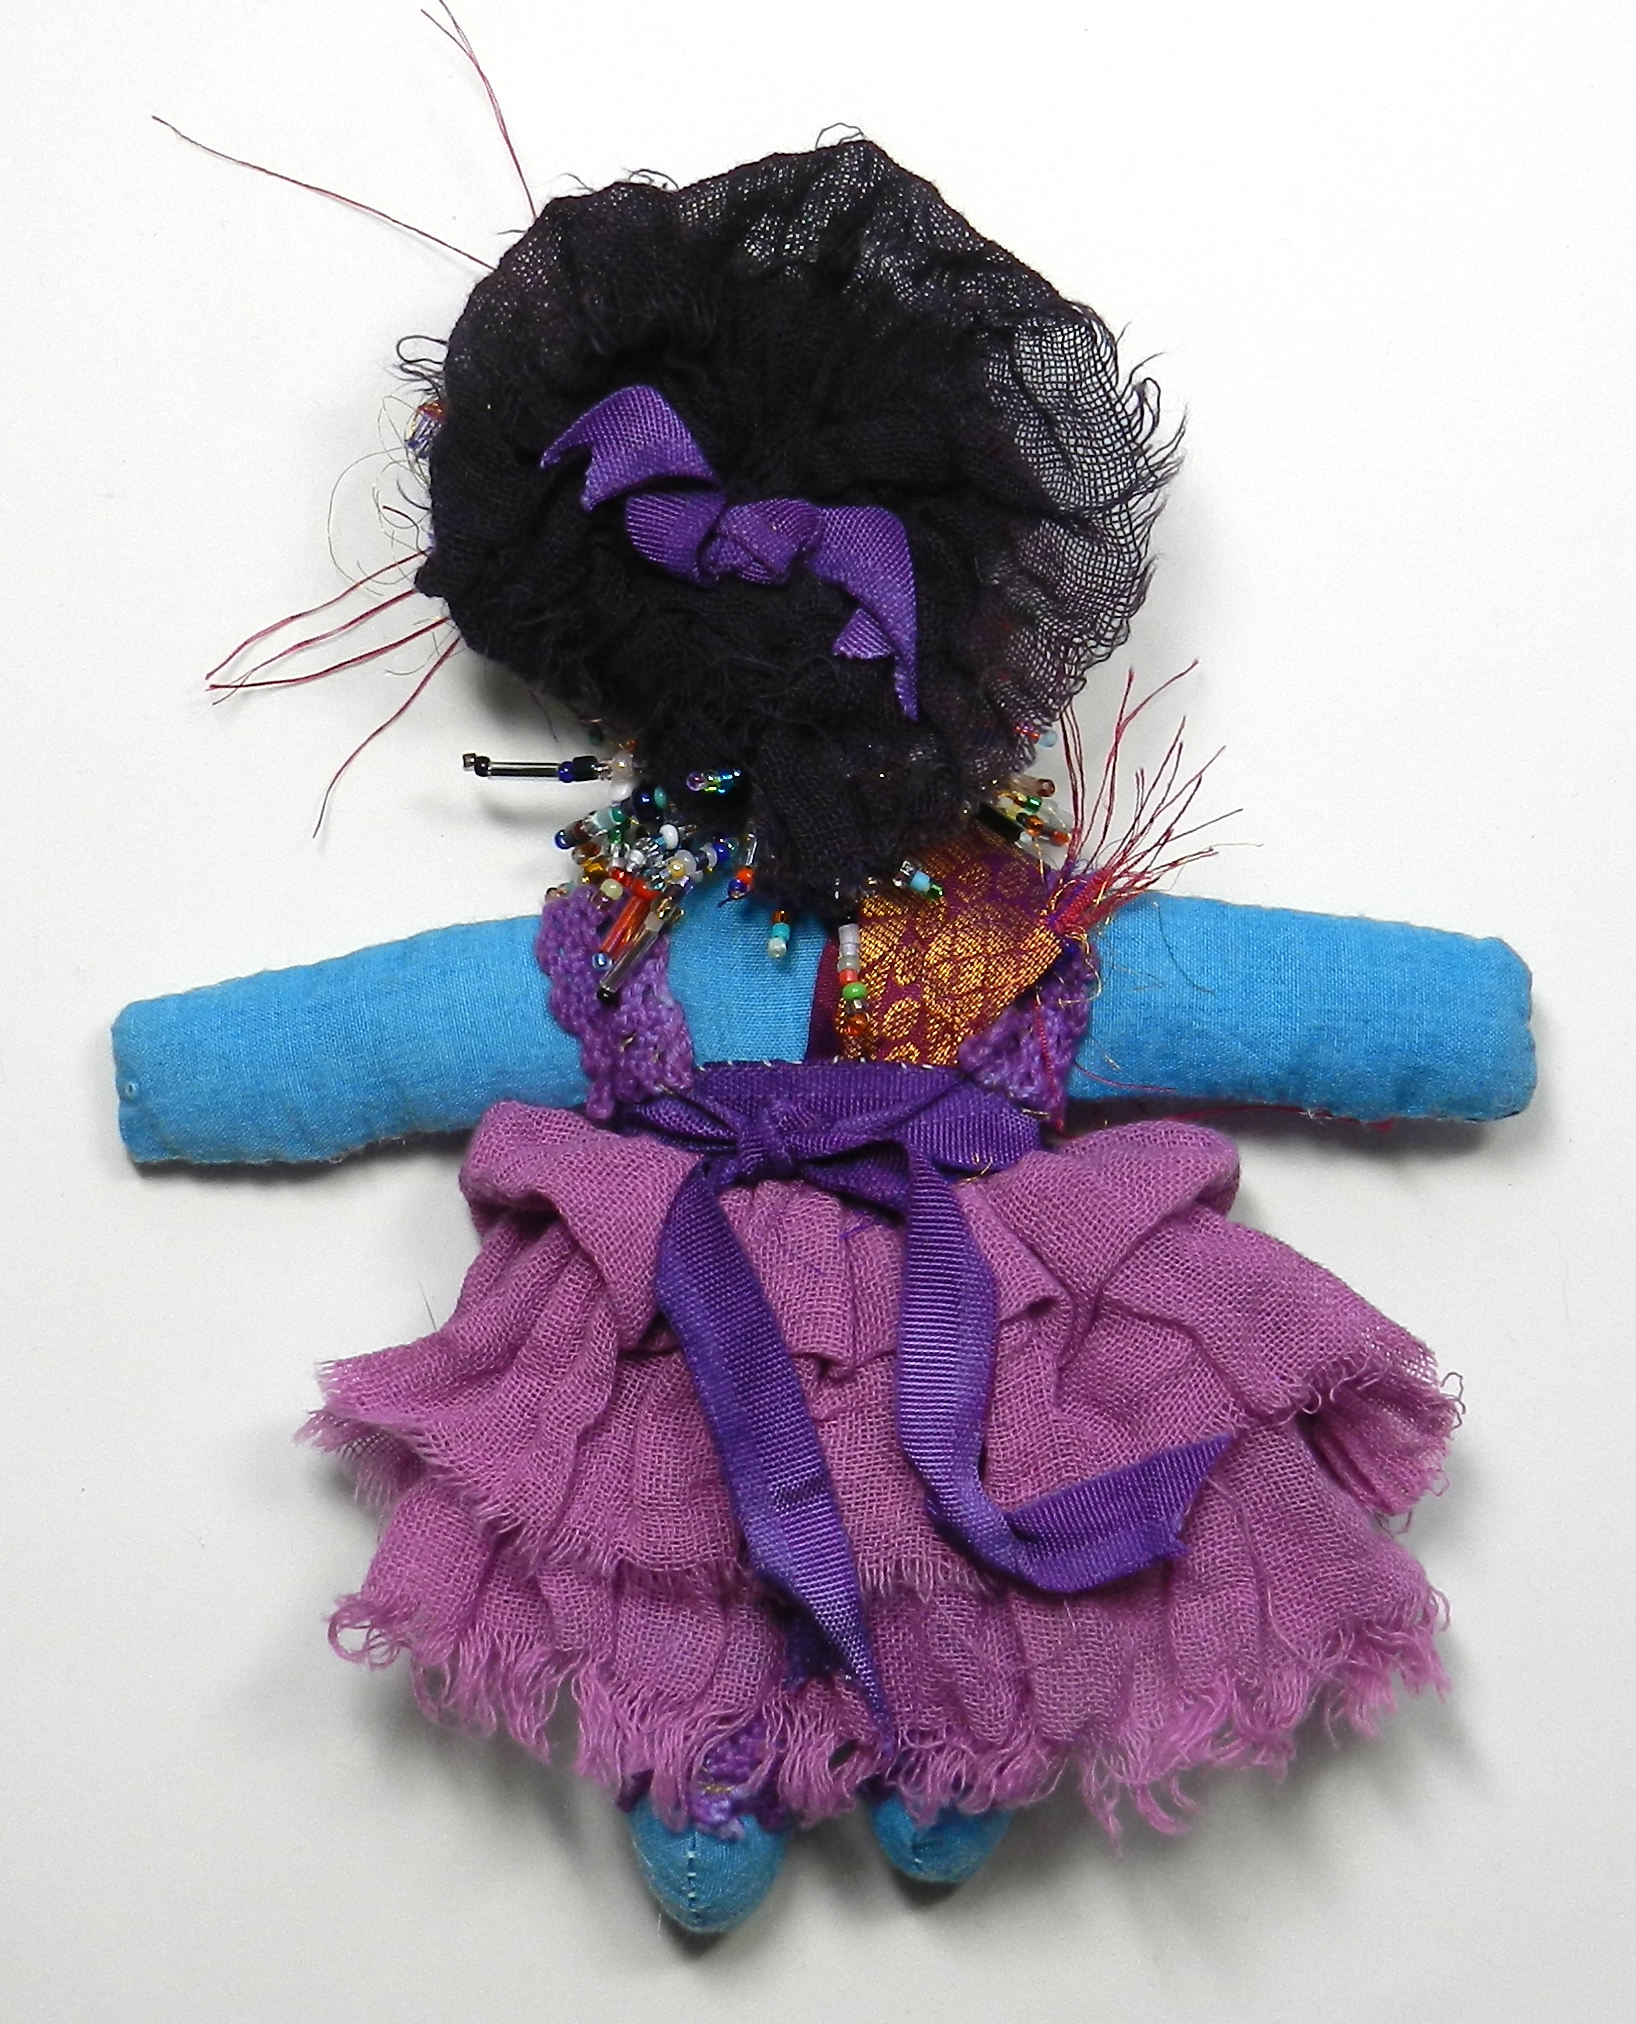
 Not only have I made a start on the pink and purple spirit doll, I’ve also had some great ideas recently about how to combine textiles, metal and clays to do bead enhanced spirit dolls with ceramic and metal bodies. I’m looking forward to getting back to school in the new year to make up examples of what I’ve been seeing in my imagination. A few things finally fell into place with the “how will I do that?” aspects and I look forward to realizing these very soon.
In the meantime, there’s lots to do with making up Spirit Doll Kit Samples and getting the bits and pieces all pulled together for making the new ladies and producing new finished work to get out to stores and galleries.
So much to do–and I do love doing it! Over the semester break I’ve had a chance to rest, see family and friends, read, and to delve into my art supplies to work on old and new projects both.
What a wonderful year of artistic and personal opportunities its been in so many ways…and I’m looking forward to more in 2012!
May we all appreciate and cherish the marvelous parts of our lives, past present and future…with lots more to come!

Jun 13, 2011
 Actually, it involves LOTS of splashes and lots of colors–I think we had 43 colors this year at our Annual Dyeing Days event.
As always, it was a marathon event, spanning 10 days of mixing, dying, rinsing, washing and of course cleanup!
This year we added a pole vaulting event. That is to say, we raided the vault which is our garage full of precious stuff–like old pvc pipes–and did some shibori arashi.
 This form of resist dyeing (shibori) is done around poles to create an effect that can look like rain in a storm (arashi).
Or it can look like feathers, or leaves. You can see the shibori arashi designs we did this year on garments and fabric yardage in the tiedye slideshow.
Our friends come to dye along with us at these events. Here’s Susan shown unwrapping a shibori arashi dyed shirt.
Here’s the pattern it created on the shirt.
This year as always I dyed lots of fabric–cotton jersey and kona cotton this time as well as some lovely cotton gauze. I also did lots of doll bodies, silk handkerchiefs and lace for making up more Spirit Doll kits, and this time I even did feathers. They took the dye beautifully!

Jul 2, 2010
 A summer time face pendant with a flowered babushka head wrap and beaded embroidery shows off luscious fringe in beautiful shades of berries and teal with long crystal twist is a great example of the fun can that come from collaborations. I made the face from polymer clay, and Laura Humenik of LandS Glory Artisan Jewelry did the yummy bead work. She has amazing patience, a wonderful sense of color, and has collected an amazing variety of beads. Her beautiful pieces are wonderful–do take a look at the the LandS Glory gallery page. Laura creates all sorts of things that are better with beads–pendants, necklaces, Spirit Dolls and more plus dyed textiles that showcase more of her love of color!
I’m making lots more polymer faces in the same “babushka” style with lots of different millefiore cane patterns for the headwraps right now, and I will show them off in the next few weeks. Between the silver and bronze metal clays, ceramic clay, and polymer clay, (even painted textile faces!) I’m making hundreds of faces, and each one a bit different. Be sure to check back in the next few weeks to see more!

May 16, 2009

Whew! What a huge undertaking, and what wonderful, amazing small rewards! I mean small as in “miniature”, or specifically “fits inside a three inch square” (more or less). Several years ago I was invited to take part in a Polymer Clay Miniature Mask Swap by Sherry Bailey. I was in one of the several groups, and sent in my masks. Shortly thereafter I got my box of goodies, and kicked myself all around the room for not having been in every group—there were pictures included and I missed out on some real gems. I vowed never to repeat THAT mistake! And also to be in another mask swap ASAP. I ended up taking over the job and expanding the number of participants (my artistic greed knows little about bounderies or sensible work loads in some areas…)
So for the last few years, there’ve ben annual swaps that attract wonderful artists who ALSO want collections of these minimarvels. When announced, interested parties sign up for one, two, or three groups of ten. The SwapMistress (thats me, in this case) keeps track of who signs up, and fills the groups. We do a total of ten groups of ten people. For each group, the participant sends in ten masks, all signed/with a card and bagged. When they are all here, my husband and I alphabetize the incoming boxes for easier finding, and then start filling up Group Bags by lining up the brown paper lunch bags. Starting with 10 bags marked “A” we check the All Powerful List and take out each participant’s set one at a time–If Mary is in group A, we put one of her masks in each bag, and the same with the other 9 participants. At the end, each person in Group A will get a Group A bag mailed back to them, containing one of their own and one of each of the other 9 people’s masks. Sounds fairly simple, right? It kindof is…except then we do it for B, C, D, E, F, G, H I and J groups. This generally takes a full day–there are a thousand little masks. Then, the next day, my dear sweet hubby and I start packing boxes. If Mary was in Group A, D and F, we pull an A, D and F bag and put it aside for her in a grocery bag marked with her name and the groups (cross checking is pretty important!! ) with the mailing lable and postage she sent. This also takes a day or so…and then there’s the packing and sealing of the boxes, and three hours or so at the Post Office.
I, being the SwapMistress and therefore In Charge, get to violate the “three groups” thing and be in ALL ten groups. This is great because I get to keep one from every person in every group–no more missed gems!! Except of course for the people that make it harder to choose by sending ten that are all different for their sets. Then I still only get to keep one, but I DO have the opportunity to unbag and photograph them all, then rebag before putting them into the group bags. So I say it again—its a huge undertaking, but OH-so-worth-the -effort. I end up making and giving away 100 miniature masks, and getting 100 masks to keep. All are individual works of art showing a vast array of techniques. All have miniature size and polymer clay in common, and “masks” as a theme, but all are astoundingly different interpretations of that theme. I will be photographing the collection that I have gathered over this decade, and putting them in a book, but I’ll share a few of them here on this blog, and you can see some masks from previous years here.
The group of ten Warm and Cool Masks shown above was sent in by Karen Cowles. The two masks below made using the alcohol inks on polymer clay were sent in by Nina Owens. The light was fading and I only had time to take a few pics. I took more the next day, so watch for future posts! You can also see more at other participants’ blogs like these by Laurel Steven and Tonja . Click the pics to see them larger.

Oct 22, 2007
 Judith Skinner and I are VERY busy getting things prepared because we will be doing the Houston International Quilt Festival November 1-4 at the George R. Brown Convention Center in Houston Texas. All sorts of new faces, jewelry, kits and beads are being created and packaged for sale. I’m having a particularly good time putting together Spirit Doll Kits, and utilizing my stockpiles of hand dyed silks, cottons and rayon in ribbons, lace, and cloth, and building up each set around a miniature polymer clay face mask.
So far I’ve got 75 kits in 3 different sizes and styles! (And I have one week to finish all the packaging and packing…eek!) Some have cotton jersey cloth thats been tie-dyed, or cotton or silk handkerchiefs or cotton plush velour; with three different sizes and pricepoints there’s lots from which to choose! Visit the polyclay.com website to see some of the others.
If you are in Houston at the start of November do come and see us at the Quilt Festival, where we will be in our PolyMarket Press booth, #1951. In addition to all sorts of polymer clay beads and embellishments, we’ll have our book “Adapting Quilt Patterns To Polymer Clay” and also the new book, “The Business Of Professional Art”.